
As the sun sets and the autumn breeze rustles the leaves, I can’t help but feel excited for the spooky season to kick off. This is the time of year when our kitchens come alive with fantastical flavors and festive fun! Today, I’m sharing a delightful recipe for Peanut Butter Spider Cookies that will surely wow your Halloween party guests. With just 12 simple ingredients and no need for chilling dough, these cookies come together in a snap, perfect for last-minute baking. They’re not just easy to make; they’re also a playful treat that brings joy to both kids and adults alike. Are you ready to scare up some deliciousness in your kitchen? Let’s get baking!

Why Are Peanut Butter Spider Cookies a Must?
Irresistible Appeal: These Peanut Butter Spider Cookies offer a playful twist that makes them the ultimate Halloween treat, captivating both kids and adults alike.
No-Wait Dough: There’s no chilling required, making these fun cookies a breeze to whip up when time is short.
Festive Fun: Topped with Reese’s Cups and candy eyes, they’re sure to steal the show at any spooky gathering.
Chewy Perfection: Each bite delivers a soft, chewy texture complemented by creamy peanut butter and rich chocolate that everyone will love.
Versatile Treats: Switch things up with different toppings or variations, like gluten-free options, to delight every guest.
With these cookies, you’ll create a memorable treat that will have your friends and family clamoring for more!
Peanut Butter Spider Cookies Ingredients
For the Cookie Base
• Unsalted Butter – Provides richness and moisture; ensure it’s at room temperature for better mixing.
• Brown Sugar – Adds sweetness and moisture, resulting in a delightful chewy texture.
• Granulated Sugar – Contributes additional sweetness and helps the cookies spread out nicely.
• Creamy Peanut Butter – Delivers a distinct peanut flavor; avoid natural peanut butter to keep the texture just right.
• Large Egg – Binds everything together and contributes to the cookie structure.
• Vanilla Extract – Enhances flavor; if you’re in a pinch, you can skip it.
• All-Purpose Flour – Provides structure; feel free to substitute with gluten-free flour for a safe option.
• Baking Soda – Helps create lift and tenderness in your cookies.
• Baking Powder – Works alongside baking soda to aid in leavening.
• Salt – Balances the sweetness and intensifies the overall flavors.
For the Decoration
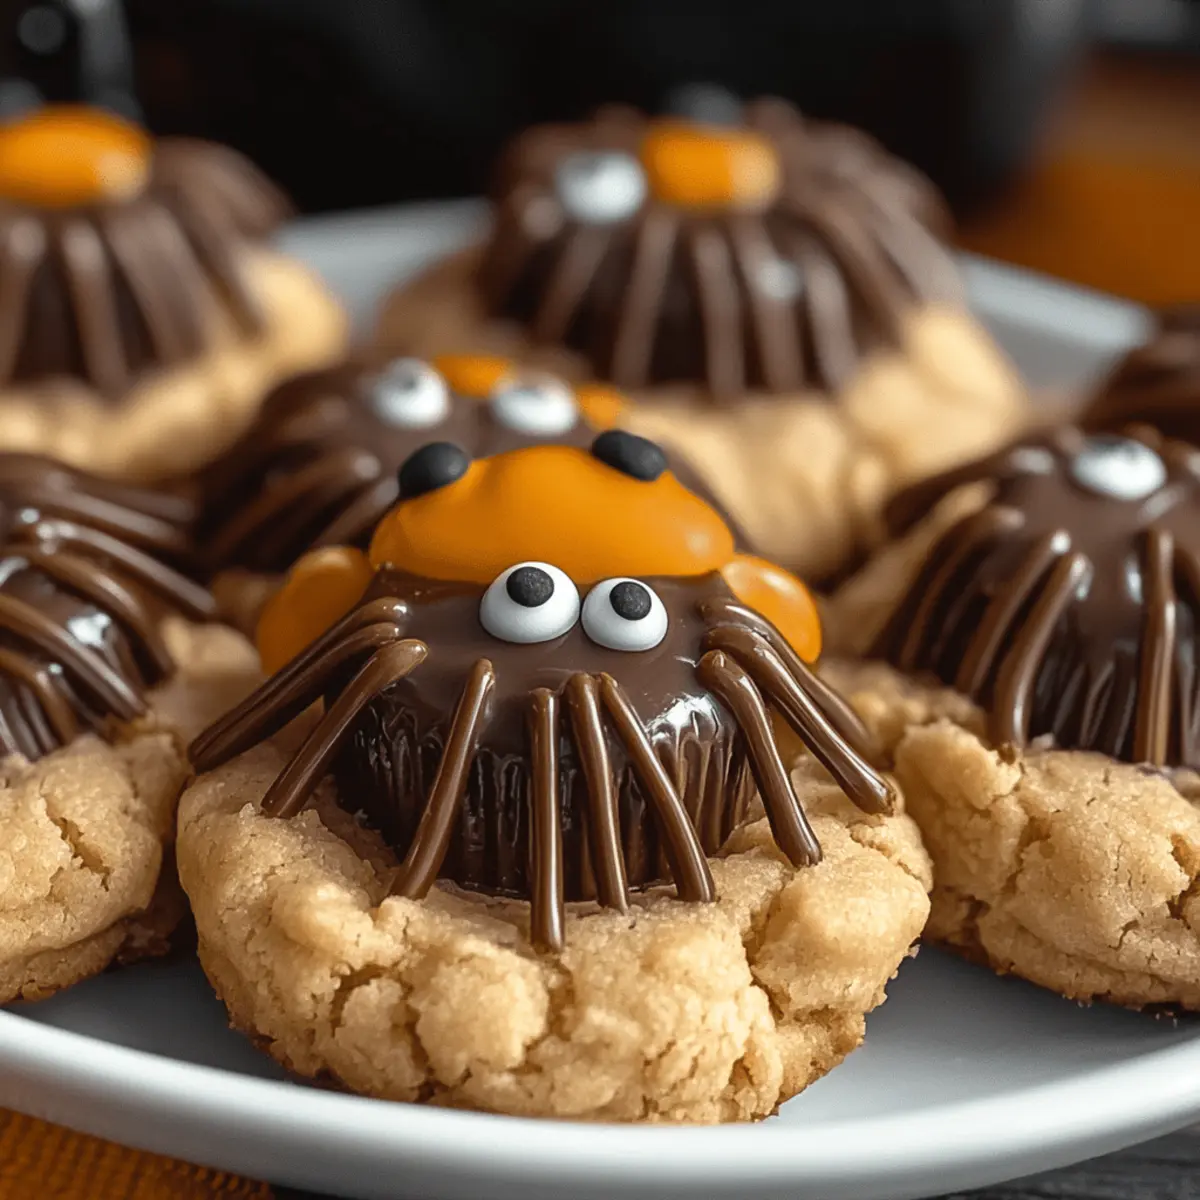
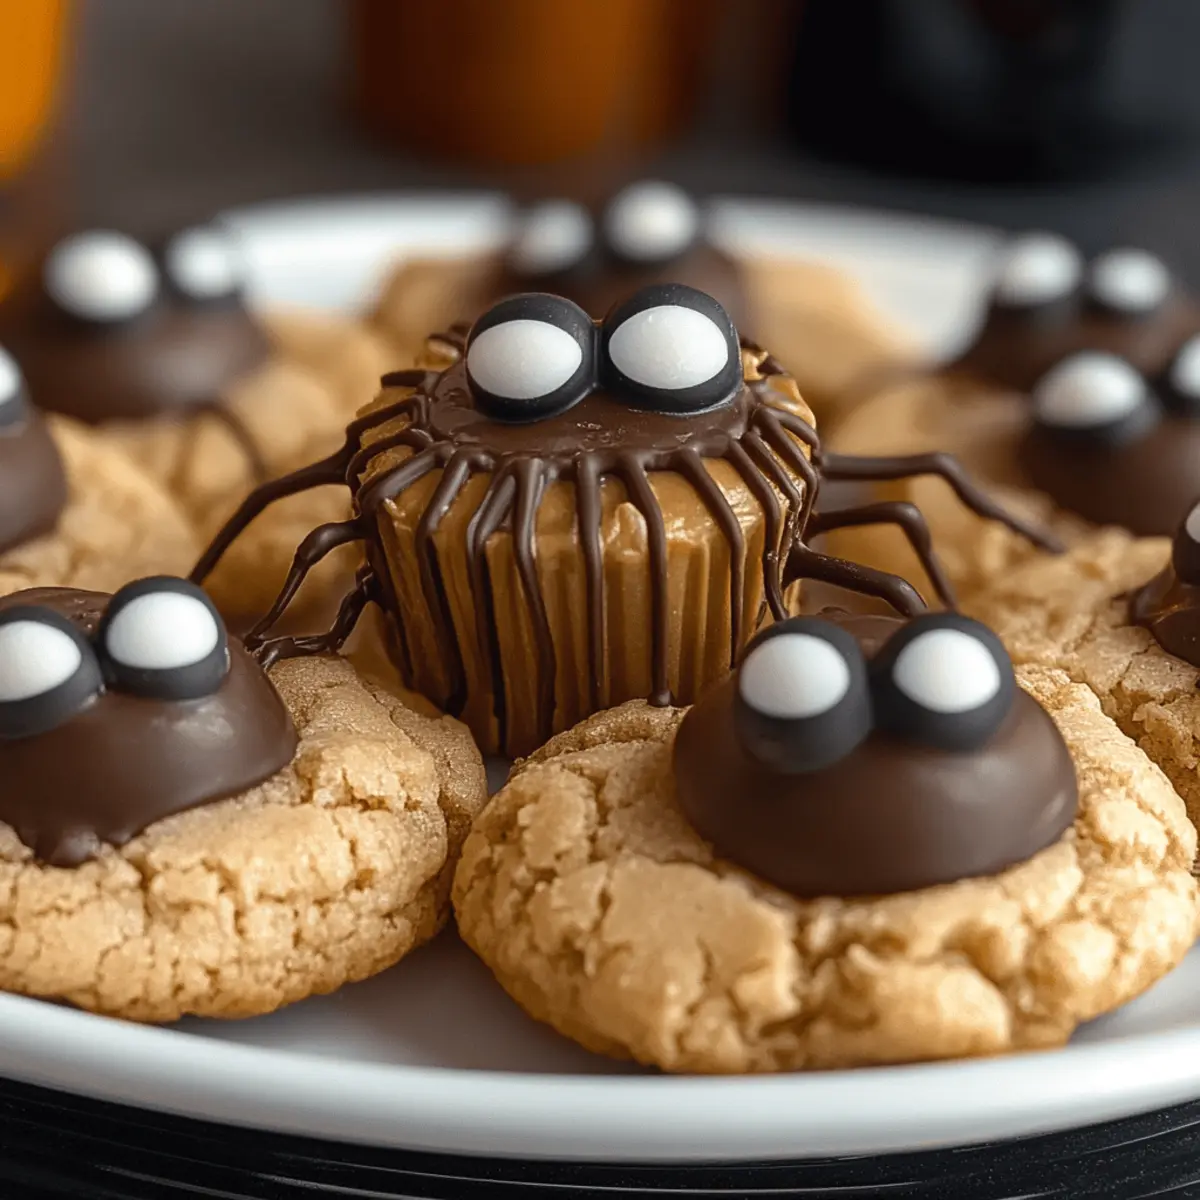
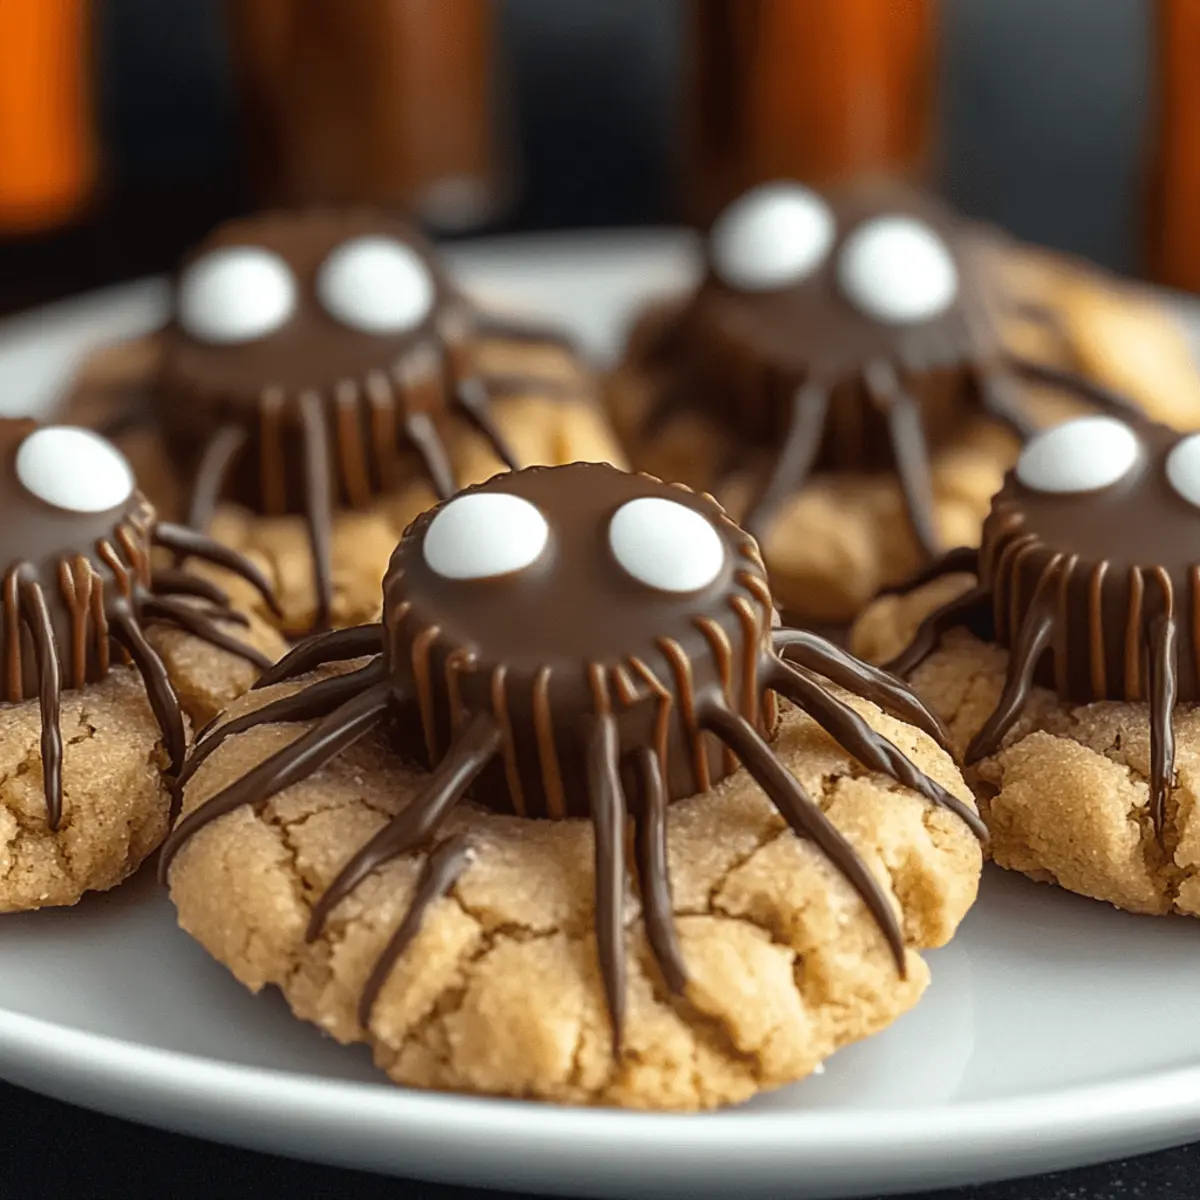
• Mini Reese’s Peanut Butter Cups – A fun topping that gives these cookies their playful spider design.
• Semi-Sweet Chocolate Chips – Perfect for drawing spider legs; other chocolates can be used, but melting methods vary.
• Candy Eyeballs – Optional but they add that extra festive charm!
These Peanut Butter Spider Cookies are not just a treat; they create an experience that will bring smiles to your Halloween celebrations!
Step‑by‑Step Instructions for Peanut Butter Spider Cookies
Step 1: Chill Reese’s
Begin by placing 24 mini Reese’s cups in the freezer for about 15 minutes. This step firms them up, making them easier to press into the center of your cookies later. While they chill, you can move on to preparing the dough, ensuring everything is ready for quick assembly.
Step 2: Prepare Oven
Preheat your oven to 350°F (175°C). This temperature is crucial for baking the Peanut Butter Spider Cookies to perfection, yielding a soft, chewy texture with golden edges. Make sure your baking sheets are lined with parchment paper or a silicone mat for easy cookie removal.
Step 3: Cream Butter and Sugars
In a large mixing bowl, beat together 1 cup of room-temperature unsalted butter, ¾ cup of brown sugar, and ½ cup of granulated sugar until it’s creamy and light, about 2-3 minutes. This step adds air to your mixture, which helps create a fluffy cookie base.
Step 4: Add Wet Ingredients
Mix in 1 cup of creamy peanut butter, 1 large egg, and 1 teaspoon of vanilla extract until everything is well combined. The mixture should be smooth and slightly thick. This adds richness and flavor, forming the core of your Peanut Butter Spider Cookies.
Step 5: Combine Dry Ingredients
Gradually add 2 cups of all-purpose flour, 1 teaspoon of baking soda, 1 teaspoon of baking powder, and ½ teaspoon of salt into the wet ingredients. Mix gently until just combined, ensuring not to overwork the dough. It should still have a slightly sticky consistency, perfect for rolling into balls.
Step 6: Shape Cookies
Scoop out dough and roll it into 1-inch balls. Roll each ball in granulated sugar before placing them on your prepared baking sheet, spacing them about 2 inches apart. This sugary coat will give a delightful sparkle and crunch to your Peanut Butter Spider Cookies.
Step 7: Bake
Bake the cookies in the preheated oven for 8 to 11 minutes, or until the edges are golden. Keep an eye on them; they should look slightly puffed with a soft center when done. This short baking time ensures they remain chewy inside, making the cookies even more enjoyable.
Step 8: Cool
Once baked, remove the sheet from the oven and immediately press a chilled Reese’s cup into the center of each cookie. Allow them to cool on the baking sheet for 15–20 minutes. This cooling period helps the cookies set while keeping the Reese’s nicely shaped.
Step 9: Decorate
Melt ½ cup of semi-sweet chocolate chips in a microwave-safe bowl, stirring every 30 seconds until smooth. Transfer the melted chocolate to a squeeze bottle and draw spider legs extending from each Reese’s cup on your cookies. For an extra festive touch, attach candy eyeballs using more melted chocolate.
What to Serve With Peanut Butter Spider Cookies
These festive treats will enchant your Halloween gatherings, offering a perfect balance of chewy goodness and playful design.
-
Spooky Milkshakes: Creamy chocolate or vanilla milkshakes make a delightful pairing, enhancing the dessert experience with festive fun.
-
Pumpkin Spice Latte: The warm, spicy notes of pumpkin spice complement the sweet peanut butter flavors, creating a cozy autumn vibe.
-
Caramel Apple Slices: Crisp apple wedges drizzled with caramel add a fresh, crunchy element that balances the cookies’ sweetness.
-
Ghostly Fruit Salad: A mix of seasonal fruits like pears, apples, and grapes looks festive and adds a refreshing contrast to the cookies’ richness. Toss in a touch of cinnamon for an extra kick.
-
Chocolate-Covered Pretzels: The sweet and salty combination is irresistible, offering a satisfying crunch that pairs beautifully with the soft cookies.
-
Homemade Hot Cocoa: Serve your cookies alongside warm, decadent hot cocoa topped with whipped cream for a memorable treat that warms hearts and tummies.
-
Whipped Cream Dips: A light, vanilla bean whipped cream can be whipped up and served as a dip for the cookies, adding a luscious addition that enhances every bite.
-
Candy Corn Cocktails: Create a non-alcoholic or spirited version of these colorful drinks for a fun, themed sip that echoes the festive spirit of Halloween!
Expert Tips for Peanut Butter Spider Cookies
-
Room Temperature Butter: Make sure your unsalted butter is at room temperature to achieve a creamy texture when mixing. This guarantees smooth incorporation of ingredients.
-
Don’t Overmix: Be cautious when combining your dry ingredients; stir just until combined. Overmixing will lead to tough cookies—nobody wants that!
-
Proper Spacing: Space your cookie dough balls about 2 inches apart on the baking sheet. This ensures even baking and prevents them from sticking together.
-
Cool for Decoration: Allow your cookies to cool properly before decorating. This prevents the chocolate from melting too much and allows for neat spider leg designs.
-
Versatile Toppings: Feel free to get creative with the decorations! Different chocolates or candies can give your Peanut Butter Spider Cookies a unique twist while still being festive.
Make Ahead Options
These Peanut Butter Spider Cookies are a perfect choice for meal prep, allowing you to enjoy Halloween festivities with ease! You can prepare the cookie dough up to 24 hours in advance; simply mix the ingredients and roll the dough into balls. Store them in an airtight container in the refrigerator to maintain their freshness. The decorative touches, like pressing in the chilled Reese’s and adding chocolate legs, should be done just before serving for the best presentation. When you’re ready to bake, simply place the refrigerated dough on a baking sheet and follow the usual baking instructions for delicious, soft cookies that are just as delightful as freshly made!
Peanut Butter Spider Cookies: Fun Variations
Ready to personalize your Peanut Butter Spider Cookies? Let your creativity run wild with these exciting twists and swaps!
- Nut-Free: Swap peanut butter for sunflower seed butter to make them friendly for nut allergies.
- Chocolate Variety: Use white chocolate chips instead of semi-sweet for a lovely contrast in flavor and color.
- Spice It Up: Add a dash of cinnamon or nutmeg to the dough for a warm, cozy autumn spice.
- Oatmeal Crunch: Incorporate rolled oats into the dough for extra texture and a heartier cookie.
- Decorative Fun: Use mini candy pumpkins or ghosts instead of candy eyeballs to add a playful touch for Halloween.
- Gluten-Free: Replace all-purpose flour with a 1:1 gluten-free blend to accommodate those with gluten sensitivities.
- Double Chocolate: Mix in chocolate chunks into the dough for an extra chocolatey treat that will satisfy any sweet tooth!
- Mellow Heat: If you’re feeling adventurous, try adding a pinch of cayenne pepper to the dough for a surprising kick of heat that pairs well with the sweetness.
Whether you’re making these for a festive gathering or just for fun, these variations will ensure that your Peanut Butter Spider Cookies are just as unique as your Halloween spirit! And if you’re looking for a quick treat to go alongside your cookies, consider making some Bake Peanut Butter or some delightful Garlic Butter Steak as well!
Storage Tips for Peanut Butter Spider Cookies
Room Temperature: Store cookies in an airtight container at room temperature for up to 3 days to maintain freshness and prevent them from drying out.
Freezer: For long-term storage, freeze the cookies in a single layer on a baking sheet until firm, then transfer to a freezer-safe container for up to 3 months.
Reheating: To enjoy warm cookies, microwave for about 10-15 seconds or let them rest at room temperature for a few minutes before serving.
Airtight Tip: Always use an airtight container for both room temperature and frozen storage to keep your Peanut Butter Spider Cookies soft and chewy!
Peanut Butter Spider Cookies Recipe FAQs
What type of peanut butter should I use?
For the best results, I recommend using creamy peanut butter for these Peanut Butter Spider Cookies. Avoid natural peanut butter, as it can affect the texture. Creamy peanut butter provides a distinct flavor and smooth consistency, ensuring your cookies turn out soft and chewy.
How do I store these cookies?
Store your Peanut Butter Spider Cookies in an airtight container at room temperature for up to 3 days. This method will keep them fresh and yummy without drying out. If you want to enjoy them longer, you can freeze them!
Can I freeze Peanut Butter Spider Cookies?
Absolutely! To freeze, first allow the cookies to cool completely. Then, place them in a single layer on a baking sheet and freeze until firm, about 1-2 hours. Transfer them to a freezer-safe container or zip-top bag and store for up to 3 months. When you’re ready to enjoy them, just let them thaw at room temperature or warm them in the microwave for a few seconds.
What should I do if my cookies are too dry?
If you find that your cookies are too dry, it usually indicates that they were overbaked or possibly had too much flour. Make sure to measure your flour accurately; spoon it into the measuring cup and level it off with a knife. Also, next time, keep a watchful eye while they bake, pulling them out when they’re just golden at the edges.
Are these cookies safe for those with allergies?
It’s important to note that these Peanut Butter Spider Cookies contain peanuts and chocolate, making them unsuitable for individuals with peanut allergies. However, you can make a nut-free variation by substituting the peanut butter with sunflower seed butter. Be sure to check all ingredient labels for potential allergens to ensure safety for your guests.
How can I make these cookies gluten-free?
To make gluten-free Peanut Butter Spider Cookies, simply swap the all-purpose flour with a gluten-free flour blend. Ensure it’s a 1:1 substitute, which many brands offer, to maintain the correct texture. This way, everyone can enjoy your spooky treats!
Peanut Butter Spider Cookies: Spooky and Easy Halloween Fun
Ingredients
Equipment
Method
- Chill Reese’s by placing them in the freezer for about 15 minutes.
- Preheat your oven to 350°F (175°C) and prepare baking sheets.
- Cream together butter, brown sugar, and granulated sugar until light and fluffy (2-3 minutes).
- Mix in peanut butter, egg, and vanilla extract until smooth.
- Gradually add flour, baking soda, baking powder, and salt until just combined.
- Shape dough into 1-inch balls and roll in granulated sugar before placing on baking sheet.
- Bake for 8-11 minutes until edges are golden and centers are soft.
- Press a chilled Reese’s cup into the center of each cookie immediately after baking.
- Cool on baking sheet for 15-20 minutes.
- Melt chocolate chips and use to draw spider legs and attach candy eyeballs.
Leave a Reply