
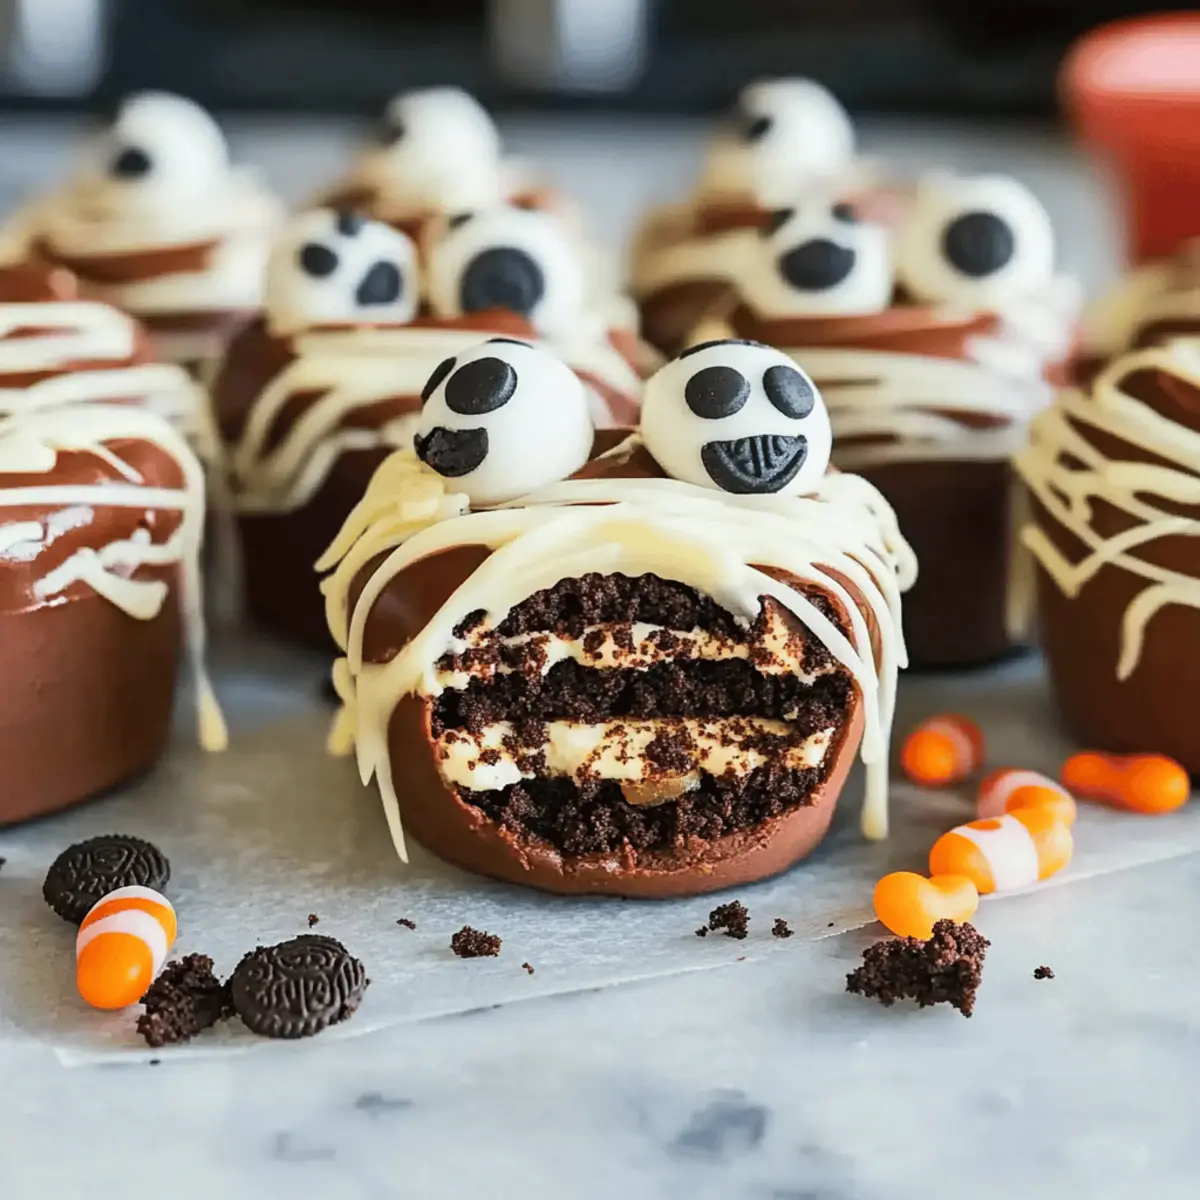
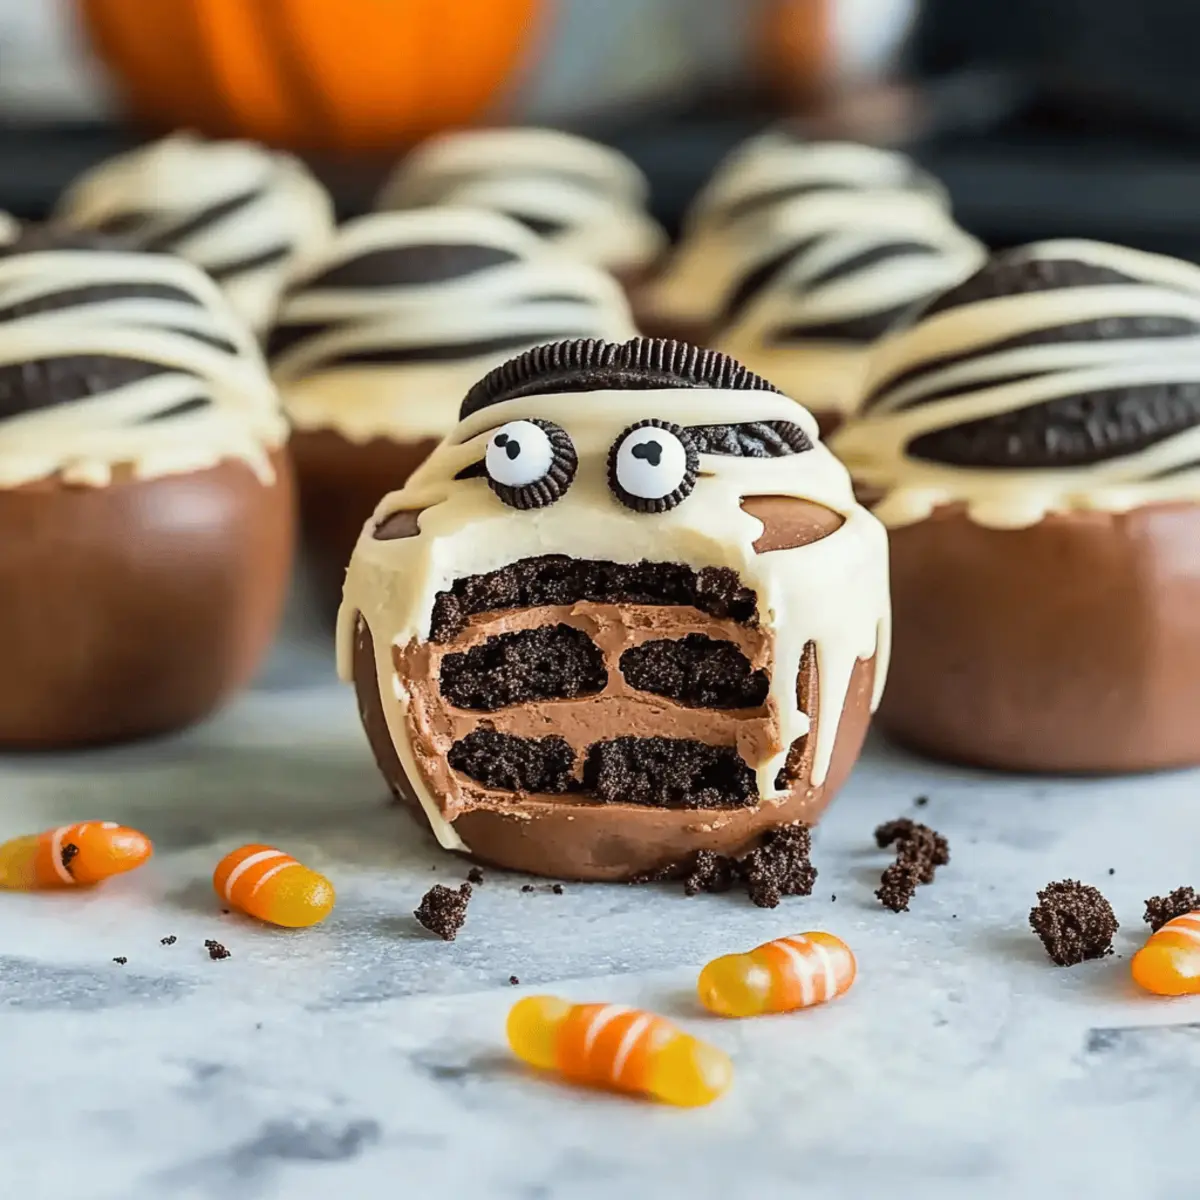
Caught in a whirlwind of Halloween preparations, I stumbled upon a delightful surprise—Mummy Oreo Truffles! These enchanting little bites not only elevate the festive spirit but are also a breeze to whip up. With their fun, spooky presentation, they make for the perfect treat to delight both kids and adults alike. Imagine a party where these no-bake wonders are the star attraction: creamy Oreo filling swathed in luscious white chocolate, playfully adorned with candy eyes. Not only do they bring a touch of whimsy to your table, but their simple preparation means you can spend more time enjoying the holiday and less time worrying in the kitchen. Ready to impress your guests with this frightfully delicious dessert? Let’s dive in!

Why Are Mummy Oreo Truffles a Must-Make?
Irresistible Treats: These Mummy Oreo Truffles are bound to be a hit with both kids and adults, perfect for adding a sweet touch to your Halloween festivities.
Quick and Easy: With no baking required, you can whip them up in no time—ideal for busy schedules filled with party prep!
Playful Presentation: Their adorable mummy design makes them a standout dessert and a fun conversation starter at any gathering.
Versatile Flavors: Use different types of Oreos or swap in various chocolate coatings for personalized versions that suit every palate.
Make-Ahead Magic: Prepare them a day in advance and store them in the fridge, so you can focus on enjoying the festivities instead of being stuck in the kitchen.
Creative Fun: Involve your kids in the decorating process, allowing them to craft their own spooky eyes with candy, making it a delightful family activity!
Mummy Oreo Truffles Ingredients
For the Truffle Filling
• Oreo Cookies – Crumbled to create a deliciously creamy base; use any flavor for a fun twist.
• Cream Cheese – Adds richness and binds the crushed Oreos; softened cream cheese blends best for smooth consistency.
For the Coating
• White Chocolate – Ideal for creating a spooky mummy look; feel free to substitute with milk chocolate for a sweeter taste.
• Candy Eyes – Essential for giving your mummies personality; use chocolate chips for simpler designs if needed.
For Decoration
• Coconut Flakes – Can mimic bandages for an extra spooky touch; toast them lightly for a nutty flavor.
• Food Coloring – Use gel colors to tint your white chocolate for an eerie green or blue appeal if desired.
These Mummy Oreo Truffles are a delightfully spooky addition to your Halloween dessert table!
Step‑by‑Step Instructions for Mummy Oreo Truffles
Step 1: Prepare the Truffle Filling
Start by crushing about 20 Oreo cookies into fine crumbs using a food processor or a resealable plastic bag with a rolling pin. In a mixing bowl, combine the crushed Oreos with 8 ounces of softened cream cheese, blending until the mixture is smooth and creamy. Using a spatula, ensure there are no lumps, and refrigerate for about 30 minutes until the mixture firms up slightly.
Step 2: Shape the Truffles
Once the Oreo mixture is chilled, use a small scoop or your hands to form 1-inch balls, placing each on a parchment-lined baking sheet. Make sure they are evenly sized for uniform melting later. After shaping all the truffles, return them to the refrigerator for an additional 15 minutes to help them hold their shape during coating.
Step 3: Melt the White Chocolate
In a microwave-safe bowl, melt 12 ounces of white chocolate in 30-second intervals, stirring well after each session until the chocolate is smooth and fully melted. If you’d like an eerie hue, add a few drops of gel food coloring at this stage for a playful twist. Be careful not to overheat, as chocolate can seize if cooked too long.
Step 4: Coat the Truffles
Using a fork, dip each Oreo truffle into the melted white chocolate, allowing excess to drip off before placing them back onto the parchment paper. Ensure each truffle is fully coated for that classic mummy look. Work quickly, as chocolate can start to set. Once all truffles are coated, return them to the fridge for about 10 minutes to harden.
Step 5: Decorate the Mummies
After the chocolate has hardened, melt a bit more white chocolate or use any remaining for decorating. Place the chocolate in a piping bag or a zip-top bag with a tiny corner snipped off, and drizzle lines across each truffle to mimic mummy bandages. Immediately add candy eyes to complete their spooky expression while the chocolate is still warm.
Step 6: Chill and Serve
Once decorated, refrigerate the Mummy Oreo Truffles for at least another 30 minutes to ensure all chocolate sets properly. Arrange them on a festive platter for presentation, showcasing your intricate designs. These delightful treats are ready to thrill your guests at your next Halloween celebration—enjoy the sweet spooky fun!

Expert Tips for Mummy Oreo Truffles
-
Chilling Time: Ensure the truffle filling is adequately chilled before shaping. This helps maintain their form during the coating process.
-
Coating Consistency: If the white chocolate is too thick, add a small amount of shortening or coconut oil for a smoother coating. This step is crucial for that beautiful, even finish.
-
Decorating Technique: Use a piping bag for precise drizzling of chocolate. A steady hand will help create the classic mummy bandage look with ease.
-
Flavor Variations: Don’t hesitate to experiment with different Oreo flavors like mint or peanut butter to create unique Mummy Oreo Truffles that cater to diverse palates.
-
Storage Tips: Store truffles in an airtight container in the fridge to keep them fresh and delicious, especially if you’re making them a day in advance for your Halloween bash!
Storage Tips for Mummy Oreo Truffles
- Room Temperature: Keep these delightful Mummy Oreo Truffles at room temperature for up to 2 hours during serving. For longer displays, store them in a cool place to maintain their texture.
- Fridge: Place the truffles in an airtight container in the fridge, where they’ll stay fresh for up to 1 week. This helps preserve their creamy filling and delightful chocolate coating.
- Freezer: For longer storage, freeze the Mummy Oreo Truffles in a single layer on a baking sheet, then transfer to an airtight container for up to 3 months. Thaw in the fridge before serving.
- Reheating: There’s no need to heat the truffles; serve them cold or at room temperature for the best texture and flavor. Enjoy these spooky treats with friends and family!
What to Serve with Mummy Oreo Truffles?
Imagine your Halloween gathering bursting with vibrant flavors and creepy curiosities, perfectly paired to complement the sweet allure of these Mummy Oreo Truffles.
- Spooky Punch: A vibrant, fruity punch with soda and gummy worms adds a festive flair that both kids and adults will enjoy.
- Pumpkin Spice Hot Chocolate: This warm drink matches the cozy vibes of fall, enhancing the sweet chocolatey bliss of the truffles.
- Caramel Apple Slices: Crisp apple slices drizzled with caramel provide a refreshing contrast while embracing the Halloween theme.
- Creepy Cheese Board: Pair assorted cheeses, spooky-shaped crackers, and unique fruits for a savory balance to your sweet truffles.
- Chocolate-Dipped Pretzels: These offer a delightful crunch and a salty-sweet combo that harmonizes beautifully with the creamy truffles.
- Goblins’ Fruit Salad: A colorful mix of seasonal fruit, like oranges and berries, adds freshness and a fun burst of colors to the table.
- Monster Cookies: These playful cookies, with vibrant candies and fun shapes, echo the truffle designs and create a whimsical dessert display.
- Ghostly Meringues: Light and airy, these sweet meringue treats adorned with little chocolate chips maintain the spooky theme without overwhelming richness.
- Witch’s Brew Iced Tea: A refreshing, herbal iced tea, lightly sweetened and garnished with eye-catching fruits or berries, keeps drinks exciting and festive.
- Freaky Fondue: Melted chocolate or caramel served with assorted dippables provides an interactive twist that pairs excellently with the Mummy Oreo Truffles.
Make Ahead Options
These Mummy Oreo Truffles are perfect for busy home cooks looking to save time during Halloween festivities! You can make the truffle filling (combining crushed Oreos and cream cheese) up to 24 hours in advance and refrigerate it until you’re ready to shape the truffles. Once formed, chill them for an additional 15 minutes before coating in melted white chocolate. To maintain their quality, ensure they are sealed in an airtight container after coating, which keeps them fresh for up to 3 days. When it’s time to serve, simply decorate the truffles before placing them on a platter. With this make-ahead strategy, you can enjoy a stress-free celebration while still impressing your guests with these spooky, delightful treats!
Mummy Oreo Truffles Variations & Substitutions
Feel free to get creative with these delightful Mummy Oreo Truffles, and let your imagination take flight!
-
Alternative Cookies: Swap classic Oreos for fun flavors like mint, peanut butter, or seasonal pumpkin spice for unique taste adventures. The variety adds a fun twist to this beloved treat.
-
Dairy-Free Delight: Use dairy-free cream cheese and dairy-free chocolate to make these truffles suitable for vegan diets. Everyone can enjoy the fun—no one will miss the traditional ingredients!
-
Nut Butter Magic: For an added layer of flavor, mix in a spoonful of peanut or almond butter into the cream cheese filling—deliciously nutty with every bite!
-
Spooky Drizzles: Instead of white chocolate drizzle, tint melting chocolate with spooky gel colors for that extra Halloween flair, creating vibrant mummies to satisfy any sweet tooth.
-
Gluten-Free Goodness: Use gluten-free Oreos or another gluten-free cookie to ensure all your guests can dive into these treats without worry. Celebrate inclusivity with sweet flavors!
-
Flavor-Infused Coating: Replace traditional chocolate coatings with flavored candy melts like strawberry or caramel for a delectable surprise in every bite. Your guests will be enchanted!
-
Festive Sprinkles: Before the icing sets, sprinkle colorful Halloween-themed candies or edible glitter for a festive finish, adding a delightful pop that captures the spirit of Halloween.
-
Mini Truffles: Form smaller, bite-sized truffles for a fun treat that’s easier to pop in your mouth—perfect for kid-friendly gatherings where portion control is vital.
Feel free to explore these variations, and don’t forget to pair your Mummy Oreo Truffles with delightful accompaniments like fizzy Halloween mocktails or warm naan bread. For a bit more fun in the kitchen, check out Creepy Cauldron Curry as a complementary spicy dish that adds flavor to your festive tablescape!
Mummy Oreo Truffles Recipe FAQs
What type of Oreos should I use for Mummy Oreo Truffles?
You can use any flavor of Oreo cookies! For a fun twist, try mint or peanut butter Oreos to add a unique taste to your truffles. The classic vanilla works beautifully too if you want to keep it traditional.
How should I store Mummy Oreo Truffles, and for how long?
Store your Mummy Oreo Truffles in an airtight container in the fridge, where they will stay fresh for up to a week. They are also great at room temperature for up to 2 hours, perfect for parties! If you want to keep them longer, they can be frozen for up to 3 months—just make sure to thaw them in the fridge before serving.
Can I freeze Mummy Oreo Truffles?
Absolutely! To freeze, lay the truffles out in a single layer on a baking sheet and freeze until solid. Then, transfer them to an airtight container or freezer bag. Remember to label them with the date, and they will be good for up to 3 months. Thaw in the fridge overnight before enjoying.
What if my melting white chocolate is too thick?
If your melted white chocolate is too thick for dipping, add a small amount of vegetable shortening or coconut oil to thin it out. Stir until smooth and well combined before dipping your truffles. This adjustment will help create a perfect coating that looks beautiful and is easy to work with.
Are there any dietary considerations I should keep in mind?
Definitely! If you have guests with dietary restrictions, consider using gluten-free Oreo cookies to make these treats accessible to everyone. You can also substitute the cream cheese with a dairy-free alternative to cater to vegan diets. Just check the labeling on your ingredients to ensure they meet those needs.
Can I involve my kids in making Mummy Oreo Truffles?
Yes! Involving children in the preparation is a fantastic idea. They can help crush the Oreos, roll the truffles into balls, and decorate them with candy eyes and chocolate drizzle. It’s a fun family activity that sparks creativity and gets everyone in the Halloween spirit!
Delicious Mummy Oreo Truffles for a Spooktacular Treat
Ingredients
Equipment
Method
- Prepare the truffle filling by crushing Oreo cookies into fine crumbs and mixing with softened cream cheese until smooth.
- Shape the mixture into 1-inch balls and refrigerate for 15 minutes to firm.
- Melt the white chocolate in intervals in a microwave-safe bowl, stirring until smooth.
- Dip each truffle into the melted chocolate, letting excess drip off, and place on parchment paper.
- Decorate with melted chocolate drizzled in lines to mimic mummy bandages and add candy eyes.
- Chill the decorated truffles for at least 30 minutes before serving.
Leave a Reply