
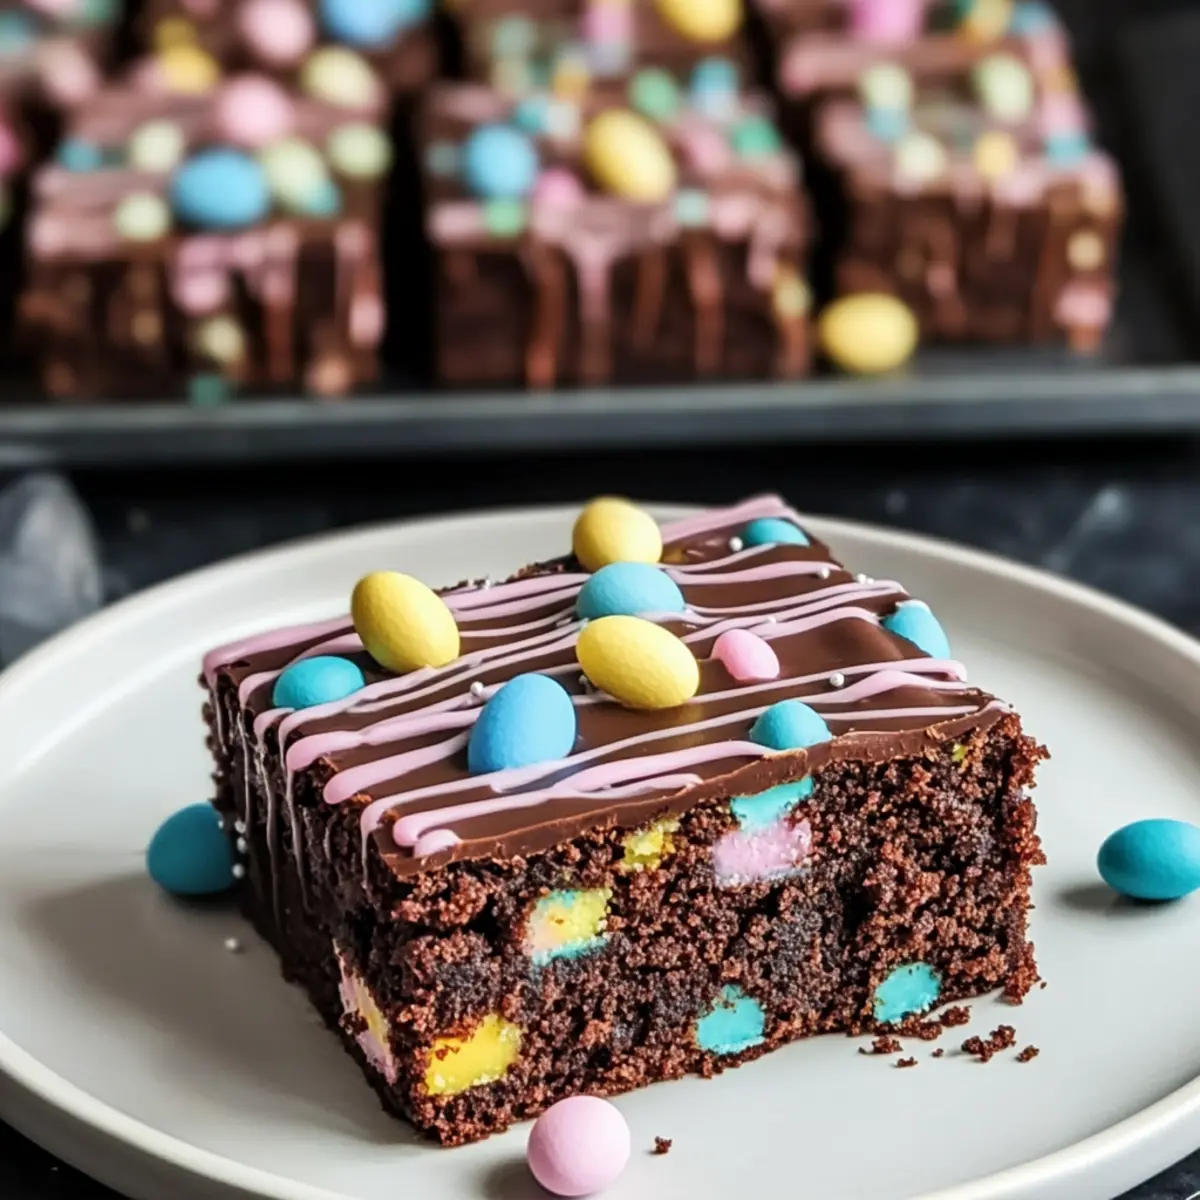
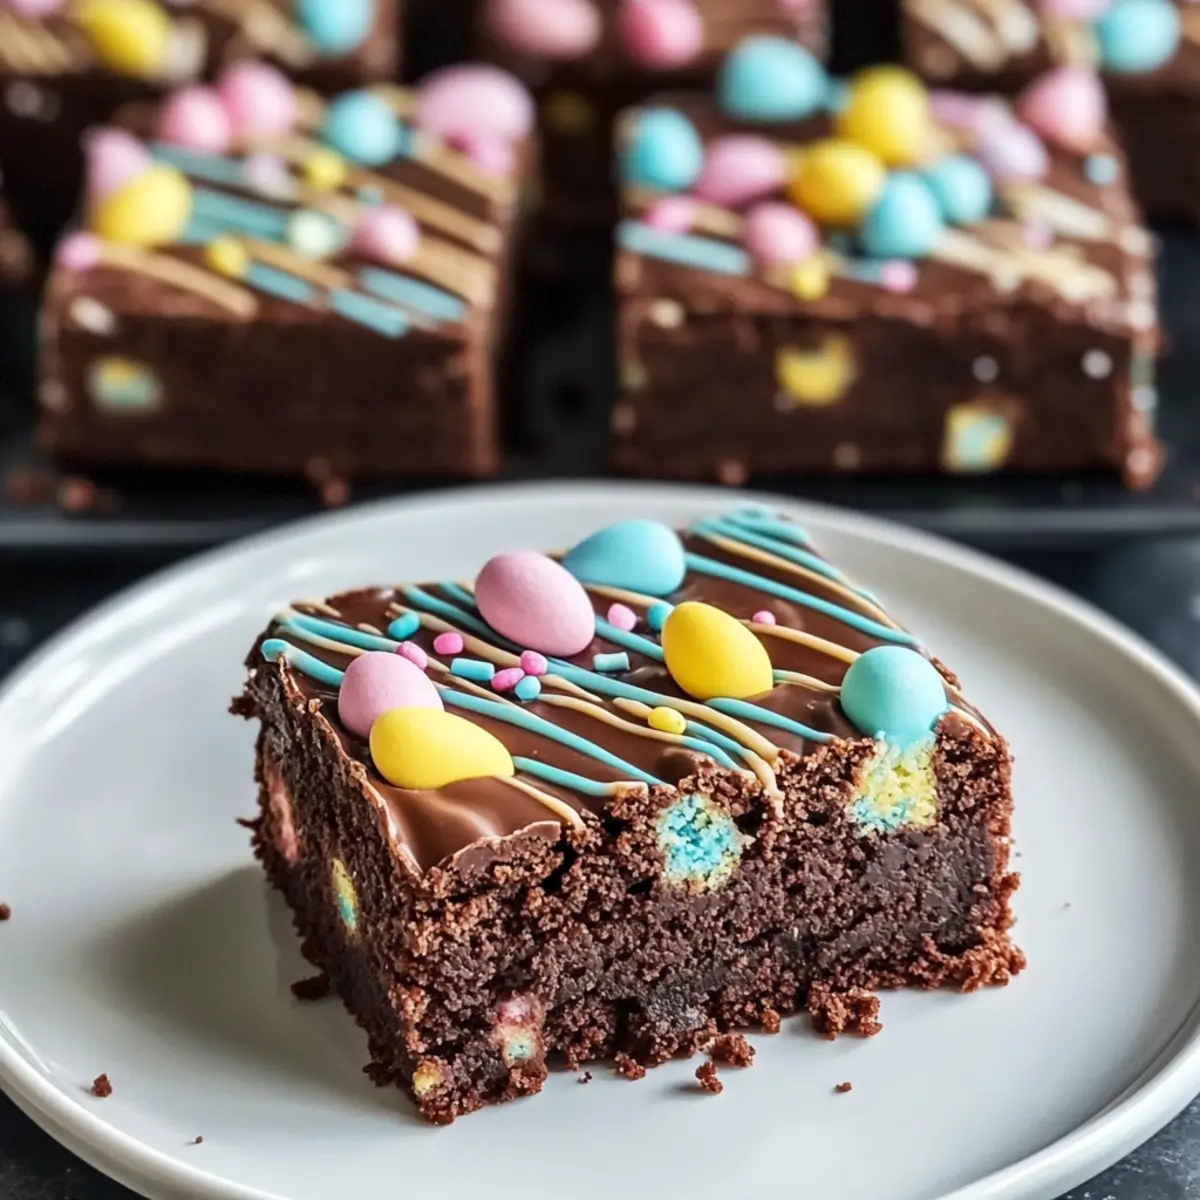
The first sight of spring often brings delightful reminders of festive gatherings, where desserts take center stage. My Fudgy Easter Brownies perfectly embody that spirit, combining rich chocolate with vibrant toppings that celebrate the season. These brownies deliver a dense, fudgy texture that melts in your mouth, making them not only a crowd-pleaser but also a sweet escape from the usual fast food routine. What’s even better? They come together in a flash—ideal for those impromptu gatherings or last-minute dessert cravings. Whether drizzled with pastel chocolate or topped with colorful sprinkles, these brownies are sure to elevate your Easter celebration. Ready to create a treat that will have everyone asking for seconds? Let’s dive into this joyful creation!
Why Are These Easter Brownies Special?
Rich, Fudgy Texture: Each bite offers a dense, chewy delight that melts in your mouth, taking brownies to a whole new level.
Colorful Appeal: Topped with vibrant sprinkles and pastel drizzles, these brownies are not only delicious but also festive—perfect for spring gatherings.
Quick and Easy: Whipping up these treats requires minimal effort for maximum satisfaction, making them ideal for last-minute dessert cravings.
Versatile Base: Feel free to customize with your favorite chocolate chips or seasonal toppings for a unique twist. For example, try adding hints of espresso for a delightful depth of flavor!
Crowd Favorite: With their rich chocolate flavor and stunning presentation, these brownies are sure to impress guests of all ages, bringing joy to any celebration. Plus, pair them with a scoop of ice cream for an indulgent treat!
Easter Brownies Ingredients
• Get ready to create a chocolate masterpiece!
For the Batter
- Granulated Sugar – Adds sweetness and contributes to a crisp top layer.
- Brown Sugar – Provides moisture and creates a chewy texture.
- Butter – Offers richness and enhances flavor; be sure to melt it for thorough incorporation.
- Eggs – Essential for structure and moisture; add them one at a time for better blending.
- Vanilla Extract – Infuses the batter with delightful aroma; standard extract works perfectly.
- Flour – Provides structure; accurate measurements are key for that ideal texture.
- Cocoa Powder – Core ingredient for deep chocolate flavor; balances sweetness with a hint of bitterness.
- Salt – Enhances overall flavor; crucial for balancing the sweetness.
- Chocolate Chips – Pockets of melted chocolate await in every bite; choose semisweet or dark for an extra treat!
- Coconut Oil (optional) – Creates a glossy chocolate topping; can swap with butter if you prefer.
- Coffee (optional) – A splash enhances the chocolate flavor without adding any mocha notes; espresso is a great substitute.
For the Toppings
- Melted White Chocolate – Use pastel-colored melted white chocolate for a festive drizzle on top.
- Sprinkles or Mini Candy Eggs – Add colorful sprinkles or mini eggs for a playful, vibrant finish that will wow your guests!
Step‑by‑Step Instructions for Easter Brownies
Step 1: Preheat the Oven
Begin by preheating your oven to 350°F (175°C). This temperature is ideal for creating fudgy Easter brownies that have a perfectly baked exterior while remaining soft and gooey inside. Make sure to prepare your baking pan by lining it with parchment paper, allowing for easy removal once the brownies are baked.
Step 2: Cream Butter and Sugars
In a medium bowl, melt the butter until it’s smooth and warm. Combine the melted butter with granulated sugar and brown sugar, mixing them together vigorously using a whisk or hand mixer until the mixture is well-blended and creamy. This process typically takes about 2-3 minutes and should result in a smooth, glossy texture.
Step 3: Add Eggs and Vanilla
Next, crack in the eggs, adding them one at a time to the butter-sugar mixture. Beat each egg well to ensure a thorough blend before incorporating the next. After the eggs, add the vanilla extract, mixing until all the ingredients are fully combined. This will introduce a wonderful aroma to your fudgy Easter brownies.
Step 4: Sift Dry Ingredients
In a separate bowl, sift together the flour, cocoa powder, and salt to eliminate any lumps and ensure even distribution. Gradually add the dry ingredients to the wet mixture, stirring gently with a spatula or wooden spoon. Be careful to combine them just until the flour is no longer visible to maintain the brownies’ dense, fudgy texture.
Step 5: Incorporate Chocolate Chips
Once your brownie batter is ready, fold in the chocolate chips last, ensuring they are evenly distributed throughout the mix. The chocolate chips will create delightful pockets of melted chocolate in every bite of your Easter brownies. This step should be done gently, so as not to overmix and affect the fudginess.
Step 6: Bake the Brownies
Pour the prepared brownie batter into your lined baking pan, spreading it evenly to ensure uniform baking. Place the pan in the preheated oven and bake for 30-35 minutes. To check for doneness, insert a toothpick into the center; it should come out with a few moist crumbs—this indicates your brownies are perfectly fudgy.
Step 7: Cool Completely
Once baked, carefully remove the brownies from the oven and allow them to cool completely in the pan. This cooling phase is crucial, as it helps the brownies set and makes it easier to add toppings later. Allow at least 30 minutes before proceeding to the next steps for decoration.
Step 8: Prepare the Topping
While the brownies cool, melt some chocolate chips with coconut oil in a microwave-safe bowl. Heat in short bursts of 20 seconds, stirring in between, until glossy and smooth. This glossy topping will add a beautiful finish to your Easter brownies, elevating their festive appeal.
Step 9: Decorate the Brownies
Once your brownies are cooled and the chocolate topping is ready, drizzle it generously over the surface. For an extra splash of color, use melted pastel-colored white chocolate to create decorative patterns. Finally, sprinkle colorful sprinkles or mini candy eggs for a fun, vibrant touch that reflects the joy of Easter.
Step 10: Slice for Serving
To cut the brownies, run a sharp knife under hot water, then dry it off before slicing through the cooled brownies. This method helps achieve clean, neat slices. Serving these fudgy Easter brownies is now a breeze, and they’re sure to be a hit during your spring gatherings!

Easter Brownies Variations & Substitutions
Customize your Easter brownies with these exciting variations for a delightful twist on this classic treat!
- Dairy-Free: Substitute butter with coconut oil and use dairy-free chocolate chips for a rich, delicious alternative.
- Nutty Additions: Stir in chopped nuts like pecans or walnuts for a lovely crunchy texture that complements the fudginess.
- Spicy Kick: Add a pinch of cayenne pepper or chili powder to the batter for a surprising warmth that enhances the chocolate flavor.
- Caramel Swirl: Drizzle caramel sauce into the batter before baking for a deliciously rich addition that takes these brownies to the next level.
- Minty Fresh: Incorporate peppermint extract into the batter for a refreshing mint chocolate flavor, perfect for springtime festivities.
- Fruit Flavors: Top with fresh raspberries or strawberries for a bright, fruity complement to the rich chocolate.
- Coffee Lover’s Option: Add a shot of espresso to the batter for a deeper coffee-infused chocolate flavor that’ll satisfy any caffeine craving.
- Gluten-Free: If you’re looking for a gluten-free option, swap the all-purpose flour with a 1:1 gluten-free flour blend, and enjoy just as much decadence!
With all these creative variations, your Easter brownies can become an even more delightful centerpiece at any gathering. If you’re exploring gluten-free desserts, don’t forget to check out these delectable Gluten Free Brownies that your friends and family will absolutely love!
Storage Tips for Easter Brownies
Room Temperature: Keep your Easter brownies in an airtight container at room temperature for up to 3 days to maintain their delicious fudgy texture.
Fridge: They can be stored in the refrigerator for up to 1 week. Just be sure to wrap them tightly to prevent them from absorbing any odors.
Freezer: For longer storage, freeze the brownies in an airtight container or freezer bag for up to 3 months. Allow to cool completely before freezing to preserve their texture.
Reheating: To enjoy brownies warm again, gently microwave individual pieces for about 10-15 seconds, ensuring they’re still soft and delicious!
What to Serve with Fudgy Easter Brownies?
Indulging in these decadent brownies opens the door to a world of delightful pairings to elevate your dessert experience.
-
Vanilla Ice Cream: The creamy coldness of vanilla ice cream beautifully complements the warm, fudgy texture of brownies, creating a blissful contrast.
-
Fresh Berries: A handful of plump strawberries or raspberries adds a refreshing burst of flavor that cuts through the richness of the brownies beautifully.
-
Whipped Cream: Light and airy, whipped cream offers a delightful creaminess that enhances each bite, especially when sprinkled with a hint of cocoa.
-
Mint Tea: The refreshing notes of mint tea serve as a perfect palate cleanser, providing a fresh, soothing finish to the chocolate richness.
-
Chocolate Sauce: Drizzling extra chocolate sauce on top brings an indulgent twist that chocolate lovers will adore—more is always merrier!
-
Fruit Salad: A colorful mix of seasonal fruits not only adds nutritional value but also a refreshing touch that complements the sweetness of the brownies.
-
Coffee or Espresso: For a cozy treat, serve your brownies with a cup of rich coffee or espresso—its deep flavor harmonizes with the chocolate and enhances the overall experience.
-
Nutty Brownie Sundae: Layer brownie pieces with vanilla ice cream, drizzle in hot fudge, and sprinkle chopped nuts for an unforgettable sundae creation.
-
Sparkling Lemonade: The zesty and bubbly nature of sparkling lemonade provides a delightful contrast to the fudgy brownies, refreshing your palate with every sip.
Make Ahead Options
These Fudgy Easter Brownies are perfect for busy home cooks looking to save time! You can prepare the brownie batter up to 24 hours in advance; simply mix all the wet and dry ingredients as instructed, cover tightly and refrigerate to maintain freshness. When you’re ready to bake, let the batter sit at room temperature for about 15 minutes before pouring it into the baking pan and baking as usual. Additionally, you can melt the chocolate topping and prepare your colorful decorations up to 3 days ahead—store them in separate airtight containers. Just reheat the chocolate topping slightly before drizzling it on top of your cooled brownies, ensuring they remain just as delicious and festive as ever!
Tips for the Best Easter Brownies
- Melted Butter is Key: Ensure your butter is completely melted for smooth mixing with sugars, which enhances the brownie’s fudgy texture.
- Don’t Overmix: Gently combine dry ingredients into the wet mixture to avoid tough brownies; a few lumps are perfectly fine.
- Cool Completely Before Topping: Let the brownies cool fully to prevent the toppings from melting into a gooey mess.
- Warm Knife for Slicing: Run your knife under hot water before slicing; this ensures clean cuts for your Easter brownies.
- Get Creative with Toppings: Don’t hesitate to explore various festive toppings or additional chocolate choices to make your brownies unique!
Easter Brownies Recipe FAQs
What kind of chocolate should I use for the brownies?
Absolutely! I recommend using semisweet or dark chocolate chips for the best flavor. They contribute to the rich chocolatey taste while providing delightful pockets of melted chocolate throughout. If you want to get creative, try adding some white chocolate chips or experimenting with flavored options for a unique twist.
How should I store my Easter brownies?
For optimal freshness, store your brownies in an airtight container at room temperature for up to 3 days. If you need to keep them longer, you can refrigerate them for up to a week, wrapping them tightly to prevent absorbing any unwanted odors. This way, you can enjoy your fudgy Easter brownies at their best!
Can I freeze these brownies?
Certainly! To freeze your Easter brownies, allow them to cool completely. Then, slice them and place them in an airtight container or freezer bag, separating layers with parchment paper. They can be stored in the freezer for up to 3 months. When you’re ready to enjoy them, let them thaw in the fridge overnight or microwave a slice for about 10-15 seconds.
What if my brownies turn out too dry?
If your brownies are dry, it might be due to overbaking or too much flour. Next time, make sure to check them at the 30-minute mark using a toothpick; it should come out with a few moist crumbs for that perfect fudgy texture. Additionally, try gently folding in the flour mixture without overmixing, as this can lead to dry brownies.
Are these brownies suitable for people with allergies?
While my Easter brownies are delicious, they do contain common allergens like eggs, butter, and gluten from flour. If you’re accommodating someone with a severe allergy, consider swapping these ingredients for suitable alternatives such as egg replacers and gluten-free flour blends. Always read labels carefully to ensure safety!
Can I make the brownies a day in advance?
Yes, making your Easter brownies the day before is a great idea! Allow them to cool completely and store them in an airtight container. This can enhance their fudgy texture as the flavors meld overnight. Just remember to add the toppings right before serving for the best presentation!

Easter Brownies: Fudgy Chocolate Treats to Celebrate Spring
Ingredients
Equipment
Method
- Preheat your oven to 350°F (175°C) and prepare your baking pan with parchment paper.
- Melt the butter and combine it with granulated sugar and brown sugar, mixing until creamy.
- Add eggs one at a time, beating well after each addition, then mix in vanilla extract.
- Sift together flour, cocoa powder, and salt; gradually incorporate into the wet mixture.
- Fold in chocolate chips evenly into the batter.
- Pour the batter into the lined baking pan and bake for 30-35 minutes.
- Cool the brownies completely in the pan before adding toppings.
- Melt chocolate chips with coconut oil in the microwave until smooth.
- Drizzle the melted chocolate over the cooled brownies, then add sprinkles or mini candy eggs.
- Slice with a warm knife for clean cuts before serving.
Leave a Reply