
“Excuse me, but have you ever tasted fried chicken wrapped in a soft tortilla?” I overheard someone say this at a food festival, and it instantly took me back to my cozy kitchen filled with the aroma of sizzling chicken and crispy bacon. That’s where the magic of the Crispy Chicken Club Wrap begins! This recipe is a delightful combination of golden-brown chicken, smoky bacon, fresh veggies, and a creamy sauce—all snuggled inside a warm tortilla. It’s quick to prepare, making it a perfect weeknight dinner or a casual weekend lunch that’s sure to impress family and friends. Plus, this wrap is easily customizable; feel free to add your favorite ingredients or even opt for a healthier baked variation. Curious to discover how to fill your wrap with layers of flavor? Let’s dive in!

Why Is This Wrap a Must-Try?
Crispy Perfection: This wrap features perfectly fried chicken that delivers a glorious crunch with every bite.
Flavor Explosion: The mix of savory bacon, fresh vegetables, and a creamy sauce creates a symphony of tastes that will keep you coming back for more.
Customizable Delight: Whether you want to add avocado or switch to grilled veggies, it’s your canvas—make it your own!
Quick and Easy: Ideal for busy nights, this recipe comes together swiftly, giving you more time to enjoy your meal.
Crowd-Pleasing: Serve it at gatherings or family dinners—everyone will be grabbing seconds, and you’ll be the star of the show. And if you’re looking for more satisfying options, consider trying my Garlic Chicken Gnocchi Skillet for a different flavor experience!
Crispy Chicken Club Wrap Ingredients
• Get ready to gather some delightful flavors!
For the Chicken
- Boneless, Skinless Chicken Breasts – The star of the wrap; ensure they’re well-seasoned for maximum flavor.
- Salt and Pepper – Essential for boosting the chicken’s natural taste.
- Flour – Helps the egg and breadcrumbs stick for a perfect coating.
- Eggs (beaten) – Acts as a binding agent for a crispy exterior.
- Breadcrumbs (1 cup) – Choose seasoned ones for an extra flavor kick.
- Garlic Powder (1 tsp) – Infuses a warm aroma into your crispy coating.
- Paprika (1 tsp) – Adds a lovely color and a hint of smokiness.
For Frying
- Vegetable Oil – Necessary for achieving that golden, crispy perfection.
- Olive Oil (1 tbsp) – Ideal for lightly frying the tortillas to warm them up.
For the Wrap
- Large Flour Tortillas (4) – Soft and flexible, these are the perfect vessel for your delicious fillings.
- Cooked Bacon (4 slices) – Brings a savory crunch and enhances flavor.
- Shredded Lettuce (1 cup) – Provides a fresh, crisp contrast to the rich wraps.
- Large Tomato (sliced) – Adds juicy acidity, balancing out the rich flavors.
- Mayonnaise (½ cup) – Creates a creamy consistency that holds everything together.
- Dijon Mustard (1 tbsp) – Adds a touch of tangy brightness to the creamy sauce.
- Shredded Cheese (1 cup) – Melts beautifully to add depth; Cheddar is a popular choice.
Get ready to dive into this Crispy Chicken Club Wrap adventure! With these ingredients in hand, you’re just a step away from a delicious homemade experience.
Step‑by‑Step Instructions for Crispy Chicken Club Wrap
Step 1: Season the Chicken
Begin by seasoning the boneless, skinless chicken breasts generously with salt and pepper on both sides. This essential step enhances their natural flavor and prepares them for the delicious crispy coating that will follow. Allow the seasoned chicken to rest for a few moments while you set up your dredging station.
Step 2: Set Up the Dredging Station
Prepare three bowls for the breading process: one with flour for the dry coating, another with beaten eggs for binding, and a third filled with breadcrumbs mixed with garlic powder and paprika for an extra flavor boost. Make sure to evenly coat the breadcrumbs with the spices, as this will contribute to the delicious crunch of the Crispy Chicken Club Wrap.
Step 3: Coat the Chicken
Take each seasoned chicken breast and first dredge it in the flour, shaking off any excess. Then dip it into the beaten eggs, ensuring an even coating, before pressing it into the breadcrumb mixture. Make sure each piece is well-covered, as this combination will create that memorable crispy exterior when fried.
Step 4: Heat the Oil
In a large frying pan, heat enough vegetable oil over medium-high heat to submerge the chicken breasts, about ½ inch deep. Allow the oil to heat until it shimmers, which indicates it’s ready for frying. This step is crucial for achieving that perfect golden brown crunch on the chicken.
Step 5: Fry the Chicken
Carefully place the breaded chicken breasts in the hot oil, ensuring not to overcrowd the pan. Fry each piece for 5-7 minutes per side, or until they turn a deep golden brown and the internal temperature reaches 165°F. This is when the magic of the Crispy Chicken Club Wrap truly begins, as the outside becomes irresistibly crunchy.
Step 6: Drain Excess Oil
Once the chicken is beautifully golden and cooked through, use a slotted spoon to remove it from the pan and place it on a plate lined with paper towels. This resting period allows the excess oil to drain, leaving you with a crispy, less-greasy coating that enhances the wrap’s overall texture.
Step 7: Prepare the Sauce
In a small bowl, mix together the mayonnaise and Dijon mustard until smooth and well-combined. This creamy sauce is a key element of the Crispy Chicken Club Wrap, providing the perfect tangy contrast to the savory chicken and crispy bacon. Spread it generously on each tortilla for added flavor.
Step 8: Assemble the Wraps
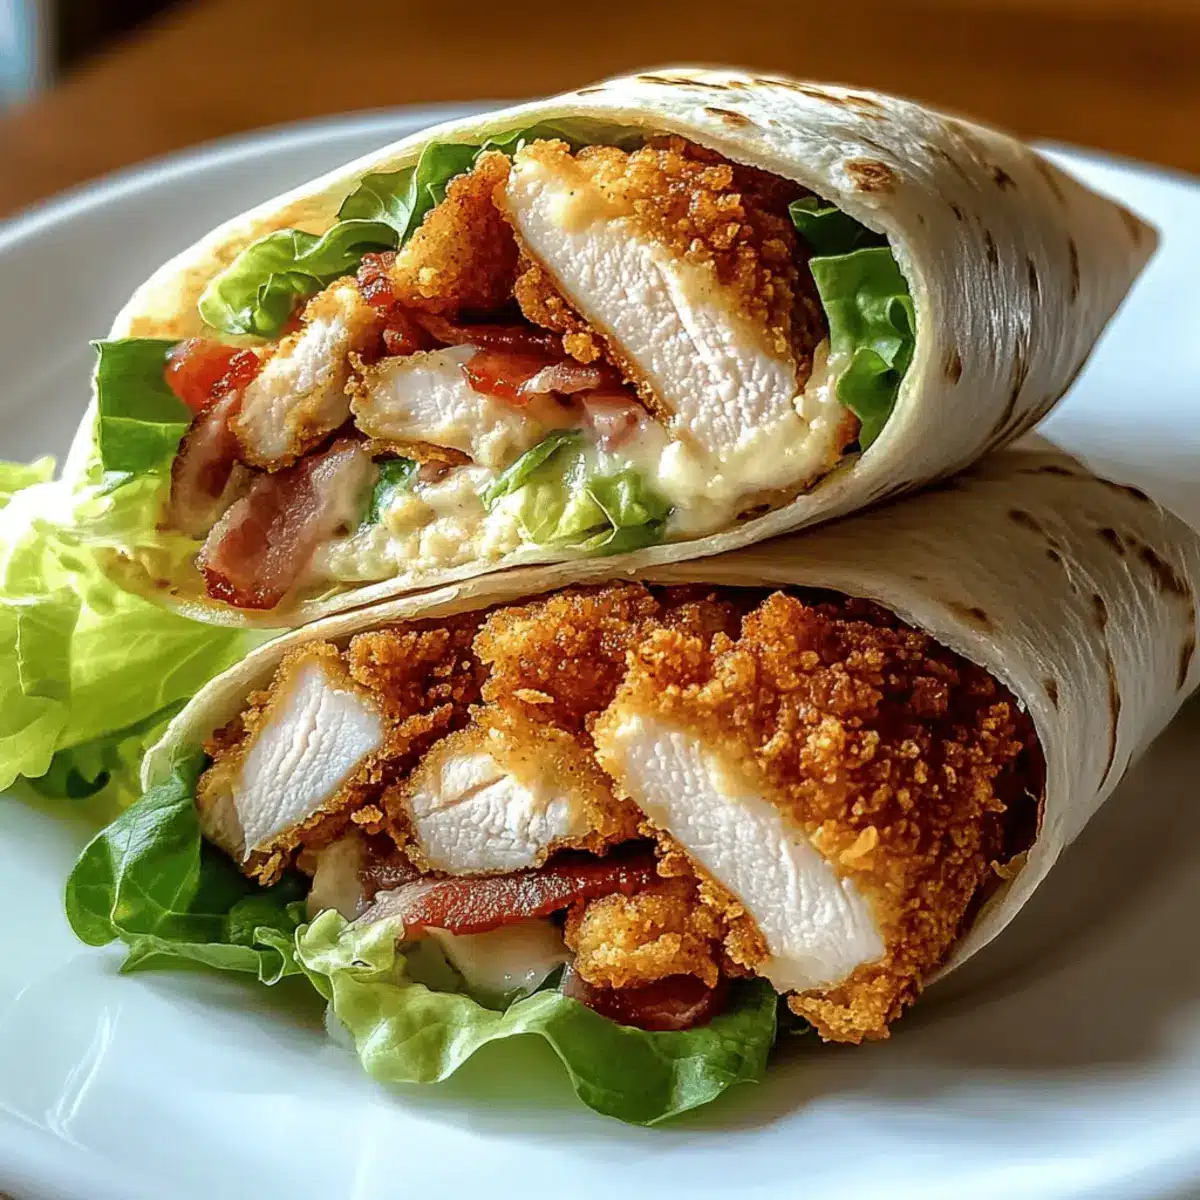
Slice the fried chicken into strips or leave them whole, based on your preference. Arrange the crispy chicken onto the prepared tortillas, layering on the shredded lettuce, sliced tomatoes, crispy bacon, and a sprinkle of shredded cheese. This assembly creates a colorful and enticing presentation just waiting to be wrapped up.
Step 9: Roll the Wraps
Fold the sides of the tortillas inward, then roll them tightly from the bottom up to secure all the delicious fillings inside. The tortilla should encase the ingredients snugly, keeping the juicy components contained as you prepare to give them a final touch.
Step 10: Cook the Wraps
In a clean skillet, add a tablespoon of olive oil and place the assembled wraps seam side down. Cook over medium heat for about 2-3 minutes on each side until they are golden brown and crispy. This final step melds the flavors together and gives the outside a delightful crunch.
Step 11: Cut and Serve
Once the Crispy Chicken Club Wraps are golden and crispy on the outside, remove them from the skillet and let them cool for a moment. Slice each wrap in half diagonally for easy handling and a visual presentation. Serve immediately, possibly with a side of ranch or your favorite dipping sauce for an extra burst of flavor.

Expert Tips for Crispy Chicken Club Wrap
-
Oil Temperature: Ensure the oil is hot enough before frying; it should shimmer. This is essential for achieving that crispy coating.
-
Avoid Crowding: Fry the chicken in batches to prevent overcrowding the pan. This maintains the oil temperature, ensuring even cooking and crispiness.
-
Proper Cooling: After frying, let the chicken rest on paper towels. This absorbs excess oil and keeps the wraps from becoming greasy.
-
Bread Crumb Variety: Use seasoned breadcrumbs for added flavor, or mix in herbs and spices to your breadcrumb mixture for a unique taste in your Crispy Chicken Club Wrap.
-
Customization Ideas: Feel free to add your favorite toppings like avocado or different cheeses for a personal touch that elevates your wrap experience.
How to Store and Freeze Crispy Chicken Club Wrap
Fridge: Store leftover wraps in an airtight container for up to 2-3 days. This helps retain their freshness and minimizes sogginess.
Freezer: If you wish to freeze, wrap each assembled Crispy Chicken Club Wrap tightly in plastic wrap and place them in a freezer-safe bag. They can be frozen for up to 2 months.
Reheating: To reheat, thaw in the fridge overnight, then warm in a skillet over medium heat for about 5 minutes each side, restoring that crispy texture.
Serving Recommendation: If you’re reheating from frozen, consider adding a sprinkle of fresh veggies or cheese to liven them up before serving for a delightful fresh touch!
Make Ahead Options
These Crispy Chicken Club Wraps are perfect for meal prep enthusiasts! You can bread and fry the chicken up to 24 hours in advance, allowing the flavors to meld without sacrificing quality. Simply let the freshly fried chicken cool completely, then store it in an airtight container in the refrigerator. The vegetables and sauces can also be prepared a day ahead: slice the tomatoes, wash and dry the lettuce, and mix the mayo with Dijon mustard. When you’re ready to enjoy your wraps, assemble everything just before serving to keep the tortillas crisp and the fillings fresh. This prep method not only saves you time on busy weeknights but also ensures that your wraps remain just as delicious!
Crispy Chicken Club Wrap Variations
Feel free to let your creativity shine in the kitchen! Here are some tasty ideas to customize your crispy chicken club wrap experience.
-
Baked Option: Instead of frying, bake the breaded chicken at 400°F for 20-25 minutes for a healthier alternative.
-
Vegetarian Swap: Replace chicken with breaded tofu or grilled veggies like zucchini and bell peppers for a delicious vegetarian twist. This option embraces a medley of flavors while keeping it satisfying.
-
Spice It Up: Add some heat with sliced jalapeños or a drizzle of hot sauce. The spicy kick enhances the wrap and complements the creamy sauce perfectly.
-
Cheese Variations: Switch up the cheese by using Pepper Jack for extra creaminess and spice, or try a sharp Asiago for a unique flavor profile. The cheese is what brings that gooeyness to every bite!
-
Avocado Addition: Layer on some ripe avocado slices for added creaminess and a healthy fat boost. It gives the wrap a satisfying richness, enhancing the overall texture.
-
Different Spreads: Swap the mayonnaise and Dijon with pesto or hummus to enjoy a different flavor experience. These spreads add a fresh twist that’s equally delicious.
-
Crunchy Extras: Throw in some sliced pickles or roasted red peppers for added crunch and zing. These small additions can elevate your wrap to new heights!
Whether you decide to explore these variations or stick with the classic, your wraps are bound to be a crowd-pleaser. For more delicious chicken ideas, don’t forget to check out my Bang Bang Chicken–it’s a flavor bomb you won’t want to miss!
What to Serve with Crispy Chicken Club Wrap
The Crispy Chicken Club Wrap is not just a meal; it’s an experience that begs to be paired with delightful accompaniments!
- Creamy Pasta Salad: This chilled dish adds a refreshing texture and flavor contrast, making each bite of the wrap even more enjoyable.
- Sweet Potato Fries: Crisp on the outside and tender on the inside, these fries bring a hint of sweetness and hearty flavor that perfectly complements the savory wrap.
- Coleslaw: This crunchy, tangy side balances the richness of the wrap while adding a boost of freshness with every bite.
- Spicy Onion Rings: For those who crave a little heat, crispy onion rings add a spicy crunch to your meal, enhancing the wrap’s flavor profile.
- Guacamole and Chips: Creamy and zesty guacamole offers a dip that takes the overall experience to another level, keeping your palate engaged.
- Fruit Salad: Bright, juicy fruit salad brings a burst of sweetness that can cleanse your palate between bites, creating a pleasant balance with the savory wrap.
- Herbal Iced Tea: Refreshing and aromatic, a glass of herbal iced tea can cool down the palate while pairing beautifully with the wrap’s crunchy elements.
- Chocolate Chip Cookies: End the meal on a sweet note! The warmth and gooeyness of freshly baked cookies is a perfect contrast to the crispy wrap.

Crispy Chicken Club Wrap Recipe FAQs
How do I pick the best chicken for my wrap?
Absolutely! Look for boneless, skinless chicken breasts that are plump and firm to the touch. Fresh chicken should have a pink hue and minimal moisture in the packaging. Avoid chicken that has dark spots or a slimy texture, as this may indicate spoilage. If you’re pressed for time, consider using pre-cooked or rotisserie chicken for ease.
How should I store leftovers?
Very! To keep your Crispy Chicken Club Wrap fresh, place any leftover wraps in an airtight container and refrigerate for up to 2-3 days. You could also wrap them tightly in plastic wrap before placing them in the container. This will help prevent them from getting soggy and maintain their delicious flavors.
Can I freeze my wraps?
Absolutely! To freeze, first assemble your Crispy Chicken Club Wraps without sauces or toppings that could become soggy. Wrap each one tightly in plastic wrap and then place them in a freezer-safe bag. They can be stored in the freezer for up to 2 months. When you’re ready to eat, thaw the wraps in the refrigerator overnight, then reheat them in a skillet to regain their crunchiness!
What should I do if my wraps are soggy?
If your wraps turn out soggy, it could be because of too many wet ingredients or inadequate cooling of the fried chicken. For the next time, make sure to let the chicken rest on paper towels to absorb excess oil. You might also want to add crispy elements like toasted nuts or serve them with a side of crispy fresh vegetables for that satisfying crunch.
Are there any dietary considerations I should keep in mind?
Yes! If you or someone you’re serving has food allergies, be cautious with the use of eggs, dairy, and gluten in the wraps. For gluten-free variations, simply swap the flour tortillas for gluten-free options and use gluten-free breadcrumbs. If making for children or pets, ensure no small bone pieces from the chicken remain inside the wrap.
Crispy Chicken Club Wrap: Crunchy, Creamy, and Oh-So-Tasty
Ingredients
Equipment
Method
- Season the chicken breasts generously with salt and pepper on both sides.
- Prepare three bowls: one with flour, one with beaten eggs, and one with breadcrumbs mixed with garlic powder and paprika.
- Coat the chicken in flour, then dip in eggs, and finally coat in breadcrumbs.
- Heat vegetable oil in a frying pan over medium-high heat until it shimmers.
- Fry the breaded chicken for 5-7 minutes per side until golden brown and cooked through.
- Drain excess oil by placing chicken on paper towels.
- Mix mayonnaise and Dijon mustard together in a bowl until smooth.
- Slice the fried chicken into strips and place onto tortillas with other fillings.
- Roll the tortillas tightly from the bottom up to secure the fillings.
- In a clean skillet, add olive oil and cook the wraps seam side down for 2-3 minutes on each side.
- Slice each wrap in half diagonally and serve immediately.
Leave a Reply