
As the air turns crisp and pumpkins line the streets, I can’t help but feel the excitement building for Halloween festivities, where creativity comes alive in the kitchen! This year, I’m thrilled to share my favorite 12 Halloween dessert ideas that will sweep you and your loved ones off your feet. Among these chillingly delightful options, you’ll find whimsical Halloween Rice Krispie Treats that are not only no-bake and accessible but also provide a playful opportunity for family fun and interactive decorating. Whether you’re hosting a spooky soirée or simply indulging your own sweet tooth, these desserts promise to add a touch of magic and fright to your celebrations. Ready to conjure up some enchanting treats? Let’s dive into the ghoulish goodness!
Why Love These Halloween Rice Krispie Treats?
Creative Fun: These treats provide an interactive experience, inviting everyone to join in on the decorating process and let their imaginations run wild.
Quick and Easy: No baking is required! You can whip up a batch in just minutes, making them perfect for unexpected guests or last-minute parties.
Versatile Decorating: From candy eyeballs to colorful sprinkles, the decorating options are limitless, ensuring your treats fit any Halloween theme.
A Crowd Favorite: These treats are sure to please both kids and adults, mixing nostalgia with a Halloween twist that no one can resist.
Storage Friendly: Make them ahead of time! These treats can easily be stored for days, keeping the spooky spirit alive and sweetening future celebrations.
So grab those Rice Krispies and dive into the fun! For another easy dessert, check out my Butter Shrimp Rice that’s sure to impress.
Halloween Rice Krispie Treats Ingredients
For the Base
- Rice Krispies – The crunchiness of these cereal treats forms the perfect base for your Halloween delights.
- Marshmallows – These help bind the Rice Krispies together, giving that classic gooey texture.
- Butter – Adds richness and helps the marshmallows melt evenly for a smooth mixture.
For the Decorations
- Candy Melts – Use these to coat your Rice Krispie shapes; they come in various colors to match your spooky themes!
- Sprinkles – The colorful additions give a festive touch; go for Halloween-themed shapes like spiders or pumpkins!
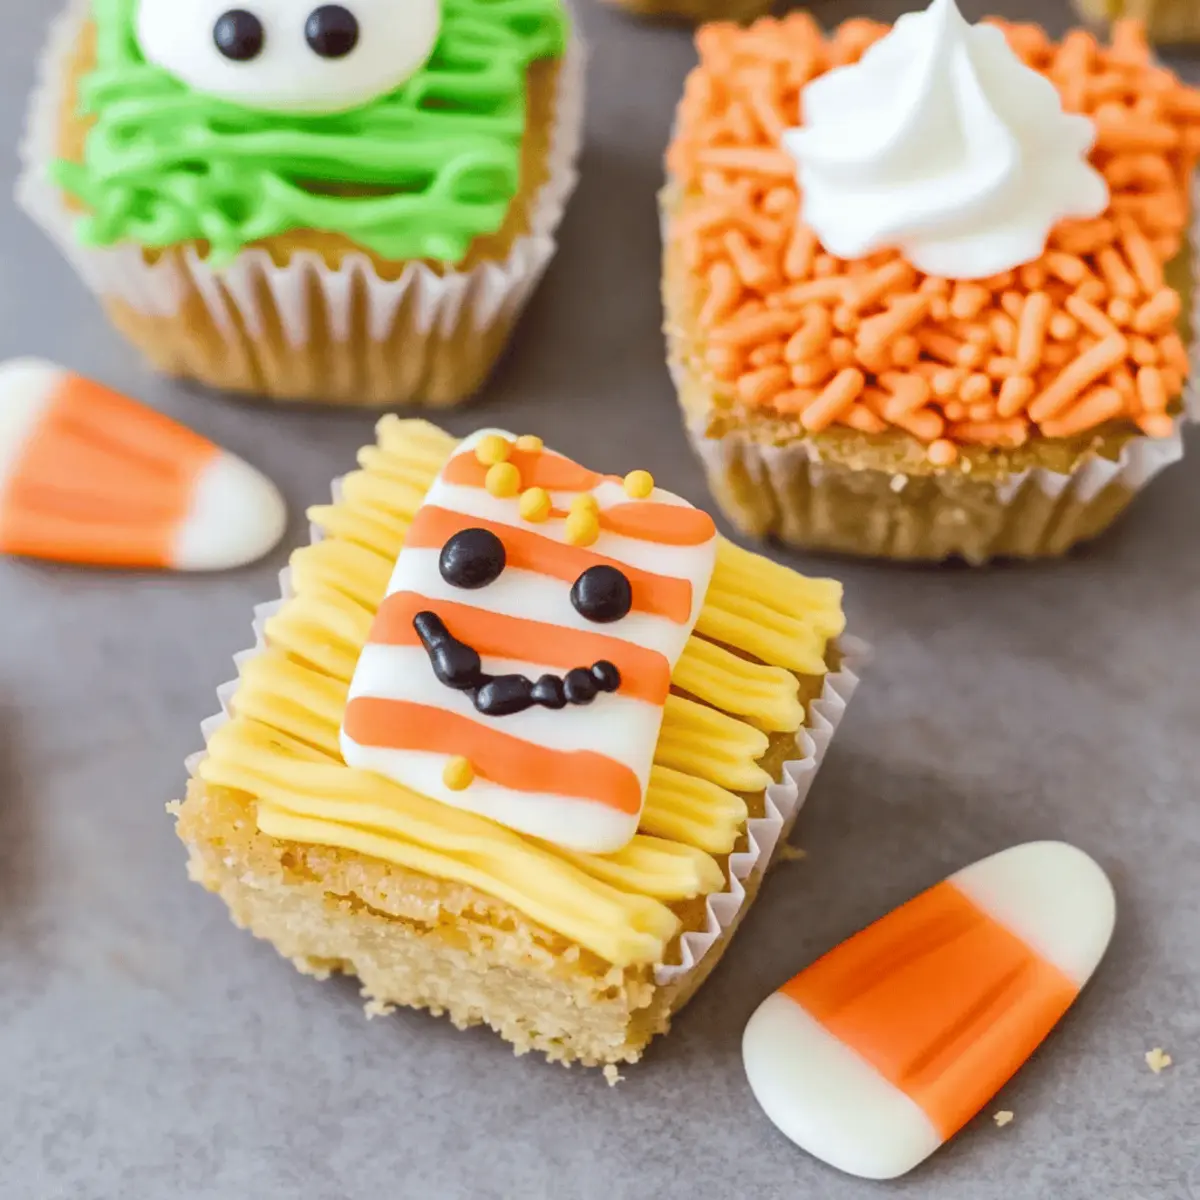
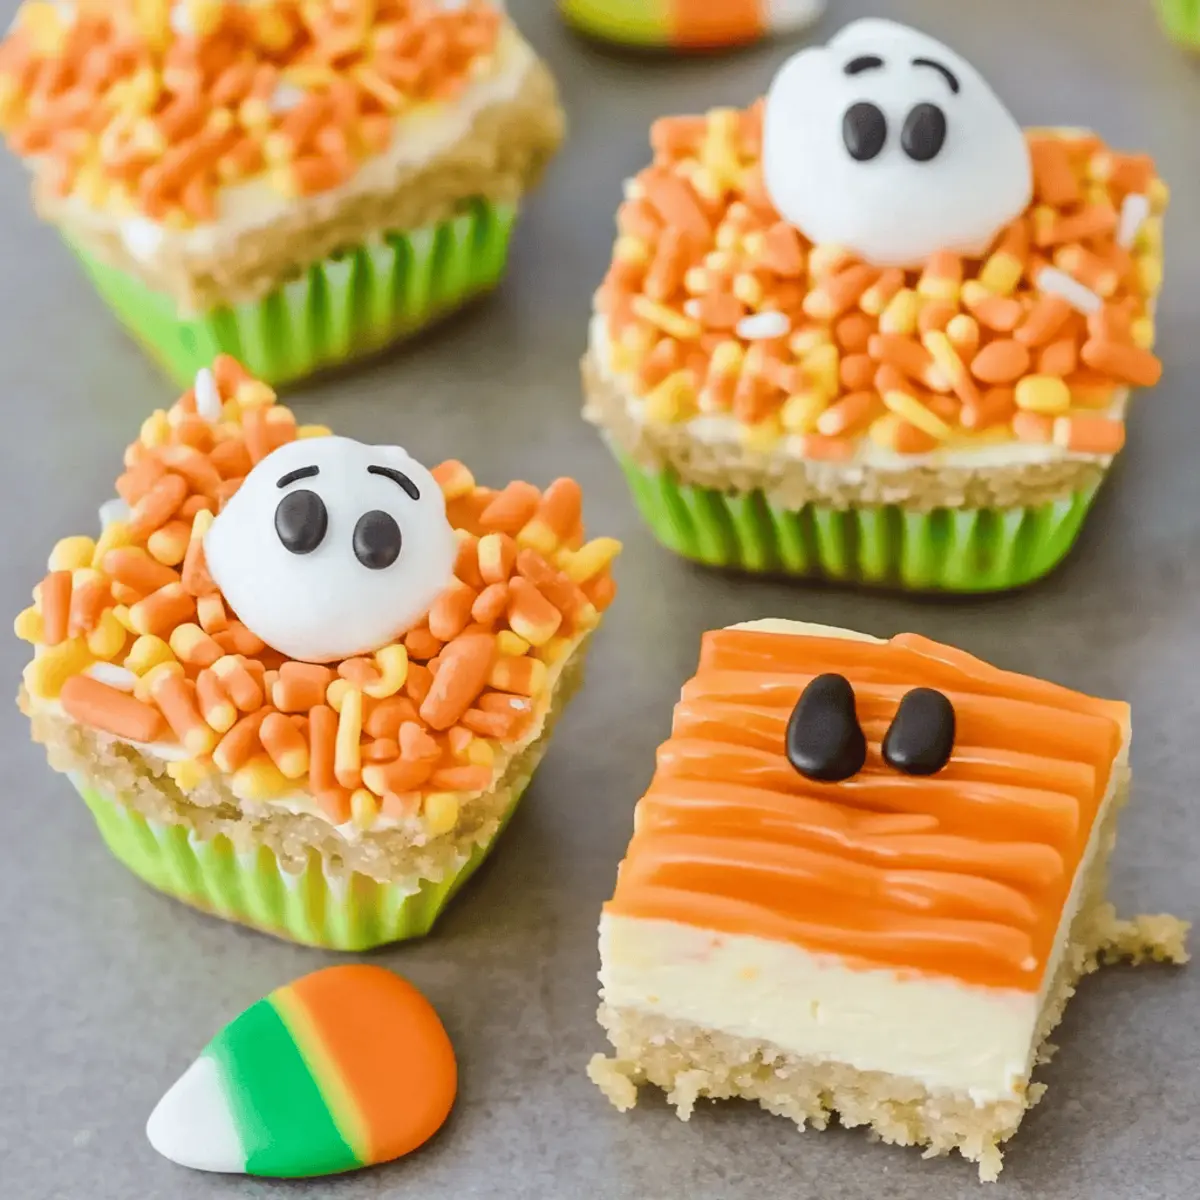
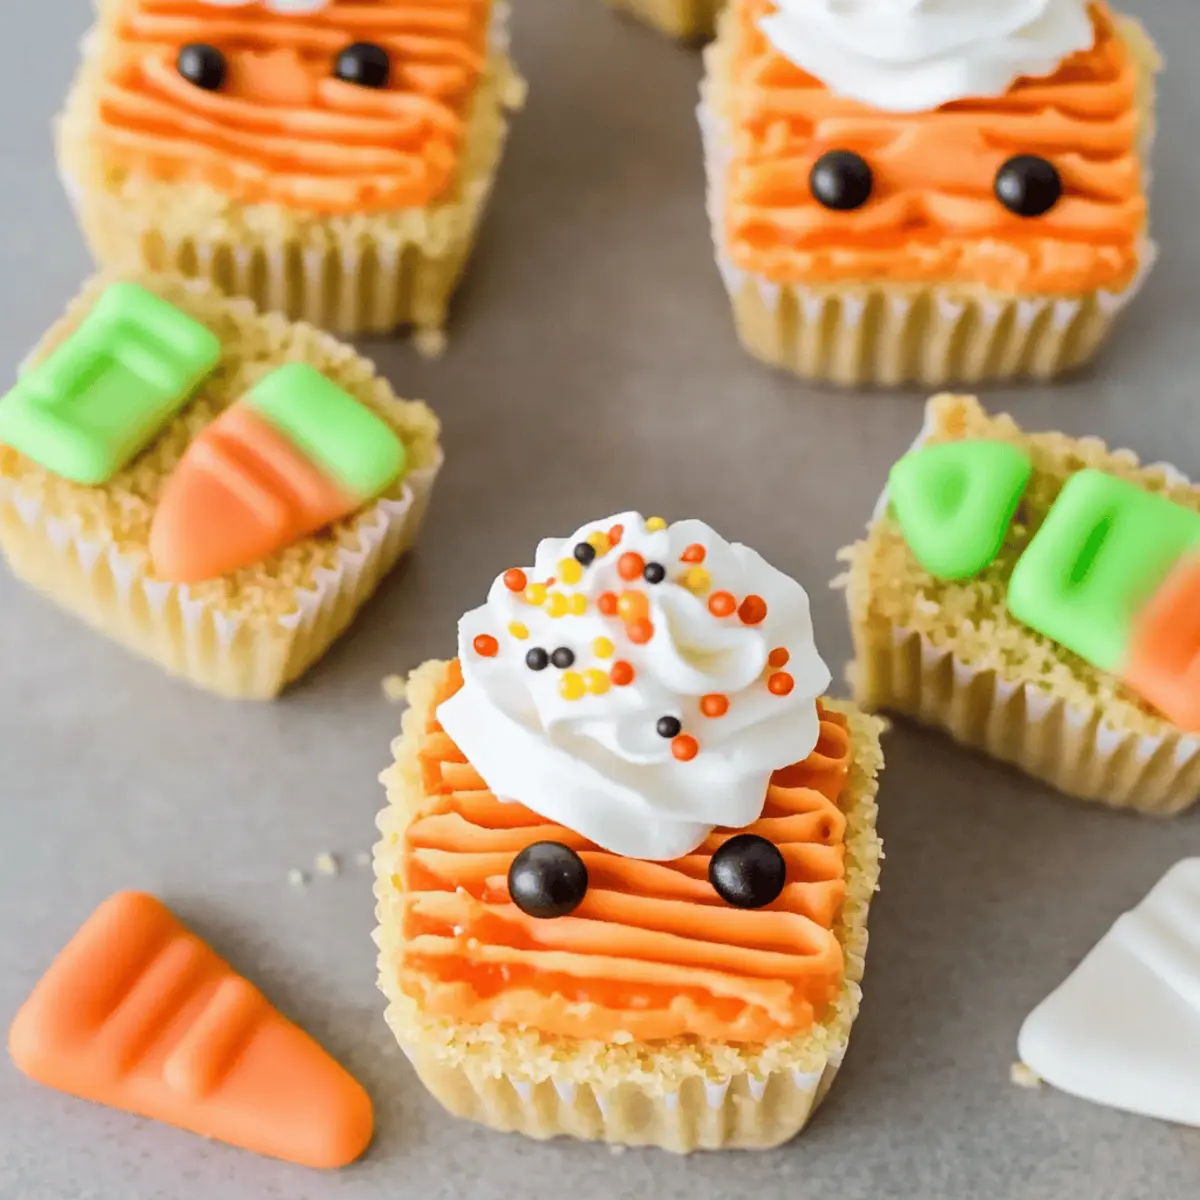
- Candy Eyeballs – A fun way to make your treats look extra creepy and cute; let your creativity run wild!
- Chocolate Chips – These can be melted and drizzled over your treats for added sweetness and an extra layer of fun.
Optional Toppings
- Gummy Worms – Perfect for creating a “dirt” effect or as playful adornments on your treats.
- Edible Glitter – Sprinkle some for a magical, shimmering effect that adds an enchanting touch to your Halloween Rice Krispie Treats.
Now you’re all set to create these spooktacular treats that will charm your guests!
Step‑by‑Step Instructions for Halloween Rice Krispie Treats
Step 1: Melt the Mixture
Begin by gathering a large pot and placing it over medium heat. Add 3 tablespoons of butter and let it melt completely, then stir in a 10-ounce bag of marshmallows until fully melted and smooth. This process should take about 3-5 minutes. Remove the pot from the heat and continue stirring until the mixture is well combined and glossy, creating the base for your Halloween Rice Krispie Treats.
Step 2: Combine Rice Krispies
Next, gently fold in 6 cups of Rice Krispies cereal into the melted marshmallow mixture. Use a large spatula to thoroughly combine the cereal, ensuring each piece is coated with the sticky mix. This should only take about 2 minutes, but make sure there are no dry spots. Once combined, the mixture will have a cohesive feel and be ready for shaping.
Step 3: Shape the Treats
Lightly grease a 9×13-inch baking dish with butter or cooking spray to prevent sticking. Transfer the Rice Krispie mixture into the dish and press it firmly into an even layer using wax paper or greased hands. This should take about 3-4 minutes. Allow the treats to set for at least 30 minutes at room temperature until firm, ensuring a perfect base for your spooky decorations.
Step 4: Cut and Shape
Once the base has set, remove it from the baking dish and place it on a cutting board. Using a sharp knife, cut the Rice Krispie treats into desired shapes, such as squares, rectangles, or even spooky monsters! Plan for about 5-10 minutes of cutting time, and feel free to get creative with your shapes to match your Halloween theme.
Step 5: Melt the Candy Coating
In a microwave-safe bowl, melt your chosen candy melts according to the package instructions—about 30 seconds at a time, stirring in between until smooth. This should take approximately 1-2 minutes total. Once melted, the bright colors will make for playful and festive decorations on your Halloween Rice Krispie Treats.
Step 6: Decorate the Treats
Dip each Rice Krispie shape into the melted candy coating, using a fork to help cover it evenly. Allow excess to drip off, then place on a baking sheet lined with parchment paper. Quickly add sprinkles or candy eyeballs while the coating is still wet, making these treats look spooky and fun. This decorating process should take around 10-15 minutes.
Step 7: Set and Serve
Let the decorated treats sit at room temperature until the candy coating hardens—this may take about 15-20 minutes. For a special touch, sprinkle some edible glitter on top before serving. Once set, arrange your Halloween Rice Krispie Treats on a festive platter, ready to delight your guests with whimsical flavors and eerie fun!
How to Store and Freeze Halloween Rice Krispie Treats
-
Room Temperature: Keep your Halloween Rice Krispie Treats in an airtight container at room temperature for up to 5 days. This maintains their delightful texture and taste.
-
Fridge: If you prefer a slightly firmer treat, store them in the refrigerator for up to a week. Just remember to let them come to room temperature before serving for the best flavor.
-
Freezer: For longer storage, wrap the treats tightly in plastic wrap and place them in a freezer-safe container. They can be frozen for up to 3 months. Thaw in the fridge overnight before enjoying.
-
Reheating: There’s no need to reheat these treats, but if they lose some of their shape after freezing, simply let them sit at room temperature for a bit before serving again.
Make Ahead Options
These Halloween Rice Krispie Treats are perfect for busy home cooks seeking to save time during the spooky season! You can prepare the base—melted marshmallow and Rice Krispies—up to 3 days in advance, allowing it to set in the baking dish. Just cover it tightly with plastic wrap to prevent drying out. When you’re ready to decorate, simply cut the prepared base into your desired shapes and dip into melted candy melts, then finish with sprinkles and candy eyeballs. This way, you can enjoy the festive spirit without the last-minute rush, ensuring your treats are just as delicious and visually enchanting when it’s time to celebrate!
Halloween Rice Krispie Treats Variations
Make these Halloween Rice Krispie Treats your own with these fun swaps and additions that will tickle your taste buds!
- Flavor Infusion: Add a splash of vanilla extract to the melted marshmallow mixture for a comforting flavor boost.
- Crispy Textures: Mix in some crushed pretzels or nuts for an unexpected crunch that complements the sweetness beautifully.
- Fun Shapes: Use cookie cutters to cut your treats into spooky shapes like bats and pumpkins for added festive flair.
- Different Cereals: Swap Rice Krispies for Cocoa Krispies for a chocolatey twist that your kids will adore!
- Peanut Butter Touch: Stir in some creamy peanut butter with the melted marshmallows for a nutty flavor that pairs perfectly with chocolate decorations.
- Gummy Decorations: Use gummy spiders and creepy crawlers to top your treats, taking “spooky” to a new level!
- Alternative Coatings: Instead of candy melts, try dipping in melted chocolate for a richer taste that’s sure to delight.
- Colorful Layers: Create a layered effect by using food coloring to tint the melted marshmallows, giving your treats an enticing rainbow look.
The beauty of these desserts lies in their versatility—the possibilities are endless! If you’re on the lookout for even more delightful desserts, consider trying the Chinese Fried Rice or the whimsical Butter Shrimp Rice to complement your Halloween festivities!
What to Serve with Halloween Rice Krispie Treats?
Indulging in these whimsical treats creates the perfect opportunity to craft a delightful Halloween-inspired spread that your guests will love.
- Spooky Punch: A bubbly, fruit-infused drink that adds a festive flair to your Halloween gathering with its colorful presentation.
- Creamy Pumpkin Soup: This warm, comforting soup pairs perfectly by balancing the sweetness of the treats with its savory flavor.
- Caramel Apples: A classic fall favorite that offers a crunchy contrast to the soft, sweet Rice Krispie treats, delighting the senses.
- Monster Veggie Platter: A playful display of fresh vegetables arranged to resemble spooky creatures, providing a healthy counterbalance.
- Chocolate-Covered Strawberries: These add a touch of elegance and sweetness, easily decorated to match your Halloween theme.
- Mummy Dogs: Fun, savory bites wrapped in crescent dough, creating a delightful contrast in flavors alongside the sweet treats.
- Candy Corn Parfaits: Layered cups that echo the Rice Krispie Treat’s playfulness; these add a visually appealing element to your dessert table.
- Autumn Spiced Cupcakes: Festively spiced and moist, these cupcakes will complement your treats while offering an additional sweet option to enjoy.
- Hot Apple Cider: This warm and aromatic drink enhances the cozy fall vibe, making it a comforting accompaniment to your spooky soirée.
- Ghostly Marshmallow Milkshakes: Creamy and fun, these delectable milkshakes mirror the playful spirit of your Halloween Rice Krispie treats!
Tips for the Best Halloween Rice Krispie Treats
-
Use Fresh Ingredients: Ensure your marshmallows and Rice Krispies are fresh for the best flavor and texture. Stale ingredients can lead to a tough treat that doesn’t set well.
-
Grease Hands Well: When shaping the treats, grease your hands with butter or cooking spray to prevent the mixture from sticking. This makes it easier to mold them into fun shapes.
-
Melt Gently: Always melt the candy melts in short intervals to avoid burning. Stir continuously until smooth, as the vibrant colors play a crucial role in your Halloween Rice Krispie Treats’ appeal.
-
Layer Up: If you’re feeling adventurous, create layers of different colored rice krispies, alternating with the candy coating for a striped effect. It adds visual interest to your treats!
-
Go Wild with Decorations: Don’t hold back on sprinkles, candy eyeballs, and gummy worms! Remember, the more creative you get, the more fun these treats will be for everyone involved.
-
Storage Savvy: Store your treats in an airtight container at room temperature. Proper storage keeps them fresh and delicious for days, extending the spooky vibes!
Halloween Rice Krispie Treats Recipe FAQs
How do I choose the right marshmallows?
Absolutely! For the best flavor and texture in your Halloween Rice Krispie Treats, opt for fresh, standard-sized marshmallows. Mini marshmallows can also work, but ensure they are not stale, as this can create a tough texture that won’t set well.
What’s the best way to store leftovers?
Storing your Halloween Rice Krispie Treats is quite simple! Keep them in an airtight container at room temperature for up to 5 days, maintaining their delightful chewiness. If you want a firmer treat, refrigeration is another option, and they’ll last up to a week this way. Just allow them to warm slightly before serving for optimal taste.
Can I freeze these Rice Krispie Treats?
Yes, you can! To freeze your Halloween Rice Krispie Treats, wrap them tightly in plastic wrap and place them in a freezer-safe container. They will hold well for up to 3 months. When you’re ready to enjoy them, simply thaw them in the fridge overnight, and they’ll be ready to delight your family again.
What if my treats are too sticky or crumbly?
Very good question! If your treats are turning out too sticky, it’s often due to using too many marshmallows or not greasing your hands or the dish well enough. To remedy this, you can add a bit more Rice Krispies to the mix, or simply use your greased hands to mold them tightly. If they’re crumbling, ensure you’ve pressed them firmly into your dish and allowed the mixture to cool completely before cutting.
Are these treats safe for kids with allergies?
Always check the label! While Rice Krispie Treats are generally safe, they may contain allergens like gluten or dairy, depending on the brand of Rice Krispies and marshmallows used. For allergen-sensitive individuals, look for gluten-free Rice Krispies and avoid specific toppings that could trigger allergies, like certain chocolate brands or sprinkles.
Can I customize the decorations for different themes?
Absolutely! The beauty of Halloween Rice Krispie Treats lies in their versatility. You can swap out decorations based on your theme—think spooky eyeballs for Halloween, or fun holiday colors for Christmas. Just let your imagination run wild! Enjoy the process and make it a fun family activity.

Halloween Rice Krispie Treats that Delight with Spooky Fun
Ingredients
Equipment
Method
- Melt the Mixture: In a large pot over medium heat, melt 3 tablespoons of butter. Stir in 10 ounces of marshmallows until melted and smooth, about 3-5 minutes.
- Combine Rice Krispies: Fold in 6 cups of Rice Krispies cereal into the melted marshmallow mixture, ensure all are well coated, about 2 minutes.
- Shape the Treats: Grease a 9x13-inch baking dish, press the mixture into an even layer using wax paper or greased hands. Let set for at least 30 minutes.
- Cut and Shape: Once set, cut the treats into desired shapes like squares or spooky monsters, about 5-10 minutes.
- Melt the Candy Coating: Melt candy melts in a microwave-safe bowl in 30-second intervals, stirring until smooth, about 1-2 minutes.
- Decorate the Treats: Dip shapes in melted candy coating, add sprinkles or candy eyeballs while still wet. Let sit on parchment-lined baking sheet.
- Set and Serve: Allow decorated treats to sit until candy coating hardens, about 15-20 minutes. Optionally, sprinkle edible glitter before serving.
Leave a Reply