
As I stood in my kitchen, a burst of creativity struck me—instantly inspiring me to reimagine traditional sushi into something uniquely delightful. Enter these Easy Spicy Salmon Sushi Cups! Perfectly combining crunchy nori and a luscious spicy salmon filling atop seasoned sushi rice, they’re a crowd-pleaser that can be prepared in just 25 minutes. Whether you’re hosting a cozy dinner or simply want to impress on a weeknight, this recipe serves up a unique twist on familiar flavors that’s as fun to make as it is to eat. With gluten-free options available, they cater to everyone at your table, making these sushi cups a delectable and accessible appetizer. Curious to know how to whip them up and elevate your cooking game? Let’s dive in!

Why are Sushi Cups So Appealing?
Crispy nori gives a delightful crunch, perfectly contrasting with the rich salmon filling. The quick preparation time of just 25 minutes makes these a fantastic last-minute solution for guests. Gluten-free options ensure everyone can enjoy this dish, while the customizable toppings allow creativity, whether you’re using avocado or adding extra spices. Ideal for a cozy night in or a party, these Spicy Salmon Sushi Cups will surely impress! Plus, they’re a great way to break away from the usual fast food routine. Want to round out your meal? Pair it with some Salmon Croquettes Savory for a delicious duo!
Spicy Salmon Sushi Cups Ingredients
For the Salmon Filling
- Salmon – Fresh salmon provides a rich flavor; for a vegetarian option, try plant-based seafood alternative or cubed tofu.
- Kewpie Mayonnaise – Adds creaminess and depth; use regular mayonnaise for a different taste or dairy-free mayo for a vegan version.
- Sriracha – Adds a kick of heat; feel free to omit for a milder flavor if desired.
- Sesame Oil – Introduces a delightful nutty aroma to the filling.
- Soy Sauce – Provides umami flavor; opt for gluten-free soy sauce to keep this dish accessible to all.
For the Sushi Cups
- Nori Sheets – The crunchy cup structure needs to be cut into squares before assembling.
- Sushi Rice – Serves as the base; sticky Jasmine rice can also work as a substitute.
- Rice Wine Vinegar – Enhances the flavor of sushi rice, providing that authentic taste.
For the Toppings
- Optional Spicy Mayo – Combine additional Kewpie mayonnaise with sriracha for drizzling on top for a flavor boost.
- Green Onions – Fresh garnish that adds color and crunch to your sushi cups.
- Sesame Seeds – Optional garnish that adds texture and flavor, enhancing the overall presentation.
With these key ingredients, you’ll be well on your way to crafting mouthwatering Spicy Salmon Sushi Cups that your family and friends will adore!
Step‑by‑Step Instructions for Spicy Salmon Sushi Cups
Step 1: Preheat the Oven
Begin your culinary adventure by preheating your oven to 400°F (200°C). This will ensure that your Spicy Salmon Sushi Cups bake evenly and achieve that perfect crispiness. While the oven heats up, gather your ingredients and set up your workspace for a smooth cooking experience.
Step 2: Prepare the Sushi Rice
Cook the sushi rice according to package directions, usually in a rice cooker or on the stovetop with the right water ratio. Once cooked, gently mix in rice wine vinegar while the rice is still warm, allowing it to enhance the flavor. Set the rice aside to cool slightly while you prepare the other components.
Step 3: Make the Salmon Filling
In a mixing bowl, combine cubed fresh salmon with Kewpie mayonnaise, sriracha, sesame oil, and soy sauce. Stir until the salmon is well-coated and the mixture is creamy and vibrant. Allow this filling to sit for about 10 minutes, letting all those bold flavors meld together before using them in your sushi cups.
Step 4: Prepare the Nori Squares
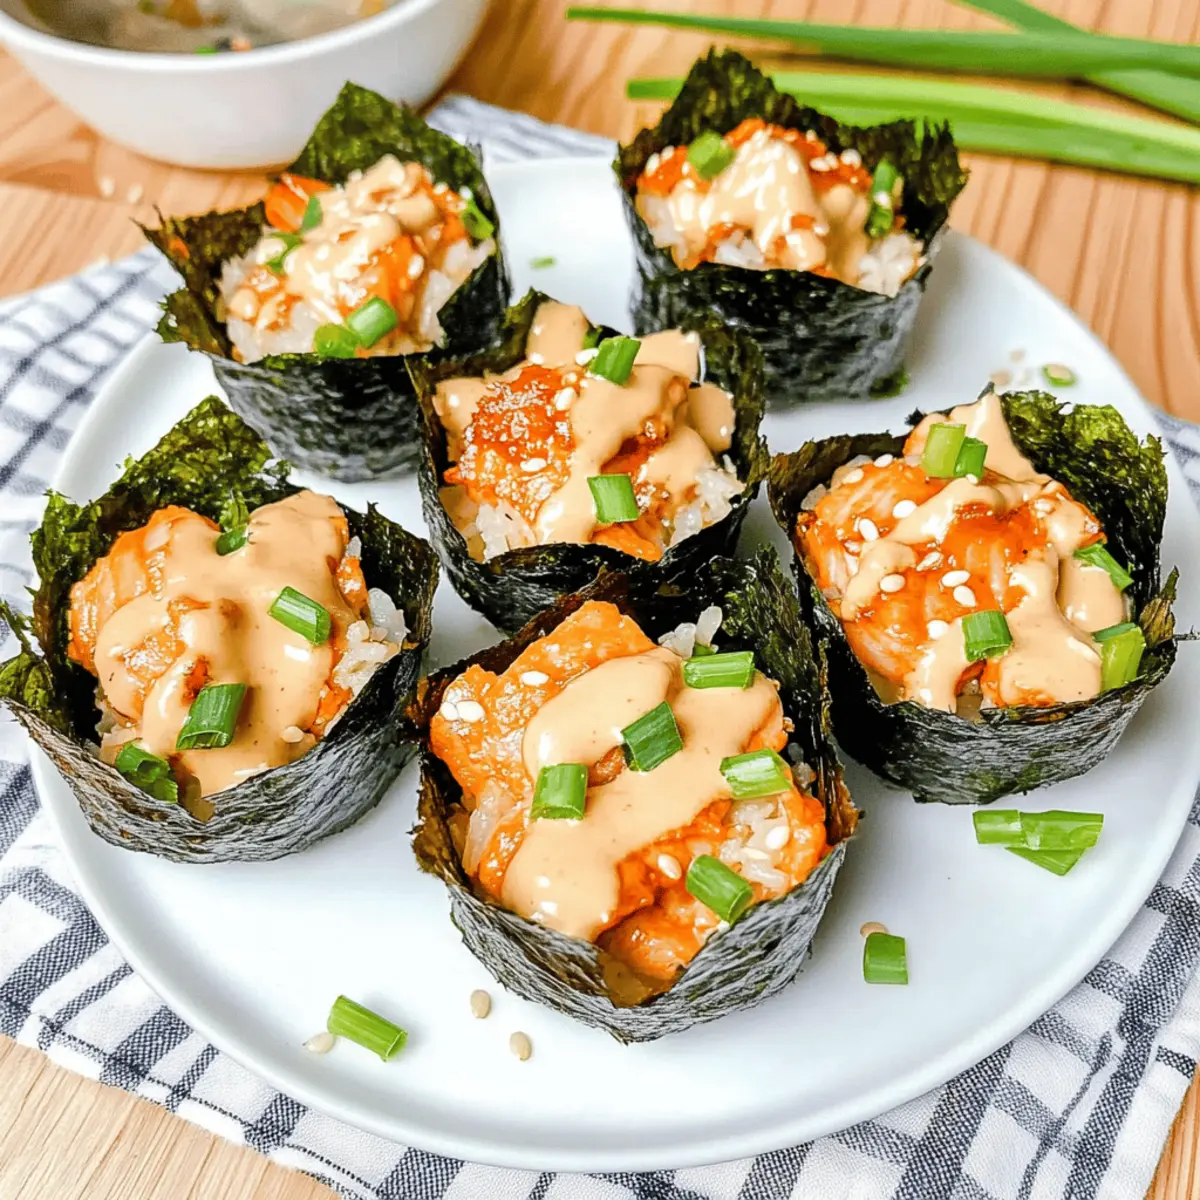
Now it’s time to shape the sushi cups! Cut your nori sheets into squares, approximately 4 inches by 4 inches. Place about 2 tablespoons of the seasoned sushi rice in the center of each nori square. Gently fold the edges of the nori up around the rice to create a cup shape, making sure to keep it anchored in the muffin tin for support.
Step 5: Fill the Sushi Cups
Spoon 2 tablespoons of the creamy salmon mixture into each rice-filled nori cup, spreading it slightly to ensure even coverage. The filling should be generously piled on top, creating a beautiful contrast with the crunchy nori base. Make sure each cup is filled to create delightful bites full of flavor.
Step 6: Bake the Sushi Cups
Carefully place the muffin tin in your preheated oven and bake for 8-9 minutes. You’ll know they are done when the salmon is cooked through and the nori is crispy but not burnt. For an extra touch, you can broil the cups for an additional 1-2 minutes to achieve a golden crisp top.
Step 7: Add Finishing Touches
Once baked, remove the sushi cups from the oven and let them cool slightly. Drizzle with the optional spicy mayo, made by mixing Kewpie mayonnaise with sriracha. Then, garnish your Spicy Salmon Sushi Cups with fresh green onions and a sprinkle of sesame seeds for added crunch and a pop of color. Serve warm and watch them disappear!

Expert Tips for Spicy Salmon Sushi Cups
• Keep Rice Centered: Ensure the sushi rice is centered in the nori to create a stable cup structure; avoid pressing it to the edges.
• Flavor Boost: Allow the salmon mixture to marinate for at least 10 minutes to enhance the flavors of your Spicy Salmon Sushi Cups.
• Crispy Nori: For perfect crispness, bake just until the salmon is cooked through; consider broiling for a minute for extra crunch.
• Garnish Wisely: Fresh green onions and sesame seeds not only add flavor but also elevate the presentation of your sushi cups.
• Freezing Tips: If freezing, cool the sushi cups completely to maintain their texture when reheated.
Make Ahead Options
These Spicy Salmon Sushi Cups are a fantastic meal prep option for busy weeknights! You can prepare the salmon filling and the sushi rice up to 24 hours in advance. Simply mix the salmon with Kewpie mayonnaise, sriracha, sesame oil, and soy sauce, allowing the flavors to meld while refrigerated. Additionally, you can cut the nori sheets and store them separately to maintain their crispness. When you’re ready to serve, assemble the cups and bake them for 8-9 minutes until they are hot and crispy. This way, you’ll have delicious homemade sushi cups with minimal effort, making them just as delightful as when freshly made!
How to Store and Freeze Spicy Salmon Sushi Cups
Room Temperature: Best enjoyed fresh, but if left out, consume within 2 hours to ensure freshness and safety.
Fridge: Store leftovers in an airtight container for up to 3-4 days. Reheat them in the oven for a few minutes to restore their crispiness before serving.
Freezer: For longer preservation, layer cooled sushi cups in an airtight container with parchment paper between them, and freeze for up to 1 month.
Reheating: Thaw in the fridge overnight and reheat in the oven at 350°F (175°C) for about 10 minutes to regain that delightful texture of your Spicy Salmon Sushi Cups.
Spicy Salmon Sushi Cups Variations
Feel free to get creative and adapt these sushi cups to suit your taste and dietary preferences!
-
Dairy-Free: Substitute Kewpie mayonnaise with a creamy dairy-free mayo for a vegan-friendly twist.
Elevate the flavor by experimenting with plant-based ingredients that pack a punch! -
Plant-Based Option: Replace salmon with cubed tofu or a plant-based seafood alternative for delicious, vegetarian sushi cups.
This swap offers a new texture and flavor, perfect for meatless days! -
Add Avocado: Top the salmon filling with thin slices of avocado for a creamy contrast.
Avocado adds a delightful richness that balances the spicy kick perfectly! -
Teriyaki Glaze: Swap sriracha for a teriyaki sauce to introduce a sweet, savory flavor profile.
This variation brings a different twist that can be a great introduction for those unfamiliar with sushi! -
Spicy Tuna Twist: Try using a spicy tuna mixture instead of salmon for a different seafood flavor.
This variation is just as delightful and caters to other seafood lovers at your table! -
Heat Level: Reduce or increase the amount of sriracha according to your preferred spice level.
You can even add fresh jalapeños for an extra zing that will keep your taste buds dancing! -
Crunchy Add-ins: Mix in chopped cucumbers or radishes into the salmon filling for an extra crunch.
This twist will elevate the textures in each bite, making your sushi cups even more enticing! -
Garnish Variations: Experiment with different toppings like jalapeños, pickled ginger, or togarashi seasoning for added flair.
These garnishes create a colorful and flavorful topping that’ll impress your guests while keeping the dish vibrant!
Now that you’ve got these fun ideas, feel free to explore and personalize your Spicy Salmon Sushi Cups! And remember, if you’re looking for more creative recipes, check out these delightful Breakfast Granola Cups that make mornings just as tasty!
What to Serve with Easy Spicy Salmon Sushi Cups
Transform your delightful sushi cups into a full-fledged culinary experience that tantalizes the senses.
- Edamame: Lightly salted, crisp edamame beans enhance the meal with a satisfying crunch and protein boost, perfect for snacking.
- Cucumber Salad: A refreshing mix of thinly sliced cucumber, rice vinegar, and sesame oil balances the spice of the sushi cups, offering a palate-cleansing contrast.
- Miso Soup: A warm, umami-rich miso soup rounds out the experience by warming up the palate, perfect alongside your sushi cups in chilly weather.
- Ginger Soy Dressing Salad: Light greens tossed in a zesty ginger soy dressing bring brightness and zest, complementing the flavors of the spicy salmon beautifully.
- Tempura Vegetables: These crispy fried vegetables add an intriguing texture contrast to your meal while showcasing delicious seasonal veggies.
- Sake: A chilled glass of sake, whether sweet or dry, elevates the meal, pairing seamlessly with the rich flavors of the sushi cups.
- Mango Sticky Rice: For a sweet ending, this dessert’s creamy coconut and luscious mango create a delightful conclusion to your Japanese-inspired meal.
- Green Tea: Warm green tea serves as a comforting beverage that aids digestion and enhances the overall dining experience with its delicate flavors.
- Pickled Ginger: Offering a sharp bite, pickled ginger provides a refreshing intermezzo between bites, cleansing your taste buds for the next delicious sushi cup.
Spicy Salmon Sushi Cups Recipe FAQs
How do I select ripe Salmon for my sushi cups?
Absolutely! When selecting salmon, look for bright, vibrant color with no dark spots. The flesh should be firm to the touch, and keep it refrigerated, ideally not longer than 1-2 days before using. Fresh salmon transported on ice can enhance flavor immensely.
What is the best way to store leftover Spicy Salmon Sushi Cups?
Very! You can store your sushi cups in an airtight container in the refrigerator for 3-4 days. It is best to reheat them gently in the oven at 350°F (175°C) for about 5-10 minutes prior to serving, to restore their delightful crunch.
Can I freeze Spicy Salmon Sushi Cups?
Definitely! To freeze, let the sushi cups cool completely, then layer them in an airtight container with parchment paper between each layer to prevent sticking. These cups can be frozen for up to 1 month. Thaw overnight in the fridge and reheat in the oven for optimal texture before enjoying.
What if my sushi rice is too sticky or too dry?
No worries! If your sushi rice is too sticky, it might be due to overcooking or using too much water. You can remedy it by rinsing it under cold water to remove excess starch and fluffing it with a fork. Conversely, if too dry, you can sprinkle a bit of water, cover it, and let it steam on low heat until it softens.
Are there any dietary considerations for making these sushi cups?
Very much so! For gluten-free options, be sure to use gluten-free soy sauce and check your mayonnaise brand for gluten-free labeling. For a vegetarian alternative, substitute fresh salmon with cubed tofu or a plant-based seafood substitute. Always check for any individual allergies, especially if serving to guests!
How do I know when the salmon in my sushi cups is fully cooked?
Absolutely! Your sushi cups should bake for about 8-9 minutes until the salmon is opaque and flakes easily when tested with a fork. For an extra crispy top, broil for an additional 1-2 minutes, keeping a close eye to avoid burning.

Savory Spicy Salmon Sushi Cups for a Fun Twist at Home
Ingredients
Equipment
Method
- Preheat your oven to 400°F (200°C).
- Cook the sushi rice according to package directions and mix in rice wine vinegar.
- Combine cubed salmon with Kewpie mayo, sriracha, sesame oil, and soy sauce. Let sit for 10 minutes.
- Cut nori sheets into squares. Place sushi rice in center and fold nori around to create cups.
- Spoon salmon mixture into each rice-filled nori cup.
- Bake the sushi cups for 8-9 minutes until salmon is cooked and nori is crispy.
- Drizzle with spicy mayo and garnish with green onions and sesame seeds before serving.
Leave a Reply