
As the chill of autumn settles in, there’s a certain magic in the air that whispers of cozy gatherings and delectable treats. Enter the No Bake Pumpkin Cheesecake Balls, a delightful fusion of creamy cheesecake and warm pumpkin spice that’s both easy to make and a total crowd-pleaser. This no-bake dessert captures the essence of fall without the fuss of turning on the oven, making it perfect for busy hosts like us who want to impress. Plus, these bite-sized wonders can easily be tailored to fit gluten-free or vegan diets, so everyone can enjoy! Are you ready to dive into this simply delicious recipe that’s bound to become a seasonal favorite?
Why Are No Bake Pumpkin Cheesecake Balls Perfect?
Effortless Preparation: These No Bake Pumpkin Cheesecake Balls are the ultimate solution for time-strapped bakers. You’ll love how simple it is to whip up this crowd-pleasing treat with minimal effort!
Delicious Flavor: Imagine the creamy richness of cheesecake paired with the warm spices of pumpkin; it’s like autumn on your palate!
Customizable Options: Enjoy the flexibility to cater to various dietary needs, whether you prefer gluten-free or vegan adaptations. Everyone can indulge!
Impressive Bite-Sized Treats: Perfect for gatherings, these little bites pack a punch in flavor while being easy to serve alongside drinks, like spiced chai tea or apple cider mimosas.
Take your dessert game up a notch and try these alongside Baked Parmesan Zucchini for a complete fall meal!
No Bake Pumpkin Cheesecake Balls Ingredients
For the Cheesecake Mixture
• Cream Cheese – Provides the classic cheesecake flavor and creamy texture; opt for low-fat cream cheese if you desire a lighter version.
• Pumpkin Puree – The star ingredient delivering rich pumpkin flavor; canned pure pumpkin works best for convenience.
• Powdered Sugar – Sweetens the mixture while keeping it smooth; consider using a sugar alternative for a lower sugar option.
• Pumpkin Spice – A blend of cinnamon, nutmeg, and cloves to enhance the pumpkin flavor; adjust to your taste preference.
• Vanilla Extract – Adds depth and warmth to the mixture; use pure vanilla for the best flavor.
For the Coating
• Graham Crackers – Adds structure and flavor; feel free to swap with crushed gingersnap cookies for a spicier kick. Gluten-free graham crackers are available for those with dietary restrictions.
Each ingredient combines seamlessly to create the ultimate No Bake Pumpkin Cheesecake Balls, ensuring every bite is a taste of autumn delight!
Step‑by‑Step Instructions for No Bake Pumpkin Cheesecake Balls
Step 1: Prepare Cheesecake Mixture
In a mixing bowl, beat 8 ounces of softened cream cheese with an electric mixer on medium speed until smooth and creamy, about 2 minutes. Add in 1 cup of canned pumpkin puree, ¾ cup of powdered sugar, 1 teaspoon of pumpkin spice, and 1 teaspoon of vanilla extract. Mix until everything is fully combined and the mixture is velvety.
Step 2: Incorporate Graham Crackers
Gradually stir in 1 cup of crushed graham crackers to the cheesecake mixture, mixing until the texture becomes thicker and holds together. The combination should be thick enough to scoop and mold into shapes. If it appears too loose, add a bit more graham cracker crumbs for proper consistency.
Step 3: Chill Mixture
Cover the bowl with plastic wrap or a lid and refrigerate for about 1 to 2 hours. This chilling time allows the flavors to meld beautifully while firming up the mixture, making it easier to work with when shaping the cheesecake balls.
Step 4: Shape Balls
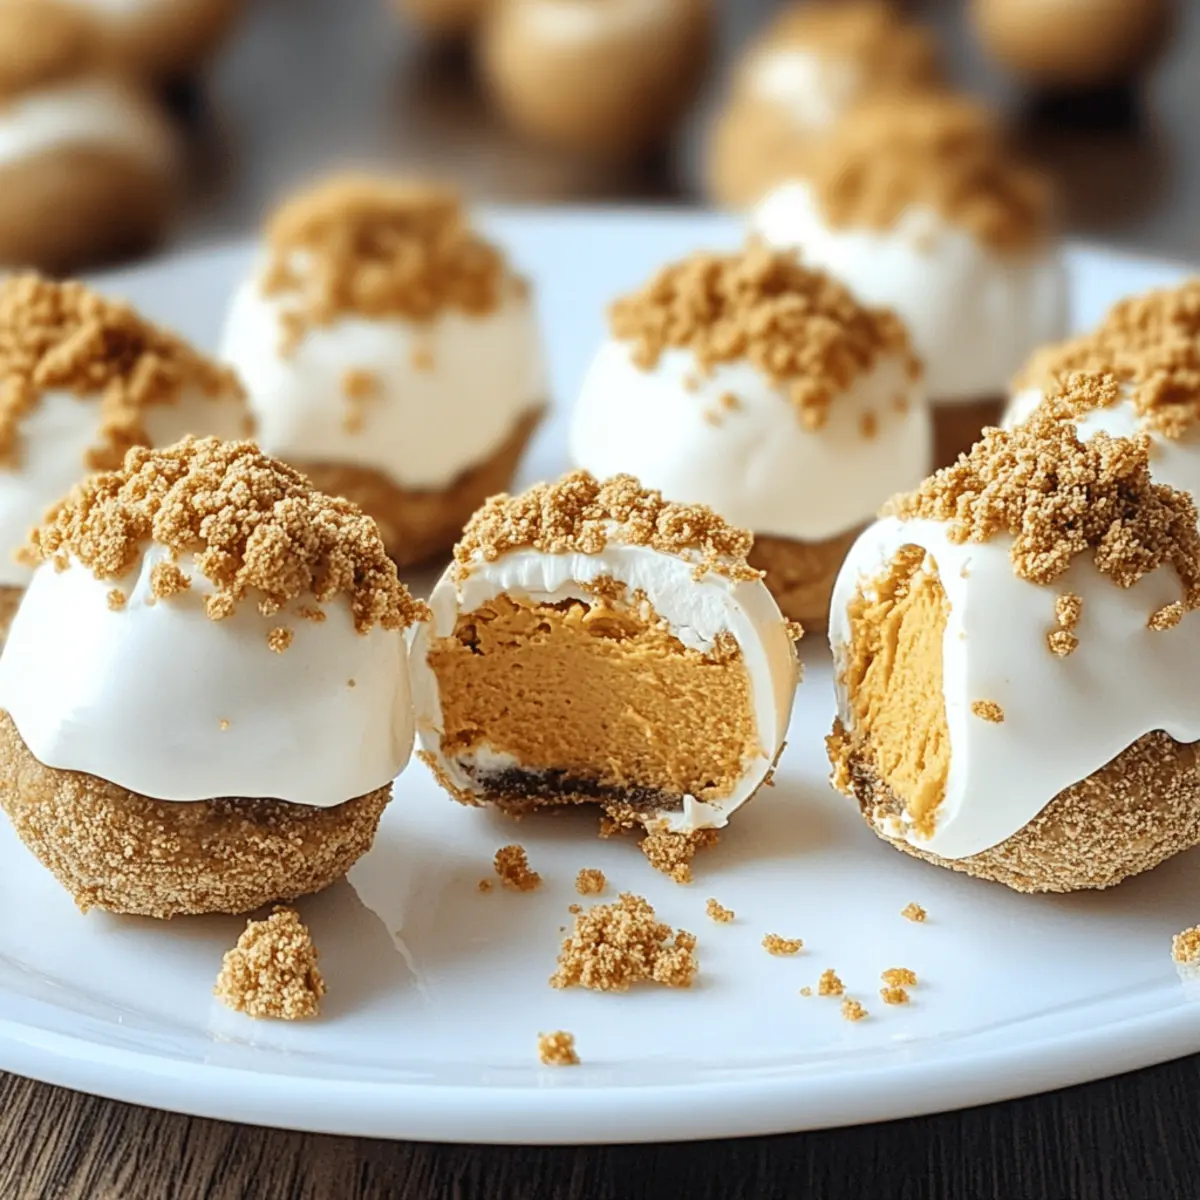
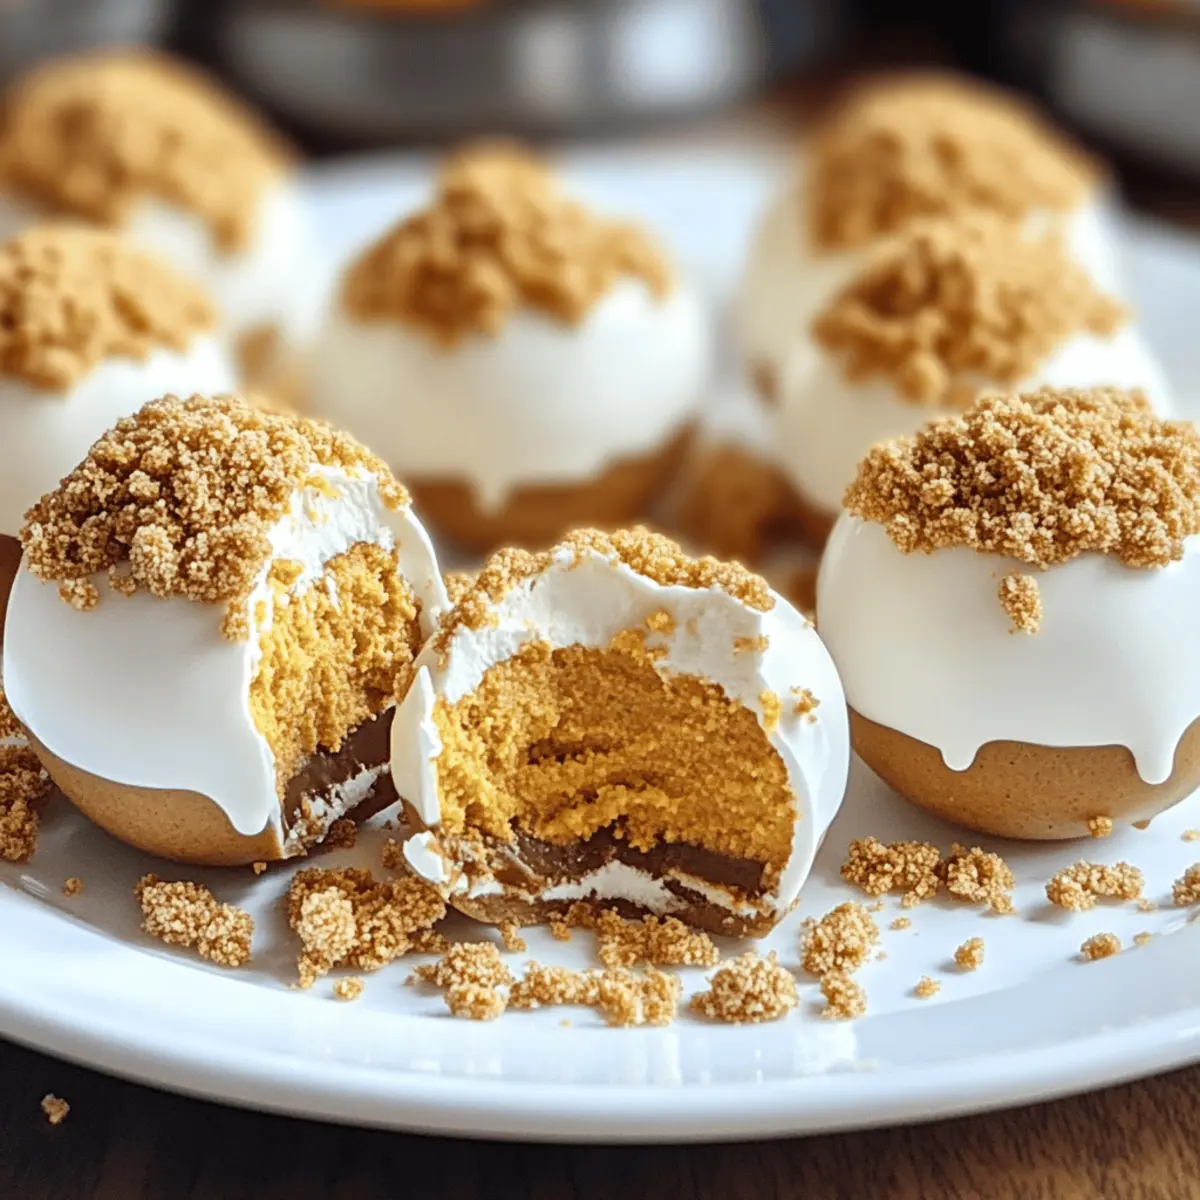
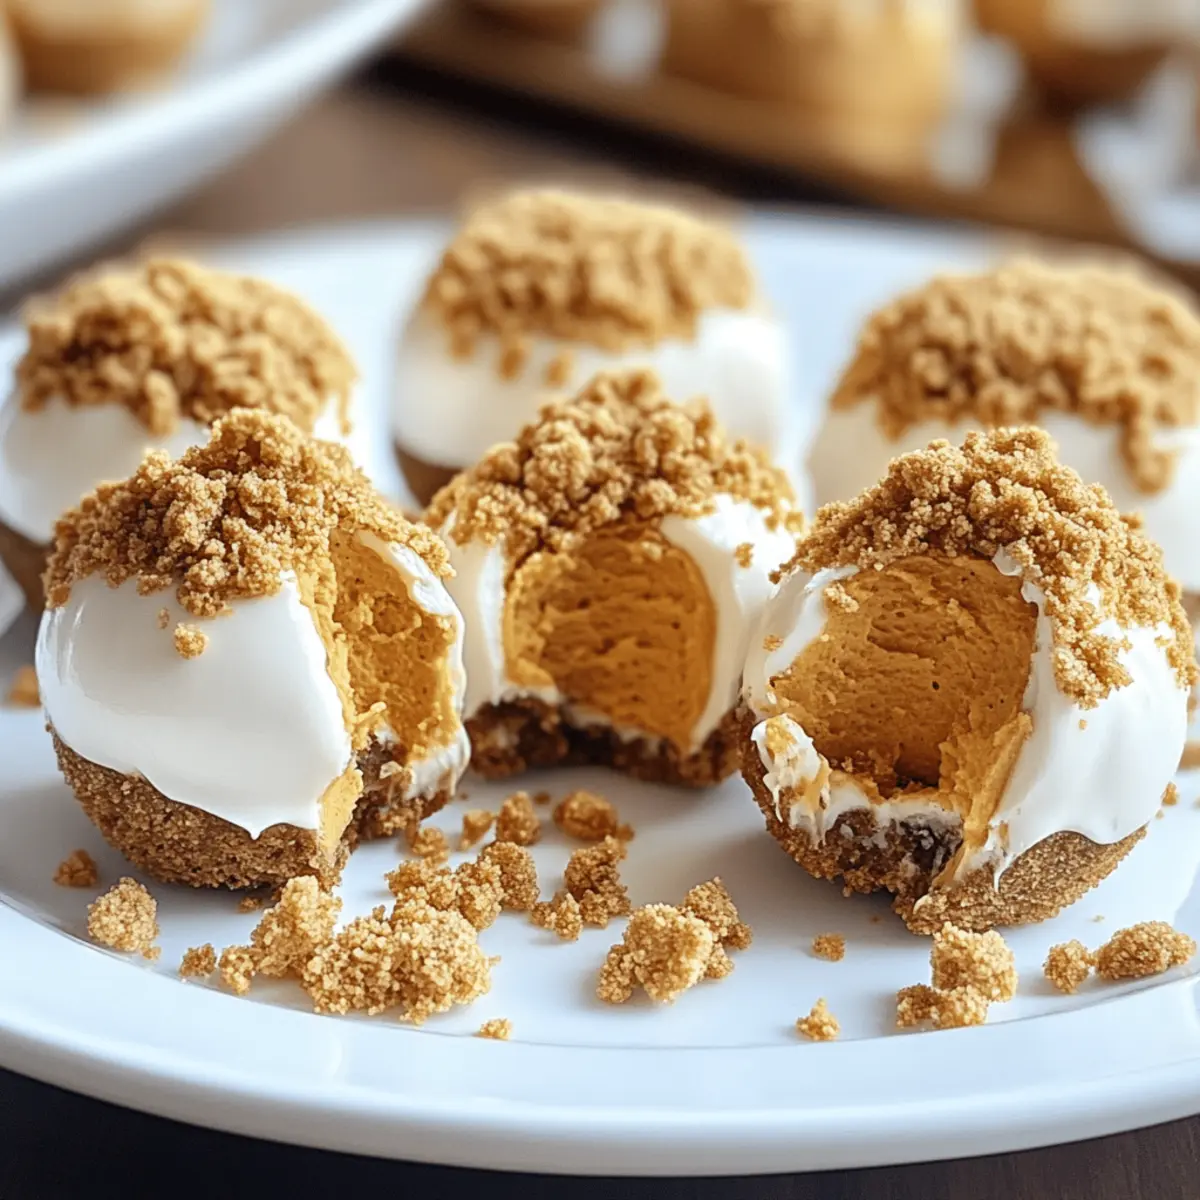
Once chilled, remove the mixture from the refrigerator and use a small cookie scoop or your hands to form 1-inch balls. Place each shaped ball onto a lined baking sheet, ensuring they are evenly spaced. This step creates the delightful bite-sized treats known as No Bake Pumpkin Cheesecake Balls.
Step 5: Optional Coating
If desired, melt chocolate in a microwave-safe bowl in 30-second increments, stirring until smooth. Dip each cheesecake ball in the melted chocolate to coat, or roll them in chopped nuts or coconut flakes for an added crunch. Allow any excess coating to drip off before placing them back on the baking sheet.
Step 6: Chill Again
After coating, return the baking sheet with the cheesecake balls to the refrigerator for an additional 30 minutes. This final chilling step will set the chocolate or coating and firm up the No Bake Pumpkin Cheesecake Balls perfectly, ready for serving or storing.
What to Serve with No Bake Pumpkin Cheesecake Balls
As you prepare to delight in these creamy autumn bites, consider complementing them with a few irresistible side options to create a full fall-inspired experience.
-
Spiced Chai Tea: The warm spices in chai enhance the pumpkin flavor, creating a cozy pairing that’s perfect for cool evenings.
-
Cinnamon Coffee: Bold coffee infused with cinnamon brings a delightful warmth that balances the sweet creaminess of the cheesecake balls beautifully.
-
Apple Cider Mimosas: Sparkling and fruity, this festive drink adds a celebratory touch to your dessert table, making every bite feel like a special occasion.
-
Salted Caramel Dip: Drizzle this luscious dip over your cheesecake balls for an added layer of flavor. Its savory notes enhance the sweet pumpkin, creating a symphony of tastes.
-
Ginger Snap Cookies: The zesty crunch of ginger snaps complements the cheesecake’s creamy richness. It’s a delightful contrast that will keep guests reaching for more.
-
Pecan Pie Bars: Serve these alongside for a classic fall dessert experience that echoes the flavors of the season while providing a rich, nutty contrast.
-
Roasted Pear Salad: A light salad with sweet roasted pears and a tangy vinaigrette offers freshness that balances the richness of the dessert, making for a well-rounded meal.
-
Pumpkin Spice Cupcakes: Why not double the pumpkin goodness? These cupcakes are a festive addition that honors the flavors of autumn and rounds off your sweet offerings perfectly.
Expert Tips for No Bake Pumpkin Cheesecake Balls
-
Keep Cream Cheese Cool: Make sure your cream cheese is softened but not too warm. This maintains the cheesecake’s structure—overly softened cream cheese can lead to a runny mixture.
-
Check Mixture Consistency: If your cheesecake mixture is too runny, gradually add more crushed graham crackers until you achieve a thick, moldable texture. This ensures your No Bake Pumpkin Cheesecake Balls hold their shape beautifully.
-
Flavor Adjustments: Start with a small amount of pumpkin spice. It’s potent, and you can always add more to suit your taste! This careful approach helps balance the flavors perfectly.
-
Chill for Best Results: Don’t skip the chilling steps! The initial chill firms the mixture, while the final chill after shaping allows the coating to set. This results in a richer, more delicious cheesecake ball.
-
Experiment with Coatings: Feel free to get creative with toppings! Rolling in nuts or coconut flakes can add extra texture and flavor, making your No Bake Pumpkin Cheesecake Balls even more delightful.
How to Store and Freeze No Bake Pumpkin Cheesecake Balls
Fridge: Keep your No Bake Pumpkin Cheesecake Balls in an airtight container for up to 3-4 days. This will maintain their creamy texture while keeping them fresh.
Freezer: For longer storage, freeze the cheesecake balls in a single layer on a baking sheet until firm, then transfer them to an airtight container or freezer bag. They’ll last for up to a month.
Thawing: To enjoy your frozen treats, simply place them in the refrigerator for a few hours or overnight to thaw gently before serving.
Reheating: These cheesecake balls are best served cold, so no reheating is needed—just take them out of the fridge and enjoy!
No Bake Pumpkin Cheesecake Balls Variations
Feel free to get creative and tailor this delightful treat to your taste preferences and dietary needs!
- Gluten-Free: Use gluten-free graham crackers or crushed nuts as a base to keep your cheesecake balls light and delicious.
- Dairy-Free: Substitute cream cheese with a dairy-free alternative, like cashew cream, for a vegan twist without losing creaminess.
- Low-Carb: Swap powdered sugar for a low-carb sweetener like erythritol to make your cheesecake balls keto-friendly.
- Flavor Boost: Add a splash of maple syrup or molasses for an enriched flavor that enhances the sweetness of the pumpkin.
- Textural Twist: Roll your cheesecake balls in crushed nuts, coconut flakes, or cocoa powder for a fun and crunchy exterior. Feel free to mix and match!
- Chocolate Drizzle: Instead of coating, drizzle melted dark or white chocolate over the chilled balls for a gourmet touch.
- Spicy Kick: Mix in a pinch of cayenne pepper or ginger for an unexpected heat that intensifies the autumn flavor.
- Presentation Idea: Serve alongside a festive autumn fruit salad or a warm spiced chai tea to complement the flavors of the pumpkin cheesecake balls.
As you explore these variations, don’t forget to check out delicious ideas like Baked Parmesan Zucchini for an exceptional fall gathering experience!
Make Ahead Options
These No Bake Pumpkin Cheesecake Balls are perfect for busy weeknights and gatherings! You can prepare the cheesecake mixture up to 24 hours in advance; simply mix all the ingredients as directed and refrigerate. The mixture can be chilled, allowing the flavors to meld beautifully and firm up. Shape the balls and coat them just before serving for the best texture. If you prefer, you can also roll the balls in coatings like chopped nuts or chocolate ahead of time and store them in an airtight container in the refrigerator for up to 3 days. This makes serving effortless while ensuring they remain just as delicious!
No Bake Pumpkin Cheesecake Balls Recipe FAQs
How do I select ripe pumpkin puree?
When choosing pumpkin puree for your No Bake Pumpkin Cheesecake Balls, opt for canned pure pumpkin rather than pie filling. Look for labels that list “100% pure pumpkin” with no added sugars or spices. The color should be a rich orange for optimal flavor!
How should I store these cheesecake balls?
Store your No Bake Pumpkin Cheesecake Balls in an airtight container in the refrigerator for up to 3-4 days. This method retains their creamy texture and freshness, so they remain as delightful as the day you made them!
Can I freeze these cheesecake balls for later enjoyment?
Absolutely! To freeze your No Bake Pumpkin Cheesecake Balls, first, place them in a single layer on a lined baking sheet and freeze until firm. Then, transfer them to an airtight container or freezer bag. They can be stored in the freezer for up to 1 month. Thaw them in the refrigerator before serving for best results.
What should I do if my mixture is too runny?
No worries! If your mixture isn’t thick enough, simply sift in additional crushed graham crackers, about a tablespoon at a time, mixing until your desired consistency is achieved. The mixture should hold its shape well—this ensures your cheesecake balls are perfectly formed!
Are there any dietary considerations for these cheesecake balls?
Definitely! This recipe can easily adapt to various dietary needs. For a gluten-free option, swap graham crackers for gluten-free alternatives. If you’re looking for a dairy-free or vegan version, try using dairy-free cream cheese and maple syrup as a sweetener. Everyone gets to indulge!
Can I use flavored pumpkin spice?
Yes, feel free to experiment with different spice blends! If you have flavored pumpkin spice on hand, that can add a unique twist to your No Bake Pumpkin Cheesecake Balls. Just start with a small amount and adjust to your taste—enjoy the creativity!

No Bake Pumpkin Cheesecake Balls for Effortless Fall Indulgence
Ingredients
Equipment
Method
- In a mixing bowl, beat cream cheese until smooth and creamy, about 2 minutes. Add pumpkin puree, powdered sugar, pumpkin spice, and vanilla extract. Mix until fully combined.
- Gradually stir in crushed graham crackers until the mixture thickens. If too loose, add more graham cracker crumbs.
- Cover and refrigerate for 1 to 2 hours to allow the flavors to meld and firm up.
- Form 1-inch balls and place on a lined baking sheet, ensuring they are evenly spaced.
- Optionally, melt chocolate and coat each cheesecake ball, or roll in chopped nuts or coconut flakes.
- Chill again for 30 minutes to set the coating.
Leave a Reply