
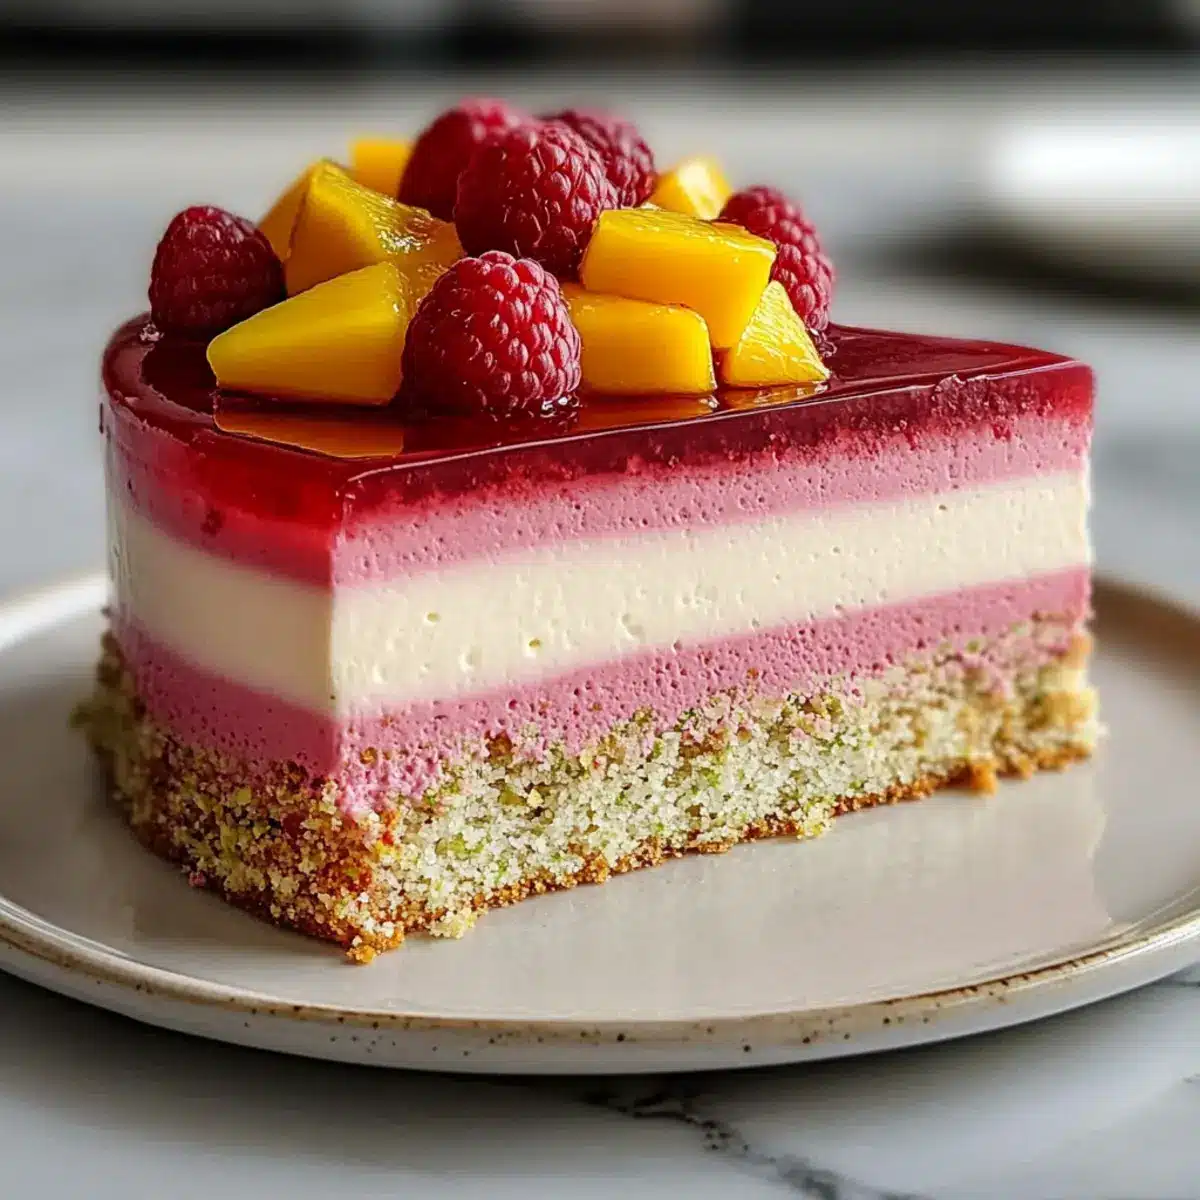
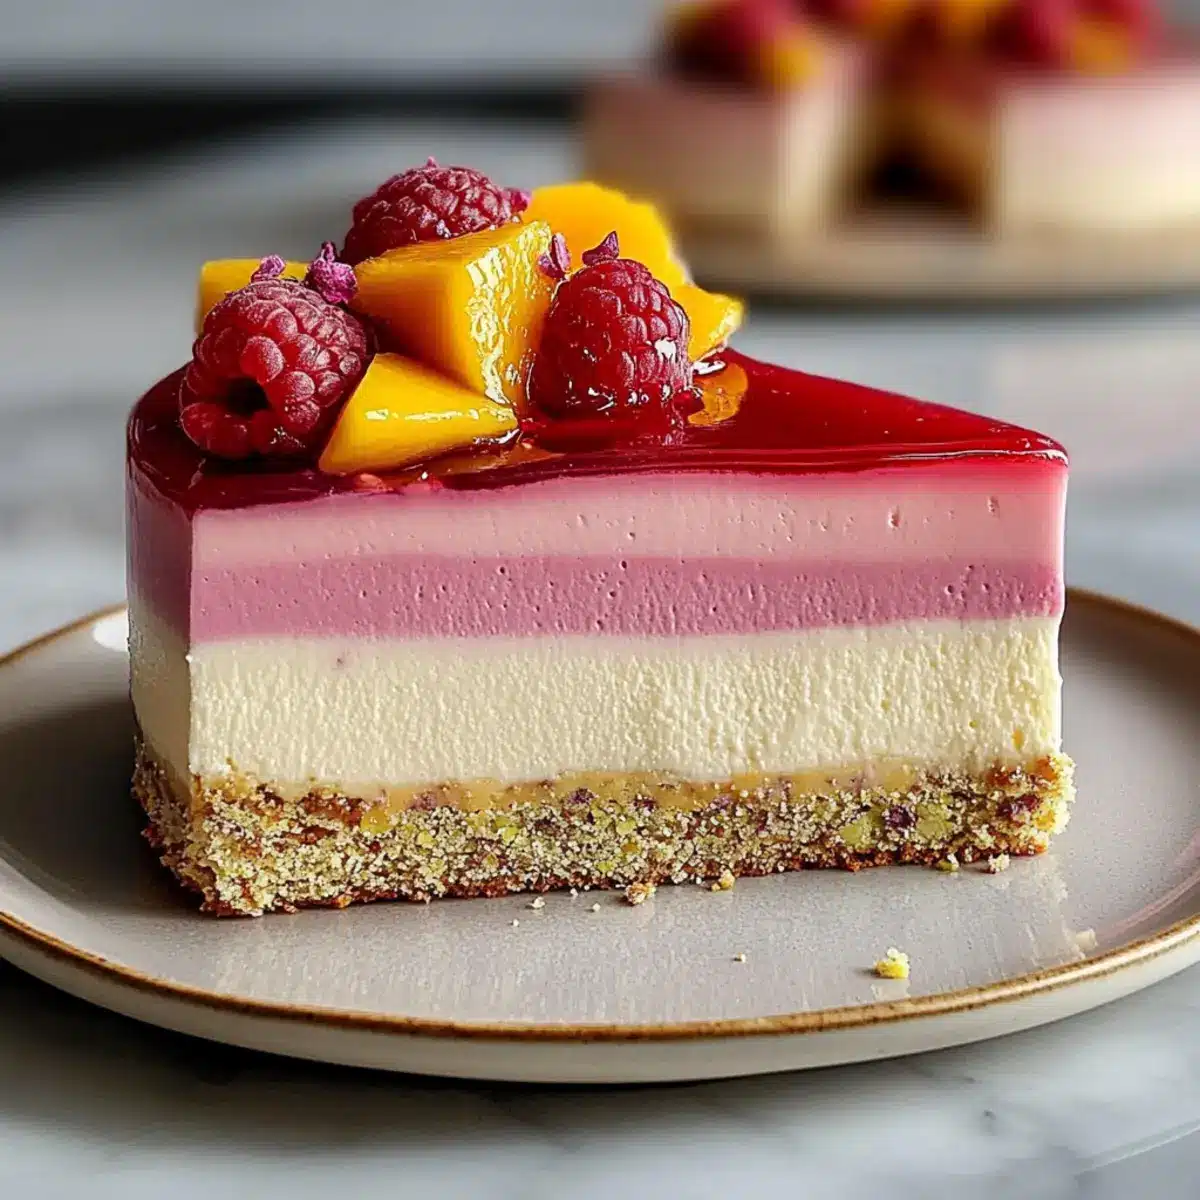
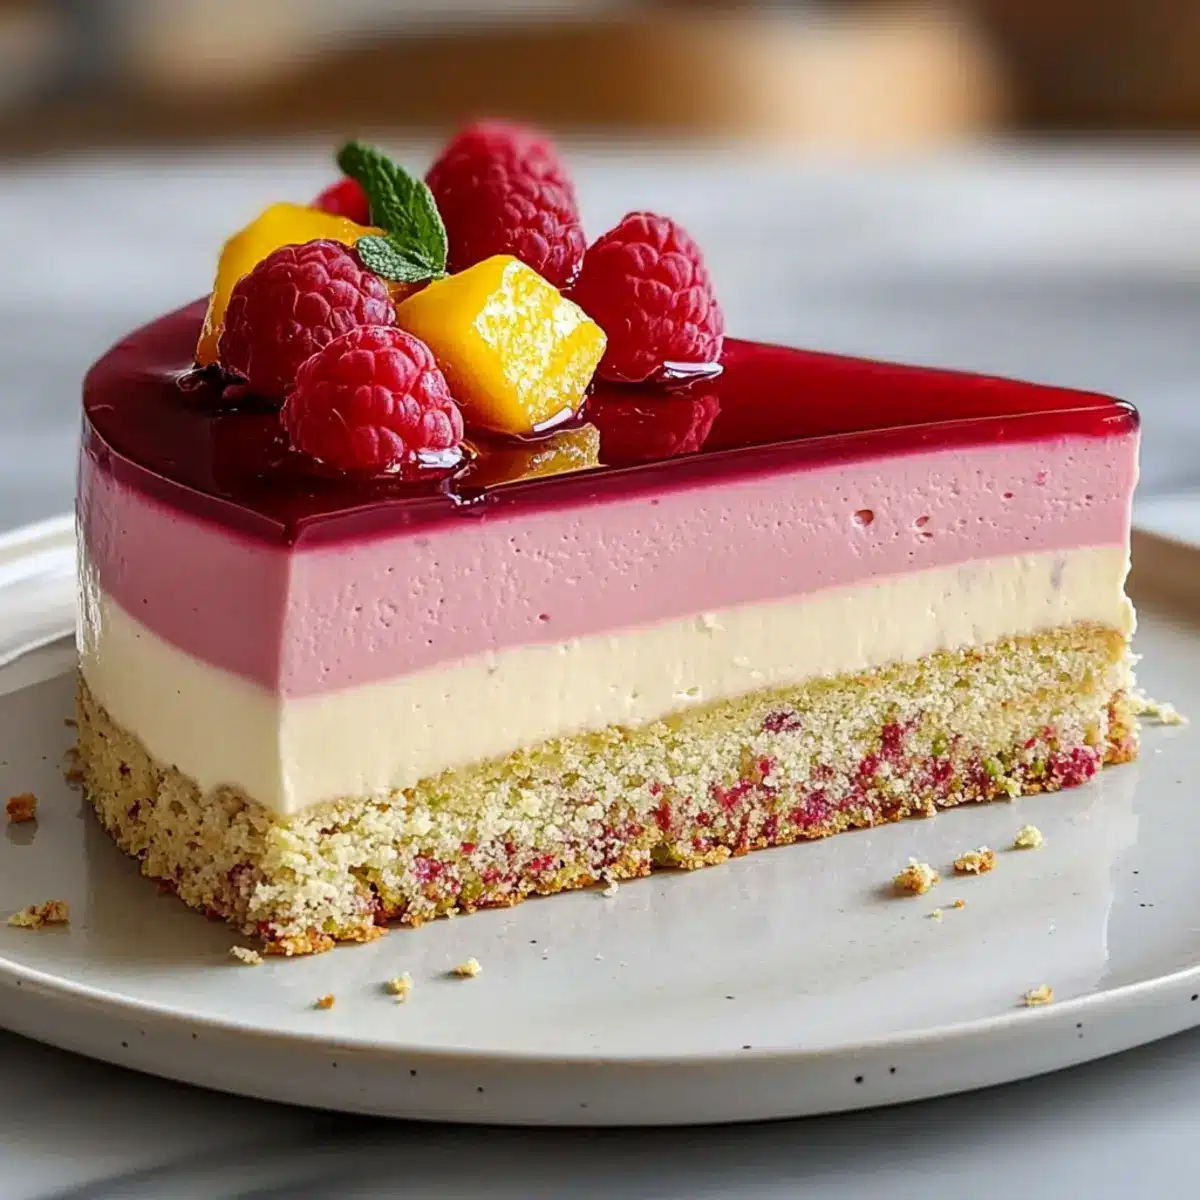
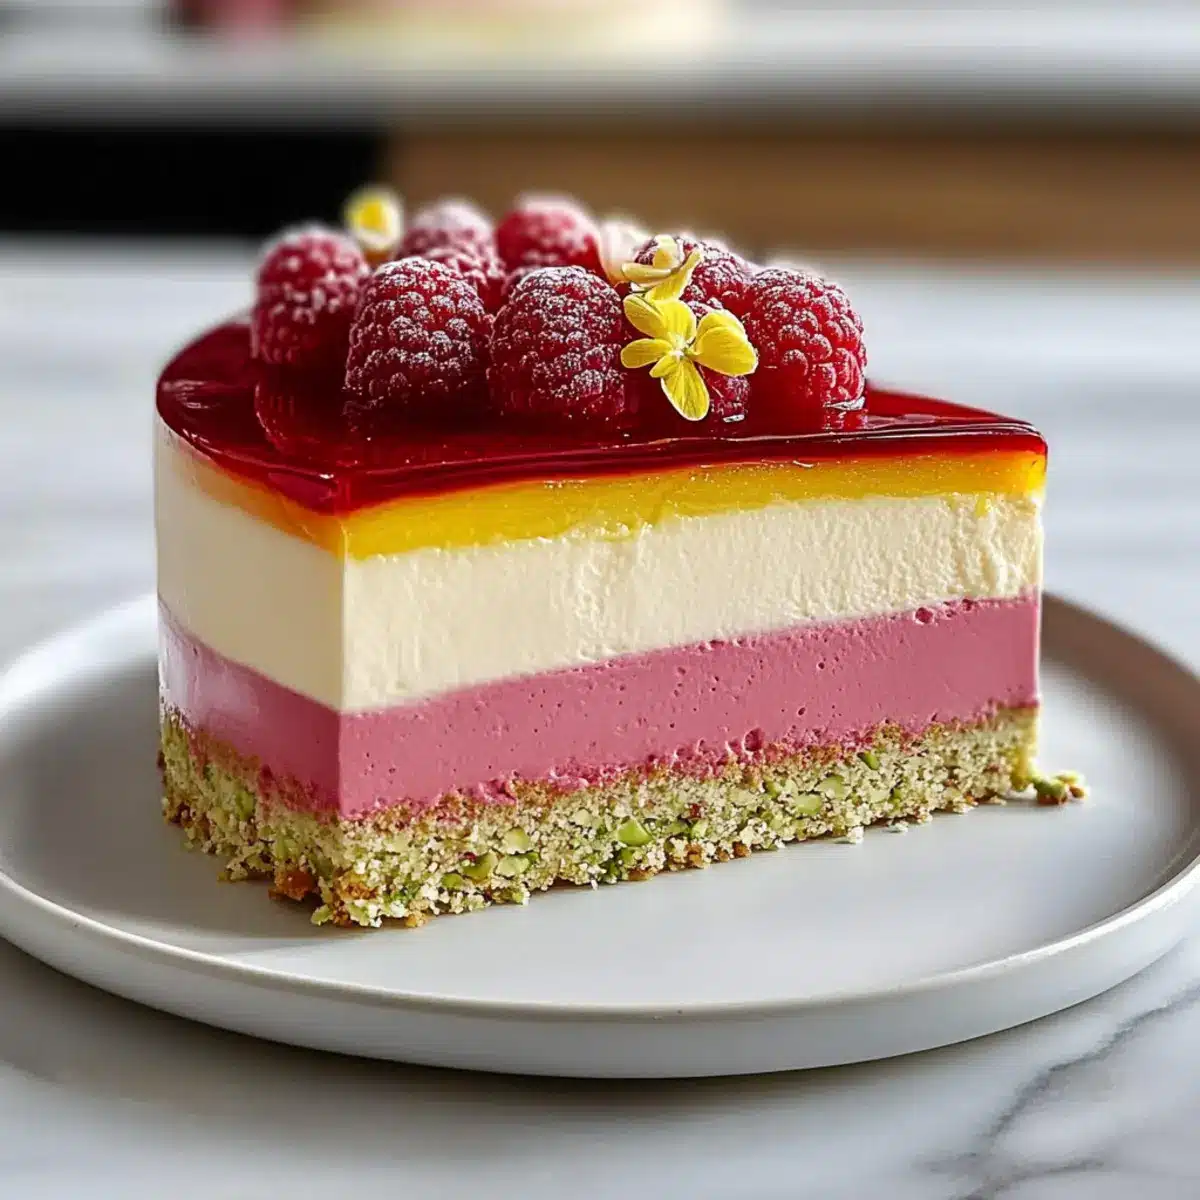
As I flipped through my recipe book one afternoon, a vibrant photo of a stunning Mango Raspberry Mousse Cake caught my eye and drew me in. This layered mousse cake isn’t just a feast for the eyes; it’s a delightful combination of moist pistachio cake, rich white chocolate, and fruity layers that beckon for you to take a bite. You’ll love how effortlessly this dessert can impress guests while keeping your prep time manageable. Plus, it’s a vegetarian alternative that can easily be adapted for those seeking a lighter treat. Are you ready to dive into the world of luscious mousses and tantalizing flavors? Let’s uncover how to create this stunning masterpiece in your own kitchen!
Why You’ll Love This Cake!
Luxurious Layers: Each bite of the Mango Raspberry Mousse Cake envelops you in creamy bliss, combining a moist pistachio base with silky mousses that dance on your palate.
Easy to Make: With straightforward steps, even novice bakers can conquer this recipe while impressing friends and family alike.
Versatile Flavors: Feel free to swap the pistachio flour with almond flour for a unique twist, or incorporate other fruits for varied taste experiences.
Perfect for Any Occasion: Whether it’s a birthday, anniversary, or simply a Sunday treat, this cake elevates your dessert table with vibrant colors and flavors that wow.
Crowd-Pleasing Appeal: The stunning presentation, especially with raspberry jelly on top, makes it an impressive centerpiece all guests will rave about. Pair it with fresh berries or whipped cream for a delightful side!
If you’re inspired by this mousse cake, consider checking out our Healthy Carrot Cake for another delicious dessert option!
Mango Raspberry Mousse Cake Ingredients
-
For the Cake
• Pistachio Flour – Adds a nutty flavor and structure to the cake; almond flour is a great substitute.
• Granulated Sugar – Sweetens the cake and mousses; you can use a sugar substitute for a lighter option.
• Eggs – Provide moisture and structure; use an egg substitute or aquafaba for a vegan alternative.
• Butter – Contributes richness to the cake; swap with vegan butter for a dairy-free version.
• Vegetable Oil – Ensures a moist cake texture; melted coconut oil can be used instead. -
For the Mousse Layers
• White Chocolate – Enhances the creaminess in the mousse layers; consider dark chocolate for a richer taste.
• Raspberry Puree – Provides natural tartness and flavor in the mousse; frozen raspberries blended work well as a substitute.
• Mango Puree – Brings sweet, tropical notes to the mousse; fresh or frozen mango can be used to make puree.
• Gelatin – Sets the mousse; agar-agar serves as a vegetarian alternative that sets firmer. -
For the Topping
• Raspberry Jelly – Adds a glossy finish; other fruit jellies can be substituted for variety.
Embrace the sweetness of this Mango Raspberry Mousse Cake and prepare to dazzle your loved ones with each delightful layer!
Step‑by‑Step Instructions for Mango Raspberry Mousse Cake
Step 1: Prepare the Pistachio Cake
Preheat your oven to 350°F (175°C). In a mixing bowl, combine pistachio flour and granulated sugar, creating a cohesive blend. Add in the eggs, melted butter, and vegetable oil, whisking until the mixture is smooth and well incorporated. Pour the batter into a greased cake pan and bake for about 25 minutes, or until a toothpick inserted in the center comes out clean. Once done, allow the cake to cool in the pan for 10 minutes before transferring it to a wire rack to cool completely.
Step 2: Make the White Chocolate Layer
While the pistachio cake cools, melt the white chocolate in a heatproof bowl over simmering water. Stir gently until smooth, then let it cool slightly. In a separate bowl, whip heavy cream until soft peaks form. Fold the cooled white chocolate into the whipped cream carefully, ensuring the mixture maintains its airy texture. This luscious layer will bring creamy richness to your Mango Raspberry Mousse Cake.
Step 3: Prepare Raspberry Mousse
For the raspberry mousse, place the raspberry puree and sugar into a saucepan over medium heat, stirring until the sugar dissolves. In a small bowl, soften the gelatin in a few tablespoons of warm water, then add it to the raspberry mixture, stirring until it’s fully incorporated. Remove the mixture from heat and cool slightly before gently folding in whipped cream. This will create a light and flavorful raspberry mousse.
Step 4: Prepare Mango Mousse
Next, repeat the process for the mango mousse: combine the mango puree with sugar in a saucepan and heat gently until the sugar dissolves. Soften gelatin in warm water, adding it to the mango mixture and stirring well. Allow to cool before incorporating fluffy whipped cream. This vibrant mango mousse will bring a delightful tropical flavor to your cake layers.
Step 5: Layer the Cake
Once the pistachio cake has cooled, place it as your base layer on a serving plate. Spread a generous layer of the white chocolate mixture evenly over the cake. Carefully layer the raspberry mousse on top, spreading it gently to avoid disturbing the layers beneath. Next, add the mango mousse layer, smoothing it out to create a beautiful, even surface. Repeat with additional layers if desired, building a delightful structure for the Mango Raspberry Mousse Cake.
Step 6: Top with Raspberry Jelly
After assembling your cake, let it chill in the refrigerator for at least 4 hours, preferably overnight, to set the mousse layers properly. When ready to serve, gently spread raspberry jelly across the top layer. This glossy finish adds a lovely sheen and enhances the fruity flavor profile of the Mango Raspberry Mousse Cake, making it irresistible to all who behold it.
What to Serve with Mango Raspberry Mousse Cake
Elevate your dessert experience with delightful pairings that complement the vibrant layers and textures of this mousse cake.
-
Whipped Cream: A dollop of lightly sweetened whipped cream adds a creamy contrast, enhancing the overall dessert experience.
-
Fresh Berries: Serve alongside a mix of fresh raspberries and mango slices to echo the cake’s fruity flavors and add a refreshing touch.
-
Chocolate Shavings: Sprinkle dark or white chocolate shavings on top for a rich contribution that elevates the presentation and balances sweetness.
-
Mint Leaves: A few sprigs of fresh mint offer a lovely aroma and bright flavor that contrasts beautifully with the creamy layers.
-
Coconut Sorbet: This tropical sorbet pairs well, adding a cooler texture that complements the rich, creamy mousse of the cake.
-
Iced Tea or Sparkling Water: Refreshing beverages like sweetened iced tea or sparkling water cleanse the palate, allowing your guests to fully enjoy every layer of the cake.
-
Lemon Tartlets: A zesty lemon dessert provides a fruity acidity that cuts through the richness and highlights the diverse flavors of the mousse cake.
-
Coffee or Espresso: A warm cup of coffee or shot of espresso brings warmth that balances the cake’s chill, enhancing the indulgence of the dessert experience.
How to Store and Freeze Mango Raspberry Mousse Cake
Fridge: Store the Mango Raspberry Mousse Cake covered in the refrigerator for up to 3 days. This helps maintain its freshness and flavor layers.
Freezer: Avoid freezing the mousse cake, as the delicate texture may be compromised upon thawing, resulting in a less enjoyable dessert experience.
Reheating: If you serve from the fridge, allow the cake to sit at room temperature for about 15 minutes before slicing to enhance the flavor and mousse texture.
Airtight Storage: If you’re uncertain about consuming the cake quickly, wrap it tightly in plastic wrap or store it in an airtight container to keep it fresh longer.
Expert Tips for Mango Raspberry Mousse Cake
-
Chill Time Matters: Allow the cake to chill overnight; this helps the layers set properly and enhances flavor integration, bringing your Mango Raspberry Mousse Cake to life.
-
Avoid Freezing: Freezing can ruin the delightful texture of the mousse. Always serve fresh, allowing the cake to sit at room temperature for 15 minutes before slicing.
-
Gelatin Check: Ensure your gelatin is fully softened before adding to the warm mixtures; this prevents lumps in both your raspberry and mango mousses for a silky finish.
-
Layering Technique: When adding layers, spread gently to avoid mixing and disturbing the beautiful colors. A spatula helps achieve the perfect smoothness every time.
-
Quality Ingredients: Use high-quality chocolate and fresh fruit puree for the best flavor. It elevates your Mango Raspberry Mousse Cake from good to extraordinary!
Make Ahead Options
These Mango Raspberry Mousse Cakes are perfect for busy home cooks looking to save time during special occasions! You can prepare the pistachio cake and mousse layers up to 24 hours in advance. Simply bake the pistachio cake and let it cool completely before wrapping it tightly in plastic wrap to maintain its moisture. Prepare the raspberry and mango mousses, then layer them over the cake, sealing with the white chocolate layer, and refrigerate. To maintain the cake’s exquisite quality, avoid adding the raspberry jelly topping until you’re ready to serve. When it’s time to enjoy, just spread the glaze on top and relish in the delightful, restaurant-quality results with minimal last-minute effort!
Mango Raspberry Mousse Cake Variations
Customize your Mango Raspberry Mousse Cake with these delightful twists that will elevate your dessert experience!
-
Nut Swap: Swap pistachio flour with almond flour for a different nutty flavor profile. The almond adds a subtle sweetness that complements the fruity layers beautifully.
-
Fruit Fusion: Incorporate other fruits like passion fruit or strawberry in the mousse layers for uniquely vibrant flavors. Mixing and matching fruit can transform this cake into a delightful experience for your taste buds.
-
Dairy-Free Delight: Use dairy-free chocolate instead of white chocolate to create a fully vegan dessert without compromising on taste. This allows more people to enjoy the delicious layers of this cake!
-
Sugar Substitute: Opt for a sugar substitute in both the cake and mousses to make a lower-calorie version of this indulgent treat. Everyone deserves to enjoy dessert without the guilt!
-
Add a Zing: Sprinkle a bit of lemon zest into your mango mousse for a refreshing zing that enhances the tropical flavor even more. This brightens the cake while adding a hint of citrus.
-
Texture Twist: For added crunch, fold in finely chopped nuts or even a layer of crushed cookies between the mousse layers. This textural surprise adds an exciting layer of flavor.
-
Heat It Up: Add a pinch of cayenne or chili powder to the raspberry mousse for a subtle spicy kick that brings an unexpected warmth to the dessert. Guaranteed to surprise and delight your guests!
If you’re already excited about transforming this delectable cake, don’t forget to also check out our Coconut Dream Cake and Strawberry Shortcake Whipped for even more scrumptious ideas!
Mango Raspberry Mousse Cake Recipe FAQs
How do I select the perfect ripe mangoes for the puree?
Absolutely! Look for mangoes that are slightly soft to the touch but not mushy. The skin should have a vibrant color, indicating ripeness, and you might notice a sweet aroma near the stem end. If they feel very firm, leave them at room temperature for a day or two to ripen before using.
What’s the best way to store leftover Mango Raspberry Mousse Cake?
Very good question! Store the mousse cake covered in the refrigerator for up to 3 days. This helps keep the layers fresh and maintains their delightful textures. Be sure to use a cake cover or wrap it tightly in plastic wrap to avoid any drying out or absorption of odors from the fridge.
Can I freeze the Mango Raspberry Mousse Cake?
No, I recommend avoiding freezing this cake. The delicate mousse layers can become grainy and lose their airy texture once thawed. It’s best enjoyed fresh. If you need to make it ahead of time, preparing it a day in advance and storing it in the fridge is an excellent option.
What if my mousse layers aren’t setting properly?
No worries! Ensure that your gelatin is fully dissolved in the warm mixture before adding it to the whipped cream, as undissolved gelatin can lead to a lumpy texture. If you find that the mousse isn’t thickening, you can try adding a little extra gelatin. Simply dissolve an additional teaspoon in warm water, then fold it into the mousse mixture before setting it in the fridge.
Is this Mango Raspberry Mousse Cake suitable for those with dietary restrictions?
Absolutely! For a vegan version, substitute eggs with aquafaba and use a vegan butter alternative. Additionally, agar-agar can replace gelatin for a vegetarian option. Just be mindful that agar-agar tends to set firmer than gelatin, which may affect the mousse’s texture slightly.
How can I ensure my cake has a beautiful finish?
For a stunning presentation, chill the fully assembled cake overnight to allow the layers to meld beautifully together. When it’s time to serve, let it sit at room temperature for about 15 minutes before slicing. This enhances not only the flavor but also the mousse’s texture, ensuring each slice is as lovely as the last.
Heavenly Mango Raspberry Mousse Cake for Your Next Celebration
Ingredients
Equipment
Method
- Preheat your oven to 350°F (175°C). In a mixing bowl, combine pistachio flour and granulated sugar. Add in eggs, melted butter, and vegetable oil. Pour the batter into a greased cake pan and bake for about 25 minutes.
- While the cake cools, melt white chocolate in a heatproof bowl over simmering water. In a separate bowl, whip heavy cream until soft peaks form. Fold cooled white chocolate into whipped cream.
- For the raspberry mousse, heat raspberry puree and sugar in a saucepan until the sugar dissolves. Soften gelatin in warm water and add to the mixture. Cool slightly and fold in whipped cream.
- Repeat for the mango mousse, heating mango puree with sugar, adding softened gelatin, and folding in whipped cream once cooled.
- Layer the cake: spread white chocolate mixture over the cooled pistachio cake, followed by raspberry mousse, and then mango mousse. Repeat layers if desired.
- Chill the assembled cake in the refrigerator for at least 4 hours. Spread raspberry jelly on top before serving.
Leave a Reply