
As the crisp autumn air dances with whispers of pumpkins and ghostly tales, it’s time to bring a splash of spooky delight to your kitchen! Halloween is the perfect occasion to unleash your culinary creativity, especially with eye-catching treats that enchant both kids and adults alike. Among my favorite Halloween-themed desserts are the whimsical Halloween Dirt Cups, a no-bake masterpiece that combines creamy chocolate pudding, crushed Oreos, and playful gummy worms. Not only are they incredibly easy to whip up, but they’re also a guaranteed crowd-pleaser for festive gatherings. Plus, the kids will love helping with the assembly, making these treats a fun family project as we embrace the Halloween spirit. Ready to dive into a cauldron of sweetness? Let’s conjure up some unforgettable Halloween memories together!
Why Are Halloween Dirt Cups a Must-Try?
Deliciously Easy: The no-bake nature of these dirt cups makes them simple enough for novice bakers and fun for kids to help with!
Visual Appeal: With their layered look and playful toppings, these cups are as eye-catching as they are tasty.
Crowd-Pleasing Flavor: The rich chocolate pudding paired with crunchy Oreos hits all the right notes for both young and old alike.
Versatile Treat: Customize with different mix-ins or switch up the gummy worms for other fun candies to make them your own!
Perfect for Parties: Serve them in individual cups for a fun, festive buffet that keeps things neat and tidy at your Halloween gathering.
Family Fun: Create cherished memories as you and the kids assemble these delightful treats together, embracing the spirit of Halloween! For more easy recipes, check out these Breakfast Granola Cups that your family will love!
Halloween Dirt Cups Ingredients
For the Dirt Base
• Chocolate Pudding – Provides a rich and creamy base for your dirt cups; opt for a sugar-free version if desired.
• Crushed Oreos – Mimics dirt for a fun presentation; graham crackers make a great substitute for a different flavor profile.
For the Toppings
• Gummy Worms – Adds a spooky touch that kids love; consider using candy spiders for a creative twist.
• Whipped Cream – For a light and fluffy layer on top; dairy-free whipped topping can be used for a dairy-free option.
These Halloween Dirt Cups are the perfect blend of fun and flavor, making them a must-try for your spooky celebrations!
Step‑by‑Step Instructions for Halloween Dirt Cups
Step 1: Prepare the Chocolate Pudding
Start by following the instructions on your chocolate pudding package to create a rich base for your Halloween Dirt Cups. In a mixing bowl, whisk the pudding mix with milk until it thickens, typically taking about 2 minutes. Once ready, set aside to allow it to set for 5 minutes while you gather the remaining ingredients.
Step 2: Crush the Oreos
While the pudding sets, take a stack of Oreos and place them in a resealable bag. Using a rolling pin or a heavy object, crush the cookies into fine crumbs, resembling dirt. You’ll need about 2 to 3 cups of crushed Oreos. Set the bag aside, as it will be used to create those delightful layers in your dirt cups.
Step 3: Assemble the Cups
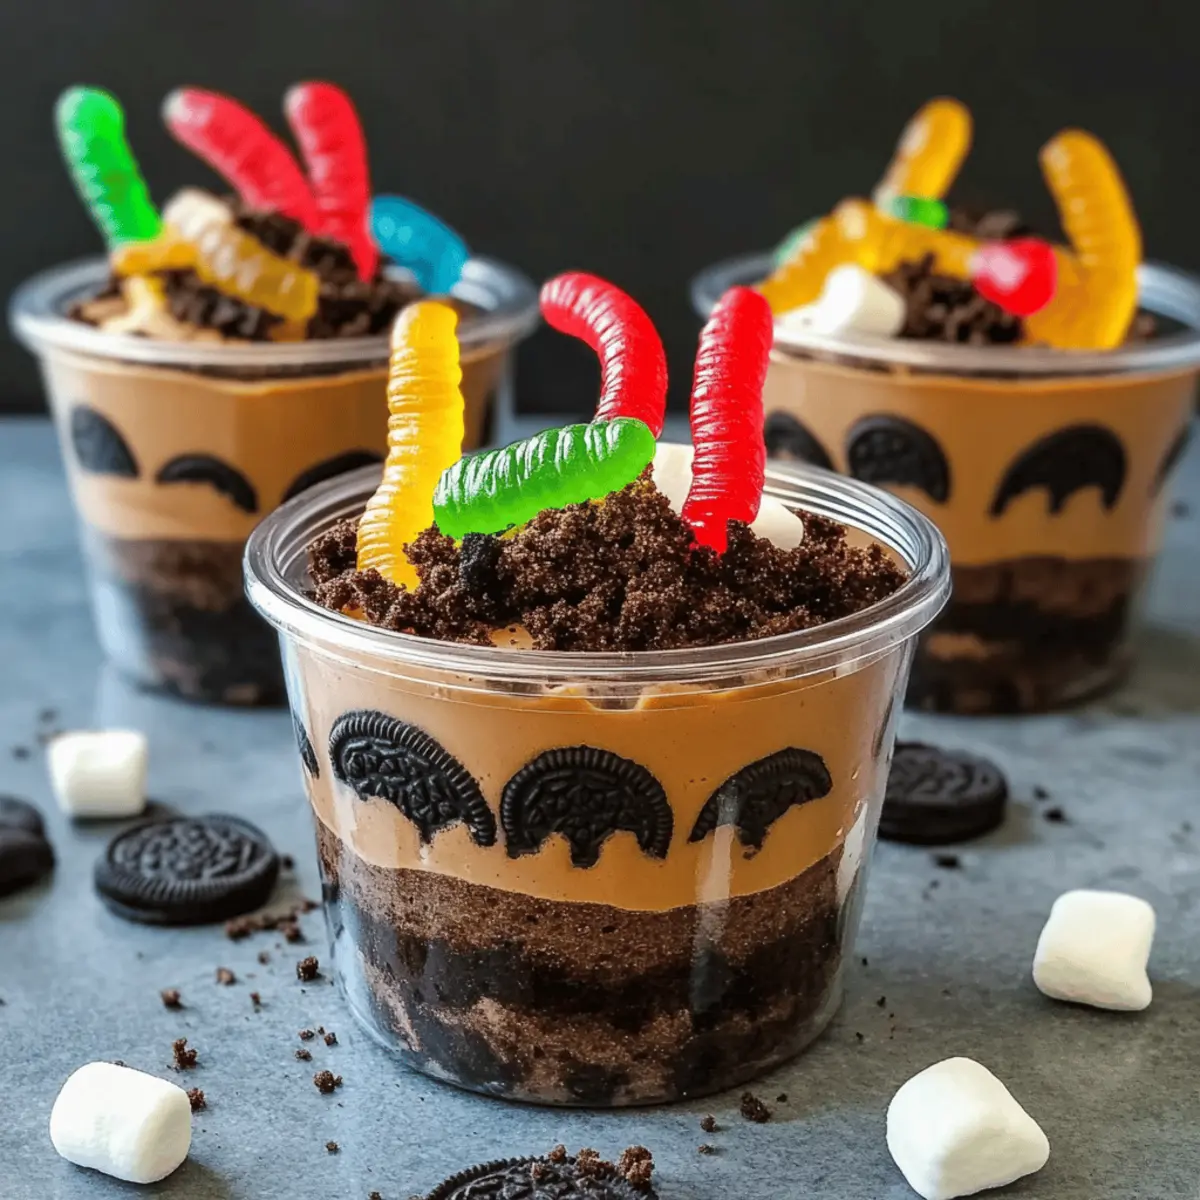
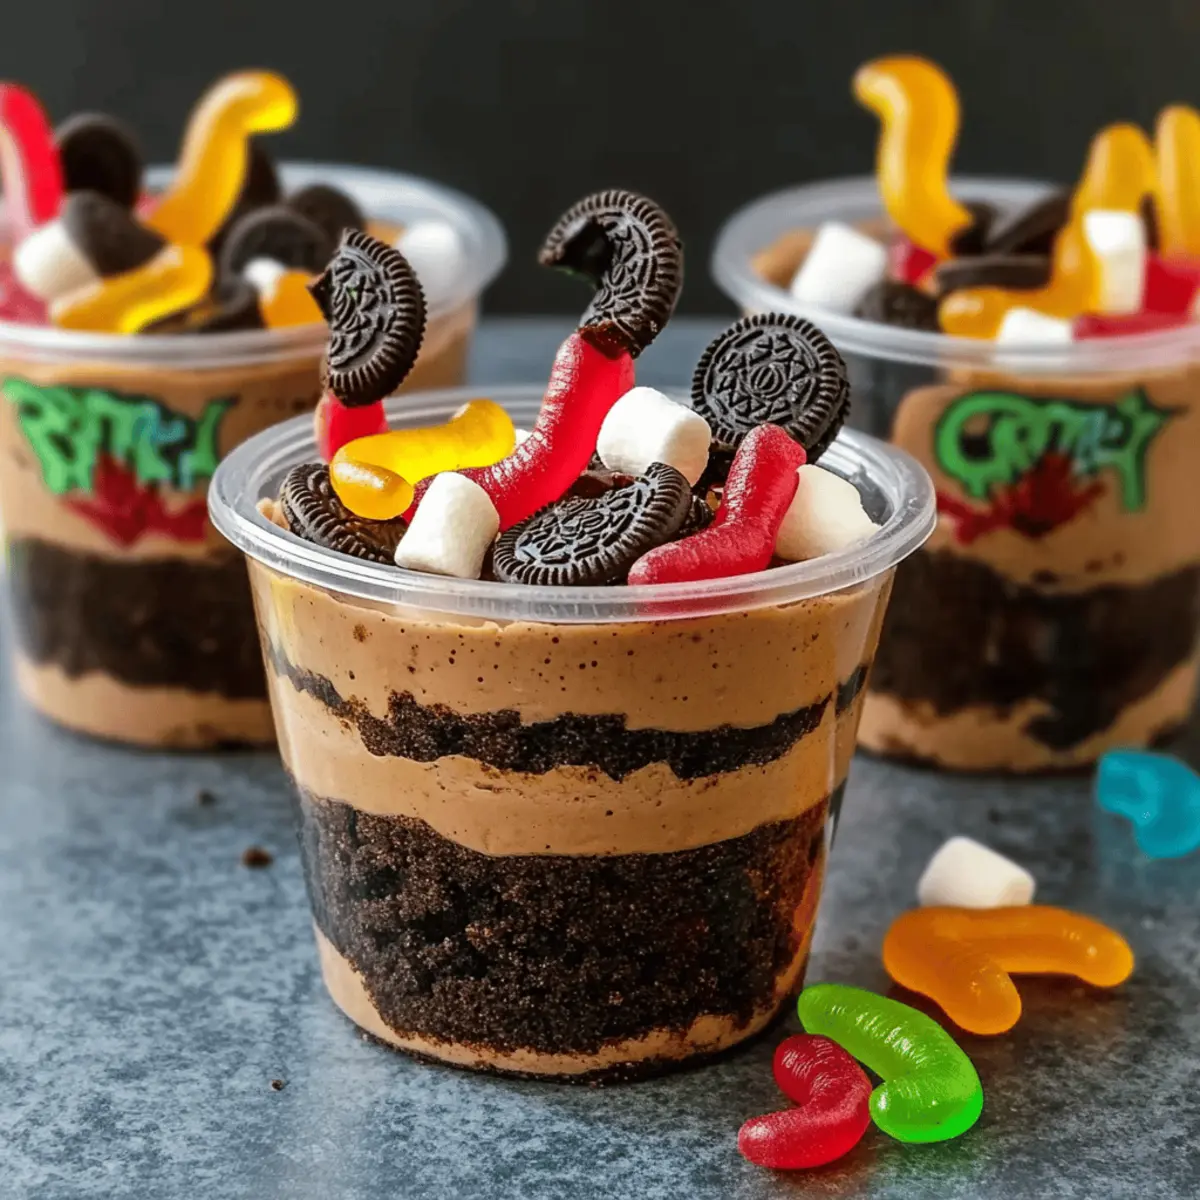
Grab your serving cups or bowls and start layering the ingredients. Begin with a generous layer of chocolate pudding at the bottom, about ½ cup. Next, sprinkle a layer of crushed Oreos on top, creating a “dirt” layer. Repeat these layers until your cups are filled, leaving a little room at the top for final touches.
Step 4: Create the Topping
Before finishing your Halloween Dirt Cups, whip some cream until soft peaks form, creating a light and fluffy topping. Spoon a dollop of whipped cream on top of each cup to add a creamy layer that balances the chocolate and cookies. This fluffy layer enhances the dessert’s appearance and adds a delicious taste.
Step 5: Add the Gummy Worms
Now comes the fun part! Decorate each Halloween Dirt Cup with playful gummy worms. Position a few worms on top of the whipped cream, allowing them to dangle over the edges for an amusing, spooky effect. This whimsical decoration makes your dessert more eye-catching and fun for the party guests.
Step 6: Chill Before Serving
To enhance the presentation and flavor, place your assembled Halloween Dirt Cups in the refrigerator for about 30 minutes. Chilling helps the layers set beautifully and makes the cups refreshingly cool when served. This step brings everything together and ensures a delightful dessert experience for both kids and adults.
Step 7: Serve and Enjoy
Once chilled, take the Halloween Dirt Cups out of the refrigerator. Arrange them on a festive platter, making sure each cup is easily accessible for your guests. Serve these delightful treats at your Halloween party and watch as everyone marvels at their spooky charm.
How to Store and Freeze Halloween Dirt Cups
Fridge: Store any leftover Halloween Dirt Cups in an airtight container in the fridge for up to 3 days to maintain their freshness and texture.
Pre-Assembled Cups: If you plan to prepare them ahead, keep the layers separate—store the pudding and crushed Oreos in separate containers for up to 2 days. Assemble just before serving.
Chilled Presentation: For the best taste, chill the assembled dirt cups for about 30 minutes before serving, enhancing the delightful experience for your guests.
Freezing: While not recommended for freezing after assembly due to texture changes, you can freeze the pudding and Oreos separately for up to a month — just reassemble when ready to serve!
Expert Tips for Halloween Dirt Cups
-
Layer with Love: Make sure to layer the pudding and Oreos carefully to create visibly appealing dirt cups. Use a clear cup to showcase those beautiful layers!
-
Pre-Chill Ingredients: Chill your pudding before assembling for a refreshing treat. Cold layers will not only enhance flavor but also help the cups maintain their shape during assembly.
-
Creative Toppings: Mix and match toppings like gummy worms, sprinkles, or even candy pumpkins for a personalized touch. This way, you can cater to different tastes while keeping the Halloween theme vibrant.
-
Avoid Over-Crushing: When crushing Oreos, aim for coarse crumbs rather than a fine powder. This will add texture to your dirt cups and prevent a mushy base.
-
Serving Suggestion: For a delightful presentation, consider using themed cups or decorating your platter with Halloween motifs like spiders and cobwebs. This brings an extra spooky flair to your dessert table.
-
Perfect for Kids: Involve the little ones in the layering process. Letting them help create their own cups adds enjoyment and encourages creativity, making Halloween Dirt Cups a fun family activity!
Halloween Dirt Cups Variations & Substitutions
Feel free to get creative and adjust these Halloween Dirt Cups to suit your tastes and dietary needs!
-
Vegan Option: Use plant-based chocolate pudding and coconut whipped cream to create a deliciously dairy-free delight.
Elevate your dessert while ensuring everyone can enjoy it. -
Gluten-Free: Swap Oreos for gluten-free cookies or crushed gluten-free graham crackers to make these treats accessible for all.
Delicious options abound for those with gluten sensitivities! -
Fruit Add-In: Incorporate fresh fruit like raspberries or strawberries between the layers for a fresh twist.
This adds a delightful contrast to the rich chocolate base! -
Spicy Surprises: For a unique kick, sprinkle a bit of cinnamon or chili powder on the chocolate pudding layers.
It’ll add depth to the flavor profile while keeping things interesting. -
Flavor Infusions: You can try flavored pudding mixes, such as butterscotch or vanilla, for a fun alternative to chocolate.
This twist opens up a whole new world of taste without losing the spooky aesthetic. -
Gummy Shapes: Instead of gummy worms, use candy eyeballs or spooky shaped gummies to switch up the decorations.
These playful options add an extra festive flair to your treats! -
Layered Goodness: Add layers of crushed candy bars between the Oreos and pudding for an indulgent surprise.
Each bite brings a new texture and flavor that’s sure to wow the crowd! -
Sugar-Free: Opt for sugar-free chocolate pudding and reduced-sugar cookies to make a lighter version of this classic.
Enjoy the same great taste while considering everyone’s dietary choices.
Let your imagination run wild with these variations, and remember – cooking is about having fun! For more delightful ideas, don’t miss these Breakfast Granola Cups that your family is sure to love!
Make Ahead Options
These Halloween Dirt Cups are perfect for busy home cooks looking to save time while still creating a festive treat! You can prepare the chocolate pudding and crushed Oreos up to 24 hours in advance. Simply whisk the pudding and refrigerate it, and store the crushed Oreos in an airtight container to maintain their crunch. When it’s time to serve, layer the chilled pudding with the crumbs, top with whipped cream, and add the gummy worms just before your guests arrive. This step ensures everything stays fresh and visually appealing. With this prep, you’ll have a delightful dessert ready in no time, allowing you to enjoy the festivities even more!
What to Serve with Halloween Dirt Cups
Treat your guests to an unforgettable Halloween feast by pairing these delightful dirt cups with a mix of savory and sweet accompaniments.
-
Spooky Cheese Platter: A variety of cheeses shaped like Halloween icons boosts your spread’s visual appeal, balancing the sweetness of dirt cups.
-
Pumpkin Soup: The warmth of creamy pumpkin soup offers a cozy contrast to the cold, sweet dirt cups while embracing the seasonal flavors.
-
Caramel Apples: Juicy apples coated in rich caramel provide a crunchy, sweet treat that complements the soft layers of your dirt cups.
-
Ghostly Cupcakes: Fun and festive, these ghost cupcakes bring another layer of whimsy to your dessert table, capturing the spirit of Halloween.
-
Witch’s Brew Punch: Serve a vibrant, colorful punch to add a refreshing element that enhances the overall Halloween experience.
-
Mini Pumpkin Pies: These small pies offer a classic fall flavor, making them a perfect sweet addition that guests will adore alongside the dirt cups.
Combining these treats will create a delightful Halloween spread that’s sure to impress both kids and adults!

Halloween Dirt Cups Recipe FAQs
What type of chocolate pudding should I use?
You can use any brand of chocolate pudding mix, but I recommend opting for one that is sugar-free if you want a healthier alternative. If you’re feeling adventurous, try using vanilla pudding for a different flavor profile!
How long can I store Halloween Dirt Cups in the fridge?
Leftover Halloween Dirt Cups can be stored in an airtight container in the refrigerator for up to 3 days. Just make sure the cups are covered to keep them fresh and maintain their delicious texture.
Can I prepare the cups ahead of time?
Absolutely! If you’re making them ahead, I suggest keeping the layers separate: store the chocolate pudding and crushed Oreos in separate containers for up to 2 days. Assemble the cups just before serving to keep everything fresh and maintain the crisp texture.
Can I freeze Halloween Dirt Cups?
Freezing the assembled cups is generally not recommended because the texture of the pudding can change once thawed. However, you can freeze the chocolate pudding and crushed Oreos separately for up to a month. When you’re ready to serve, simply reassemble them, and you’ll have a fresh-tasting treat!
Are there any allergy considerations for the ingredients?
Yes, keep an eye on allergies! The recipe includes common allergens like dairy (in chocolate pudding and whipped cream) and gluten (in Oreos). Substitute with dairy-free and gluten-free options as needed—look for alternatives like coconut whipped cream and gluten-free cookie options to make them safe for everyone.
How do I make the layers look pretty in the cups?
For stylish layers, carefully spoon in your ingredients to create distinct layers without mixing. Using clear cups will accentuate the layers beautifully, allowing everyone to see the delicious chocolate pudding “dirt” and cookie crumble!

Delicious Halloween Dirt Cups That Wow Kids and Adults!
Ingredients
Equipment
Method
- Prepare the chocolate pudding by whisking the pudding mix with milk until it thickens, about 2 minutes. Let it set for 5 minutes.
- Crush Oreos in a resealable bag until they resemble fine crumbs. Set aside.
- Layer the chocolate pudding and crushed Oreos in serving cups, starting with pudding at the bottom.
- Whip the cream until soft peaks form and spoon a dollop onto each cup.
- Decorate with gummy worms on top of the whipped cream.
- Chill the cups in the refrigerator for about 30 minutes before serving.
- Serve and enjoy at your Halloween party!
Leave a Reply