
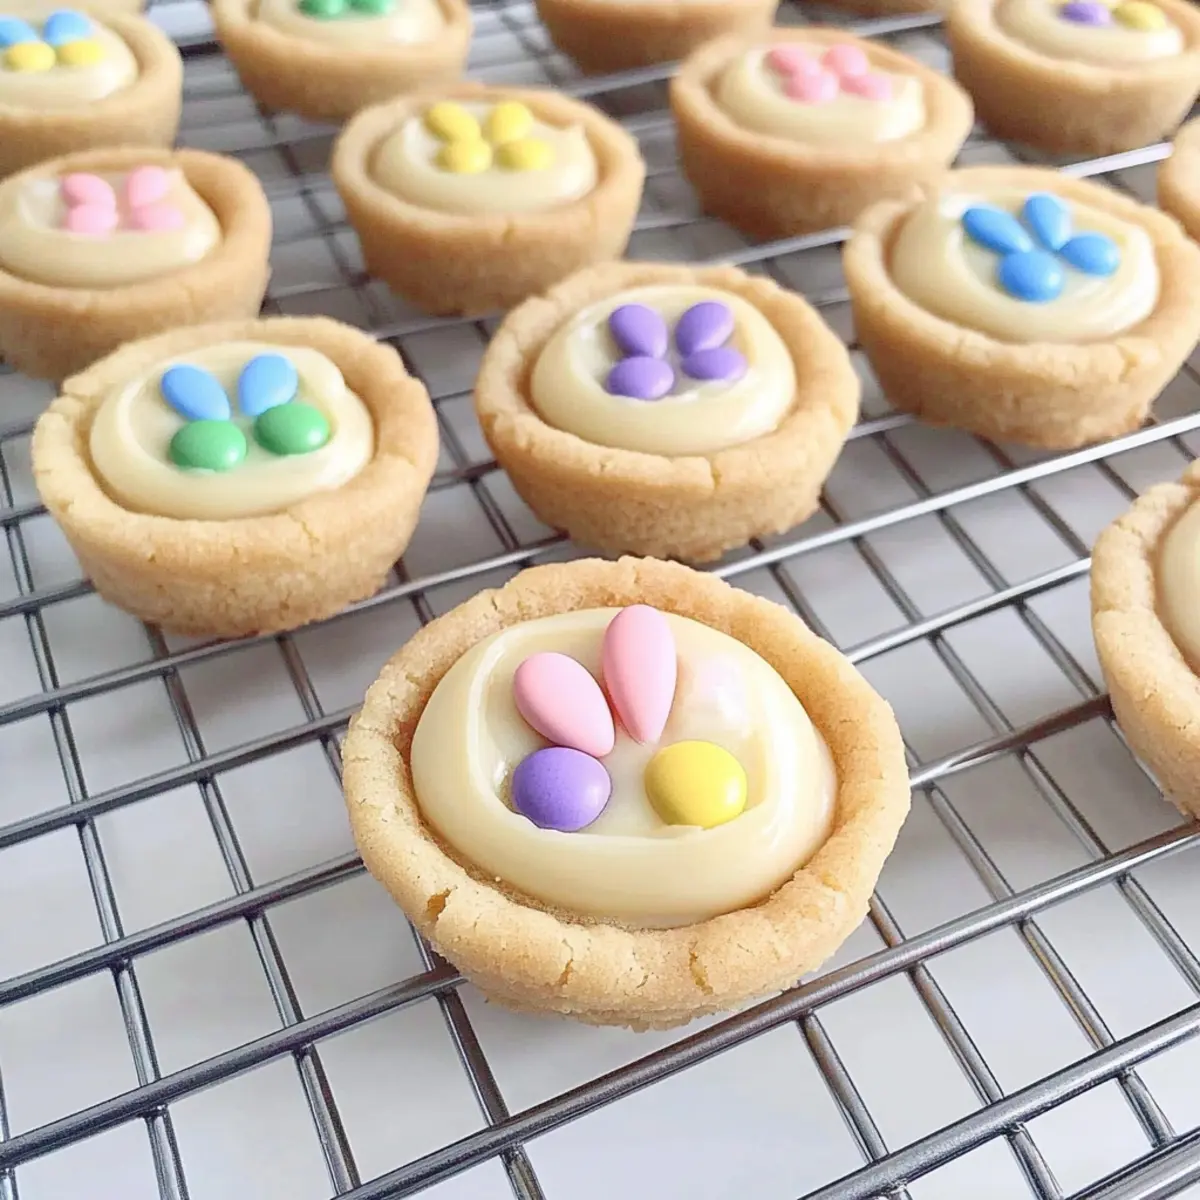
As I was admiring the cheerful blossoms of spring, an idea sprang to mind: why not celebrate the season with some delightful Easter Bunny Sugar Cookie Cups? These adorable treats are incredibly easy to whip up, making them a perfect choice for festive gatherings with friends and family. Each soft, chewy cookie is filled with a luscious white chocolate ganache, then topped with colorful pastel M&Ms that give them a whimsical bunny face. What’s not to love? Whether you’re a seasoned baker or just diving into the world of homemade desserts, these cookie cups are a fun way to bring joy to your Easter celebrations. Can you resist the charm of these cute little cookies, or will they be the star of your next holiday table?
Why are These Cookie Cups a Must-Bake?
Festive and Fun: These Easter Bunny Sugar Cookie Cups are the ultimate treat for your spring celebrations, bringing joy to both kids and adults alike.
Simple to Make: With just a few ingredients and straightforward steps, you can create these adorable cookies without any complicated techniques. Perfect for novice bakers!
Deliciously Indulgent: The combination of soft, chewy cookie and creamy ganache makes for an irresistible bite that will have everyone reaching for seconds.
Versatile Flavors: Feel free to swap the cake mix for chocolate or funfetti to suit your taste or occasion. The ability to customize makes these cookie cups a hit for any gathering.
A Showstopper: Whimsically decorated with pastel M&Ms, these treats are not only delicious but also a delightful centerpiece for your holiday table, sure to impress your guests.
With these adorable cookies, it’s easy to spread happiness this Easter! For another sweet option, check out my Breakfast Granola Cups, which are perfect for any occasion!
Easter Bunny Sugar Cookie Cups Ingredients
Get ready to bake these charming treats!
For the Cookie Base
• Box of White or Yellow Cake Mix (13.25 oz) – This gives you a delightful sugary foundation. Try gluten-free for a lighter option!
• ¼ cup All-Purpose Flour – Essential for structure, ensuring your cookies have the perfect texture.
• 8 tablespoons Unsalted Butter, melted and cooled – Adds richness; make sure it’s cooled to keep the eggs from cooking.
• 1 large Egg – The binder that holds everything together; swap with a flax egg for a vegan version.
• 1 large Egg Yolk – For even more moisture and softness in your cookie; omit for a lighter cookie.
• 2 teaspoons Pure Vanilla Extract – A splash will enhance the flavor; swap in almond extract for a unique twist.
• ¼ cup Granulated Sugar (for rolling) – Adds a beautiful sweetness and crunch; roll cookies in sugar for extra sparkle!
For the Ganache Filling
• 1 cup White Chocolate Chips – The creamy filling that makes these cups divine; dark chocolate can be used for a richer flavor.
• ¼ cup Heavy Cream – Works with chocolate chips for a silky ganache; coconut cream is a tasty dairy-free substitute.
For Decoration
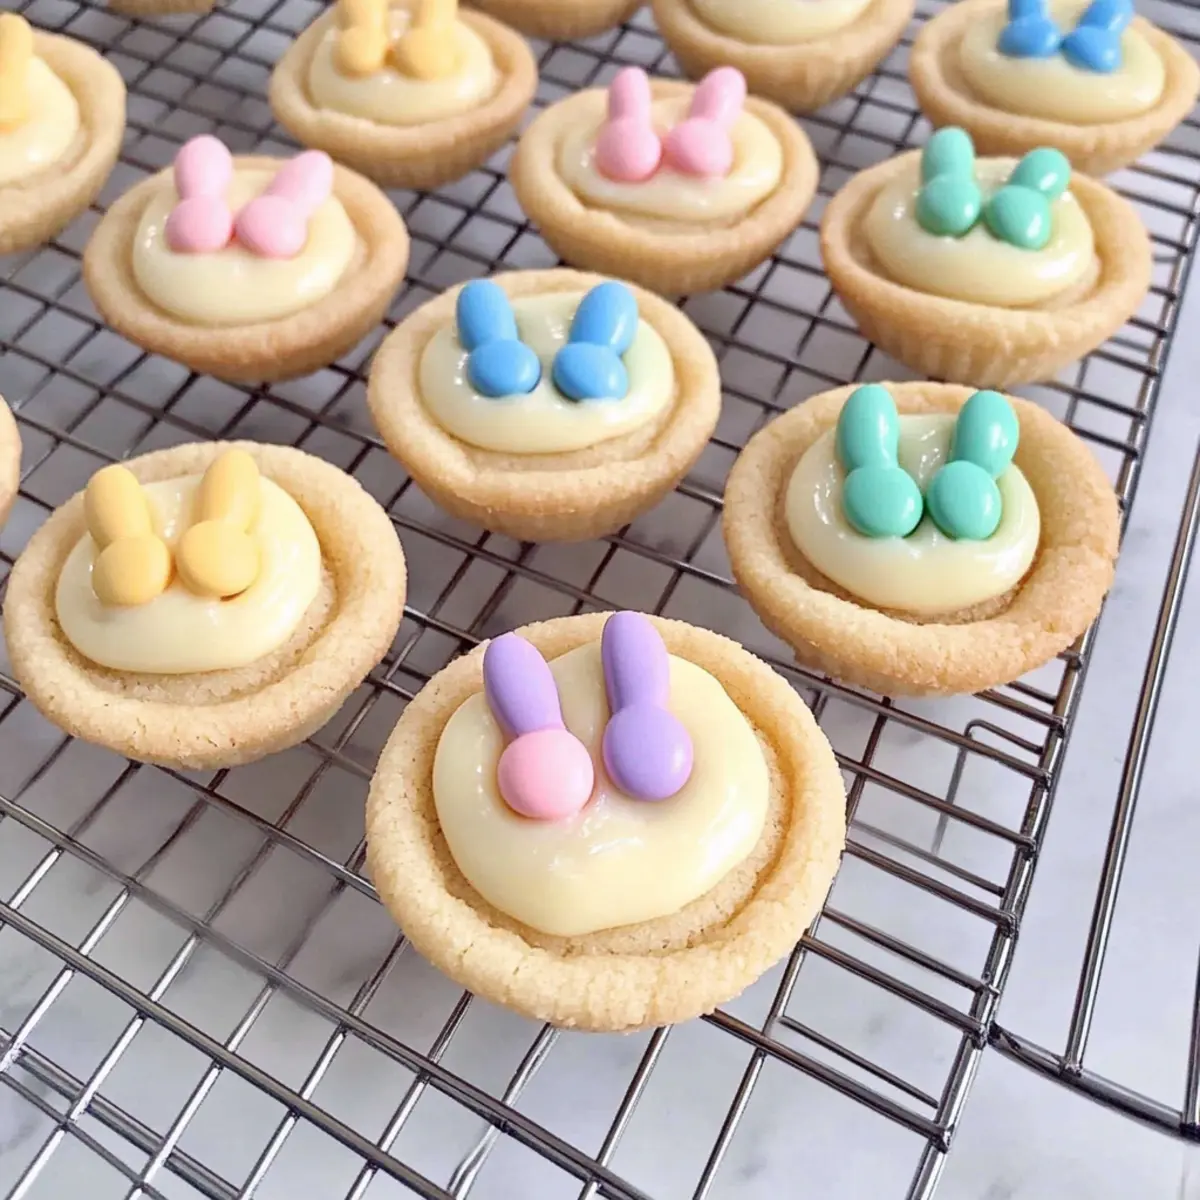
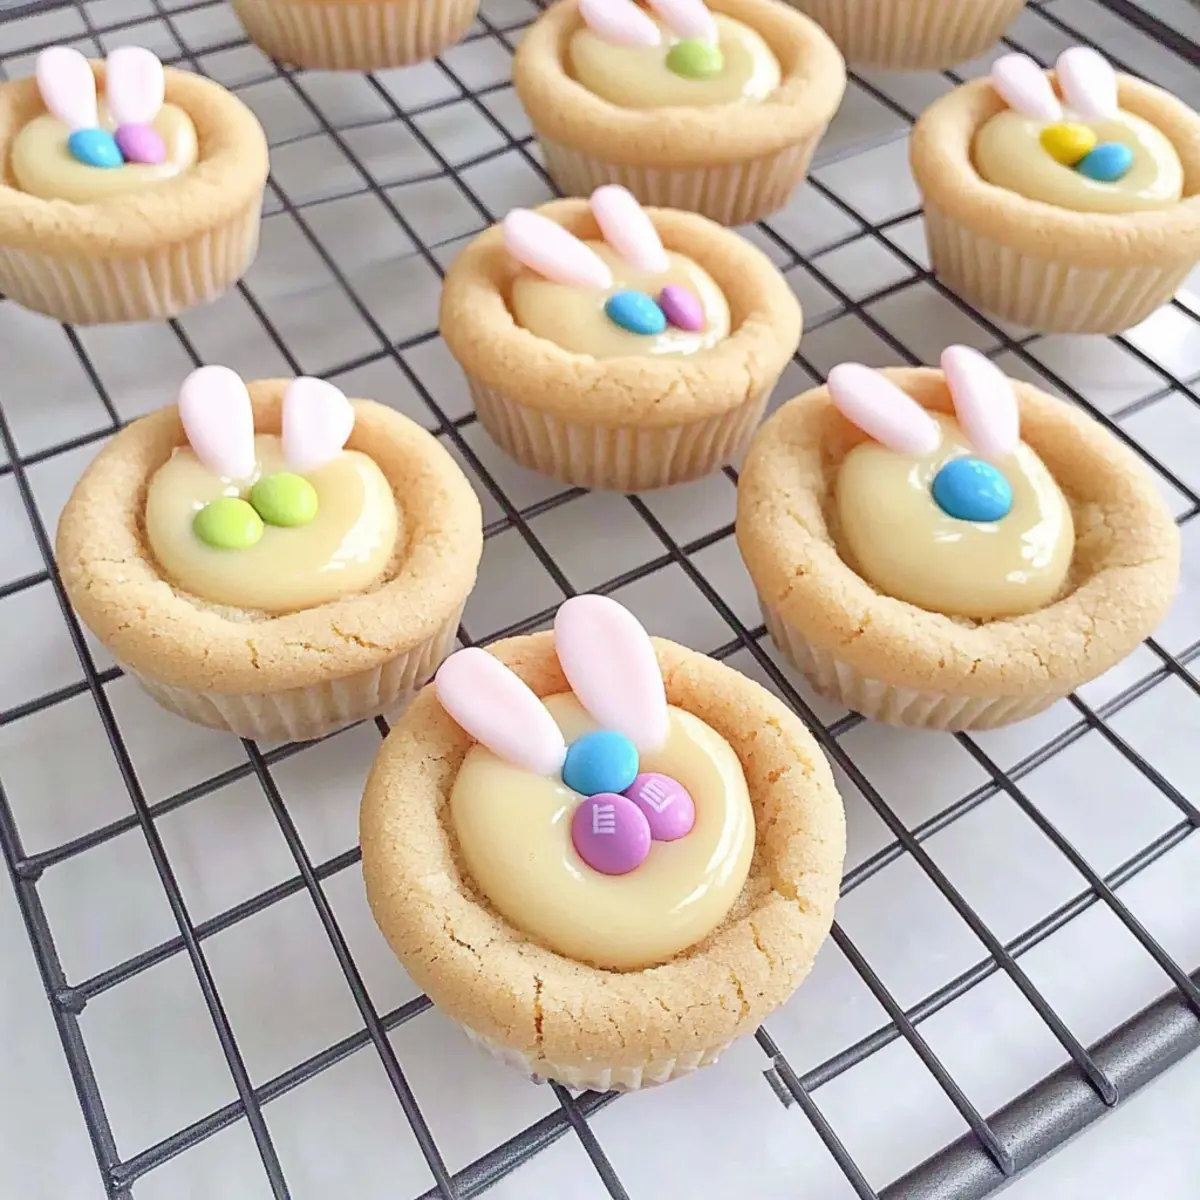
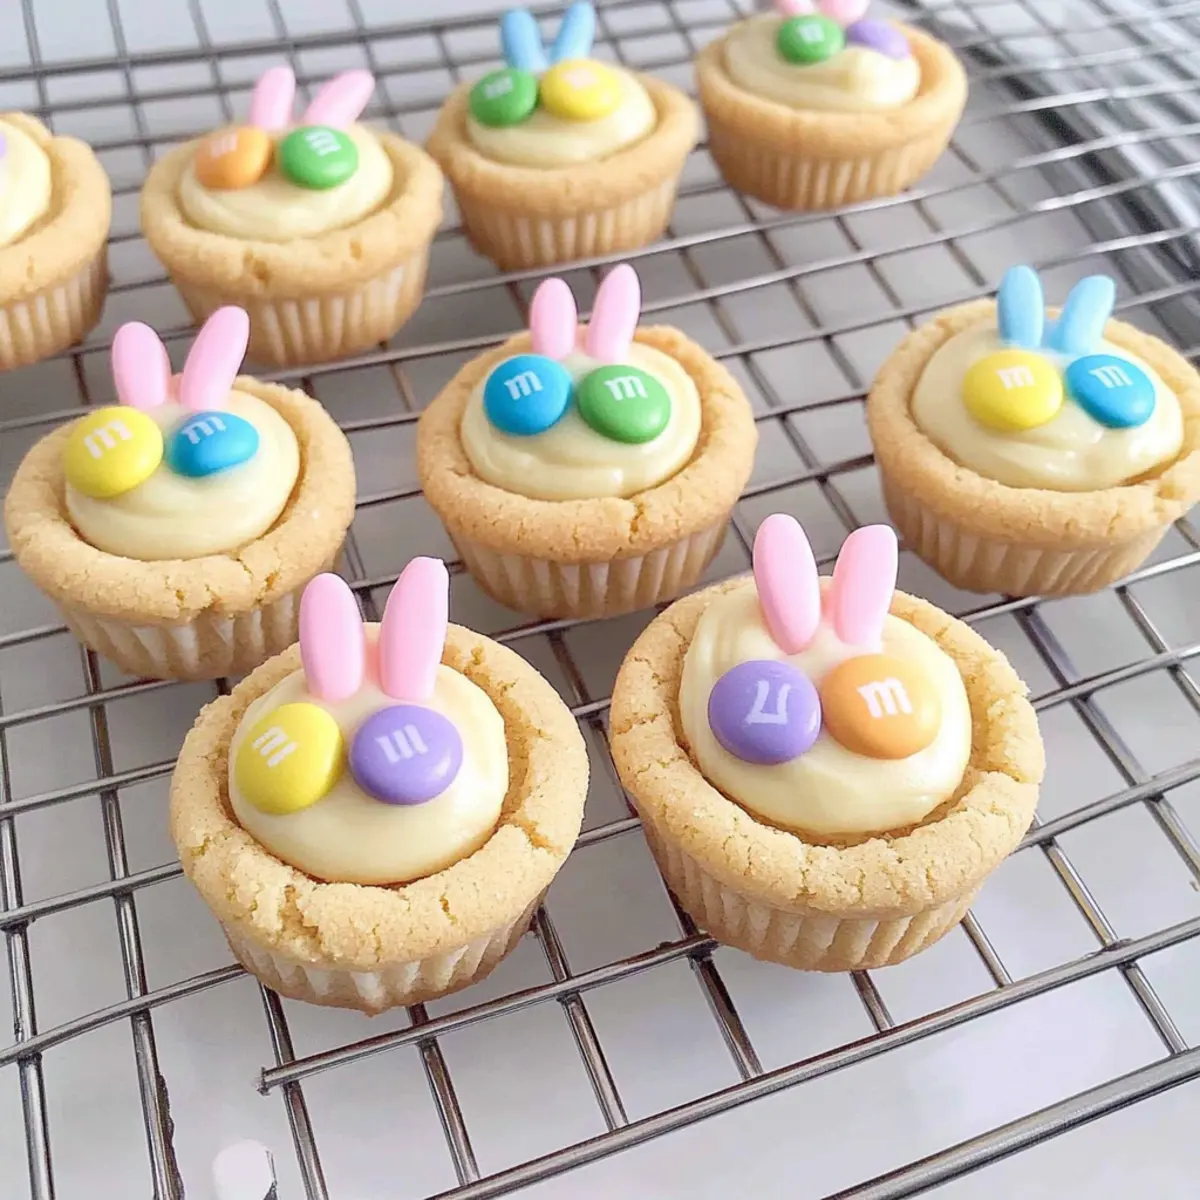
• 58 M&Ms (or 2 per cookie cup) – These will create adorable bunny faces; feel free to use any pastel candies you like!
Let’s bake some memories with these Easter Bunny Sugar Cookie Cups that everyone will adore!
Step‑by‑Step Instructions for Easter Bunny Sugar Cookie Cups
Step 1: Preheat Oven
Begin by preheating your oven to 325°F (163°C). While the oven warms up, grab a mini muffin tin and generously coat it with cooking spray to ensure easy removal of your adorable Easter Bunny Sugar Cookie Cups later.
Step 2: Prepare Dough
In a mixing bowl, whisk together the box of cake mix and all-purpose flour until well combined. Next, add the melted and cooled butter, egg, egg yolk, and vanilla extract, mixing on low speed initially, then increasing to medium until a soft dough forms, roughly 2-3 minutes.
Step 3: Shape Cookies
Once your dough is ready, take approximately one tablespoon of dough and roll it into a ball in your hands. Consider rolling each ball in granulated sugar to enhance sweetness and presentation, then place them into the prepared muffin tin, spacing them evenly.
Step 4: Bake
Place the muffin tin in the preheated oven and bake the cookie cups for about 14 minutes. Look for them to be puffy and slightly cracked on top; avoid browning for the soft, chewy texture we want in our Easter Bunny Sugar Cookie Cups.
Step 5: Create Indent
Immediately after removing the tin from the oven, use a small utensil, like a spoon or your finger, to gently press down in the center of each cookie to form an indent or cup. Let them cool in the pan for 5-10 minutes before transferring them to a wire rack to finish cooling.
Step 6: Make Ganache
In a microwave-safe bowl, combine the white chocolate chips and heavy cream. Microwave in short 30-second intervals, stirring in between, until the mixture is smooth and glossy. This luscious ganache will be the perfect filling for your Easter Bunny Sugar Cookie Cups.
Step 7: Fill Cookie Cups
Once the ganache has cooled slightly, carefully fill each cookie cup with the smooth mixture, making sure to distribute evenly. You want to ensure each cup gets a delightful helping of ganache that will complement the cookie perfectly.
Step 8: Decorate
To bring your cookie cups to life, take one whole M&M and gently press it into the center of each filled cookie for the bunny’s face. Use two half-M&Ms (cut side down) for the ears, pressing them firmly into the ganache to secure their position.
Step 9: Set Ganache
Finally, let the decorated Easter Bunny Sugar Cookie Cups sit at room temperature for about 2 hours until the ganache firms up. This will ensure that your treats are perfectly set and ready to delight at your next festive gathering!
Easter Bunny Sugar Cookie Cups Variations
Feel free to get creative with these Easter Bunny Sugar Cookie Cups and make them your own!
-
Chocolate Cake Mix: Swap the white cake mix for chocolate to create a rich, decadent variation that’s sure to please chocolate lovers.
-
Vegan Option: Use a flax egg instead of a regular egg and coconut cream instead of heavy cream for a delightful vegan treat.
-
Almond Flavor: Replace the vanilla extract with almond extract for a unique flavor twist that adds a warm, nutty touch.
-
Colorful Sprinkles: Before baking, add fun pastel sprinkles to the dough for bursts of color that make these cookie cups even more festive!
-
Whipped Cream Filling: Swap out the ganache with whipped cream or flavored mousse for a light and airy filling. This will change the texture and take the flavor in a different, fun direction.
-
Nutty Crunch: Fold in crushed nuts, like almonds or walnuts, into the dough before baking for a delicious crunch that complements the soft texture.
-
Fruit Filling: Consider filling the cookie cups with a fruity jam or curd instead of ganache. Lemon curd or raspberry jam offers a refreshing contrast that brightens the overall flavor.
-
Add Spice: Spice things up by adding a pinch of cinnamon or nutmeg to the dough before mixing. This subtle flavor enhancement could be just what your Easter gathering needs!
With these variations, your Easter Bunny Sugar Cookie Cups can be as delightful as they are delicious! For more sweet recipes, don’t forget to check out my delightful Healthy Carrot Cookies or your favorite Breakfast Granola Cups!
Make Ahead Options
These Easter Bunny Sugar Cookie Cups are perfect for busy home cooks looking to save time during festive preparations! You can make the cookie dough up to 24 hours in advance; just prepare the dough and wrap it tightly in plastic wrap before refrigerating to keep it fresh. Additionally, you can prepare the ganache filling ahead of time as well and store it in an airtight container in the fridge for up to 3 days. When you’re ready to bake, simply roll the dough into balls, bake, and fill with the ganache. These make-ahead steps ensure that you will still have delicious results without the stress, leaving you to enjoy your holiday gatherings!
Expert Tips for Easter Bunny Sugar Cookie Cups
Chill Dough: Keep dough chilled for 10-15 minutes before shaping to avoid a soft texture that can be hard to work with.
Measure Carefully: Accurate ingredient measurements are crucial. Using too much flour can lead to dry cookies, so be precise!
Monitor Baking Time: Avoid overbaking to ensure your cookie cups remain soft and chewy. Look for a slight puff and slight cracks on top.
Use Quality Chocolate: For the ganache, opt for high-quality white chocolate for a richer flavor. It makes a world of difference in these Easter Bunny Sugar Cookie Cups.
Customize Toppings: Feel free to swap M&Ms with your favorite pastel candies or sprinkle colorful nonpareils for added flair.
What to Serve with Easter Bunny Sugar Cookie Cups?
These festive cookie cups are the perfect centerpiece for your spring gathering, but what should you serve alongside them to create a memorable meal?
-
Fresh Fruit Salad: A medley of strawberries, blueberries, and kiwi offers a refreshing contrast to the rich sweetness of the cookies.
-
Vanilla Ice Cream: The creamy, cool texture of ice cream complements the chewy cookie and ganache, making for a delightful dessert combo.
-
Chocolate Dipped Strawberries: These elegant treats harmonize beautifully with the chocolate ganache in the cookie cups, adding a touch of indulgence.
-
Sparkling Lemonade: This light and bubbly drink provides a zesty kick that pairs excellently with the sweet flavors of the cookie cups, refreshing your palate.
-
Carrot Cake: Celebrate the season with a moist slice of carrot cake, whose spices and cream cheese frosting will echo the festive spirit of Easter gatherings.
-
Mini Quiches: Start the meal on a savory note! These bite-sized delights are easy to prepare and perfectly offset the sweetness of your cookie cups.
-
Easter-themed Charcuterie Board: Arrange an assortment of cheeses, meats, and pastels that not only looks beautiful but also offers a variety of flavors to enjoy before indulging in dessert.
-
Iced Tea: A classic choice, its slightly sweet and refreshing profile will balance the sugariness of the Easter Bunny Sugar Cookie Cups beautifully.
-
Chocolate Milk: Treat the kids (and the kid in you!) with a glass of chocolate milk – a nostalgic choice that perfectly complements the cookies’ rich flavors.
How to Store and Freeze Easter Bunny Sugar Cookie Cups
Room Temperature: Keep cookie cups in an airtight container at room temperature for up to 2 days to maintain their soft texture and flavor.
Fridge: You can refrigerate them in an airtight container for up to a week; just note that they may lose some of their chewiness.
Freezer: For longer storage, freeze the unfilled cookie cups in a single layer. Once firm, place them in a freezer-safe bag and store for up to 2 months.
Reheating: To enjoy them again, thaw at room temperature or warm briefly in the oven at 300°F (150°C) until just heated through before filling with the ganache.
Easter Bunny Sugar Cookie Cups Recipe FAQs
What type of cake mix should I use?
Absolutely! You can use either white or yellow cake mix as the base for your Easter Bunny Sugar Cookie Cups. If you need a gluten-free option, simply substitute with a gluten-free cake mix. This keeps the recipe easy while accommodating different dietary preferences.
How should I store these cookie cups?
For the best flavor and texture, keep your cookie cups in an airtight container at room temperature for up to 2 days. If you prefer to refrigerate them, they will last up to a week, but they may lose some of their delightful chewiness.
Can I freeze these cookie cups?
Yes! To freeze your Easter Bunny Sugar Cookie Cups, it’s best to freeze the unfilled cups first. Place them in a single layer on a baking sheet until they’re firm, then transfer them to a freezer-safe bag. They can be stored in the freezer for up to 2 months. To enjoy them later, simply thaw at room temperature or warm them gently in the oven at 300°F (150°C) before filling them with ganache.
What if my cookie cups spread too much in the oven?
If your cookies end up being too flat, it could be due to overmixing the dough or not chilling it long enough. Be sure to chill the dough for 10-15 minutes before shaping, which helps them retain their cute cup shape while baking. Additionally, measuring your flour accurately is crucial, as too much flour can lead to dense cookies—so keep those measurements precise!
Are there any allergen considerations?
Yes! The recipe contains common allergens like eggs and dairy. If you’re looking for an egg substitute, you can use a flax egg instead (1 tablespoon of ground flaxseed mixed with 2.5 tablespoons of water, let sit until thickened). For dairy-free options, swap the milk and butter for plant-based alternatives, such as coconut cream for the ganache. Make sure to check the labels of any packaged ingredients you use, especially for those with sensitivity to gluten or dairy.
Can I use different candies for decoration?
Very! While M&Ms are a fun and colorful choice for decorating the bunny faces, feel free to get creative! You can use pastel Skittles, Jelly Beans, or even small chocolate eggs. This customization allows you to tailor the cookie cups for different occasions and preferences while keeping the festive spirit alive!
Delicious Easter Bunny Sugar Cookie Cups You’ll Love!
Ingredients
Equipment
Method
- Preheat your oven to 325°F (163°C). Coat a mini muffin tin with cooking spray.
- In a mixing bowl, whisk together the cake mix and all-purpose flour. Add melted butter, egg, egg yolk, and vanilla extract, mixing until a soft dough forms.
- Roll about one tablespoon of dough into a ball and place in the muffin tin.
- Bake for about 14 minutes until puffy and slightly cracked on top.
- Immediately press a small utensil in the center of each cookie to form a cup. Let cool in the pan for 5-10 minutes.
- In a microwave-safe bowl, combine white chocolate chips and heavy cream. Microwave until smooth, stirring in 30-second intervals.
- Fill each cookie cup with the ganache, distributing evenly.
- Press one whole M&M in the center of each filled cookie for the bunny face and two half-M&Ms for the ears.
- Let the cups sit at room temperature for about 2 hours until the ganache firms up.
Leave a Reply