
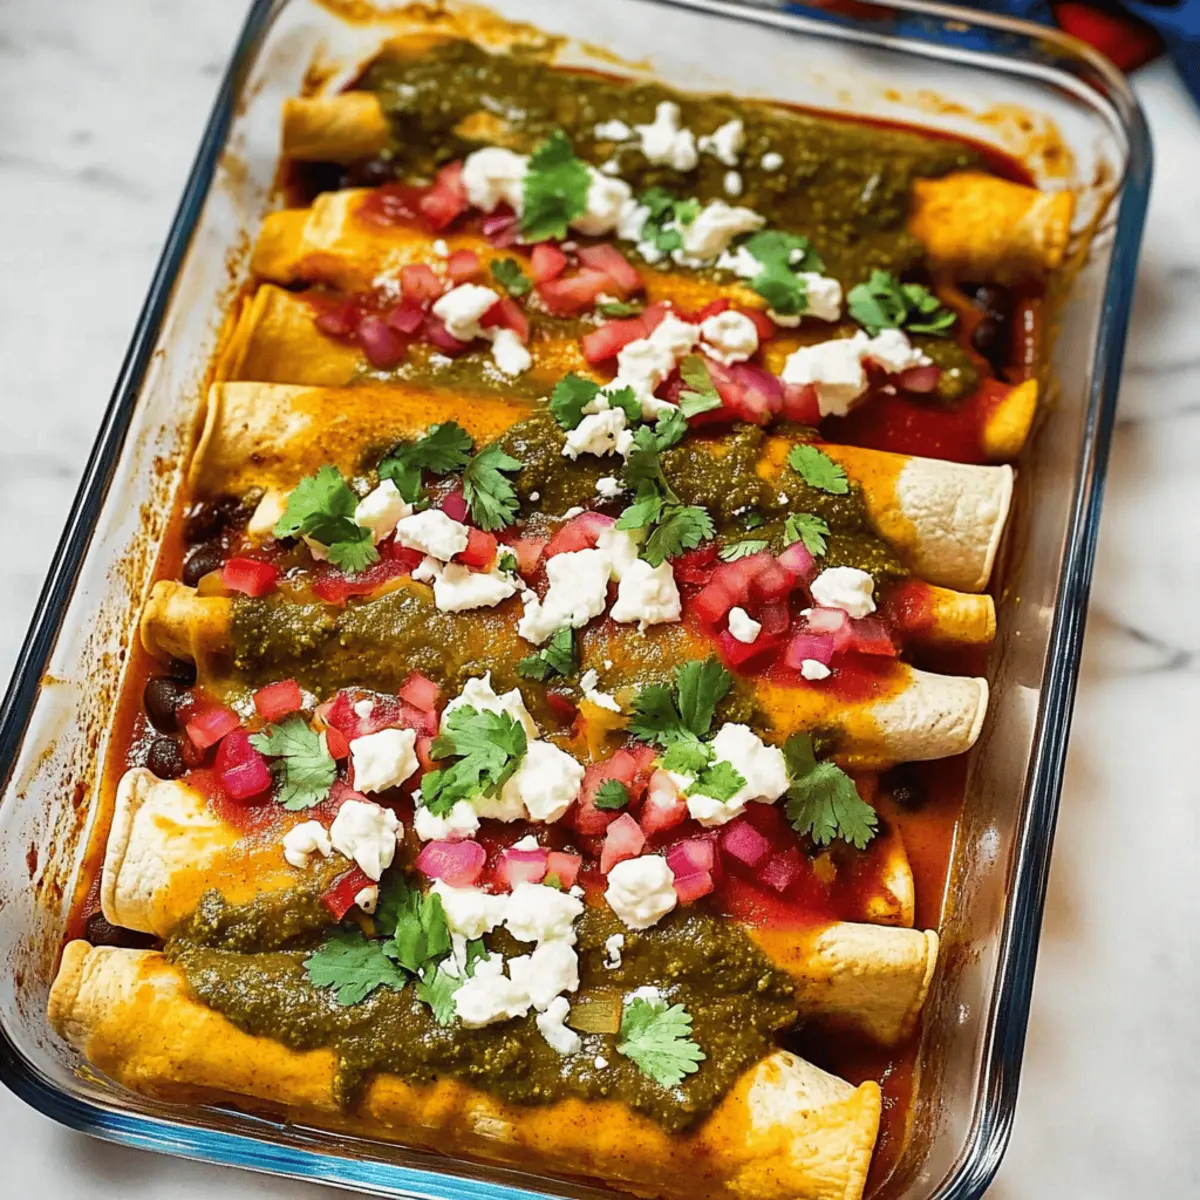
The aroma of bubbling enchiladas wafts through my kitchen, igniting feelings of joy and nostalgia. Christmas enchiladas, with their vibrant red and green sauces, have become a holiday tradition in my home, marrying flavors and colors that feel as festive as the season itself. This vegetarian delight, stuffed with hearty black beans and fresh vegetables, not only pleases the palate but also serves as a healthy upgrade to traditional Christmas fare. With minimal prep time and the option to make them gluten-free, it’s the perfect dish for gatherings that bring family and friends together. As you dive into this recipe, you’ll soon discover how easy it is to create a comforting, seasonal feast that can easily become your new holiday favorite. Curious to see how these festive enchiladas come together? Let’s get rolling!
Why Are Christmas Enchiladas So Special?
Festive Charm: These Christmas enchiladas brighten your holiday table with their vibrant red and green sauces, capturing the spirit of the season.
Ease of Preparation: With simple steps and fewer than 30 minutes of prep time, you’ll be enjoying a delicious homemade meal in no time!
Nutritious Ingredients: Packed with fresh vegetables and black beans, they offer a healthy, vegetarian option that doesn’t compromise on flavor.
Versatile Options: Customize your enchiladas by swapping fillings or sauces; they cater to various dietary needs, including gluten-free and vegan.
Crowd-Pleasing Delight: Perfect for large gatherings, these enchiladas are sure to impress your guests and leave them asking for seconds.
Take a look at our tips for customizing and serving to elevate your festive gathering!
Christmas Enchiladas Ingredients
For the Filling
- Corn Tortillas – Essential for structure; provides a traditional base for the enchiladas. Substitution: Can use flour tortillas; however, traditional recipes favor corn.
- Black Beans – Adds protein and fiber; offers a creamy texture when mashed. Note: Use canned beans for ease; rinse well before using.
- Bell Peppers – Contributes sweetness and crunch; enhances color appeal. Substitution: Any preferred bell pepper color (red, yellow, green) can be used.
- Mushrooms – Adds umami flavor and a meaty texture; enhances the dish’s heartiness. Note: Can substitute with diced zucchini or eggplant for variation.
- Spinach – Provides leafy greens packed with nutrients; contributes a fresh taste. Note: Other greens like kale can be used.
- Onion – For flavor; caramelizes to add sweetness. Substitution: Shallots can be used for a milder taste.
- Garlic – Offers aromatic flavor; essential for building depth in the sauce. Note: Fresh cloves preferred but can use garlic powder in a pinch.
- Cumin – Enhances the enchilada filling with warm, earthy notes. Substitution: Coriander can add variation to the spice profile.
- Cheese (Cotija or feta) – Provides richness and completes the flavor; melts beautifully within the enchiladas. Note: Vegan cheese can be used for a non-dairy option.
For the Sauce
- Red and Green Enchilada Sauces – Main flavor components; each brings its unique taste. Preparation: Both sauces can be homemade or store-bought.
Let’s get the ingredients ready and follow the magical steps to create our festive Christmas enchiladas!
Step‑by‑Step Instructions for Christmas Enchiladas
Step 1: Preheat your Oven
Begin by preheating your oven to 400°F (200°C). While the oven heats, grab a 9×13-inch baking dish and lightly grease it with cooking spray or a drizzle of olive oil. This will prevent your vibrant Christmas enchiladas from sticking as they bake, ensuring easy serving and cleanup when it’s time to feast.
Step 2: Sauté the Vegetables
In a Dutch oven, warm a couple of tablespoons of olive oil over medium heat. Add finely chopped onion and diced bell peppers, sautéing them for about 5-6 minutes until they’re softened and aromatic. Stir often, watching for the onion to turn translucent and the peppers to brighten, a lovely base for your filling.
Step 3: Add the Mushrooms and Greens
Next, incorporate sliced mushrooms into the mixture and continue cooking for an additional 6-9 minutes until they are beautifully caramelized. Then stir in a heaping handful of fresh spinach, cooking until just wilted, roughly 2-4 minutes. To elevate the flavor profile, add minced garlic and cumin, letting the fragrance fill your kitchen.
Step 4: Combine the Filling Ingredients
Remove the pan from heat, then gently fold in rinsed black beans and crumbled cheese into the vegetable mixture. Season your filling with salt and pepper, adjusting to taste. The filling for your Christmas enchiladas should be hearty and flavorful, ready to deliver a comforting bite in every roll.
Step 5: Prepare the Tortillas
To make your tortillas pliable, place them in the warm oven for about 2 minutes. This step is crucial; warm tortillas will prevent cracking when rolling. Once heated, wrap them in a clean towel to keep them warm while you assemble your delicious Christmas enchiladas.
Step 6: Assemble the Enchiladas
Spread a layer of red and green enchilada sauces in the bottom of your prepared baking dish. Taking a warmed tortilla, spoon a generous amount of the filling mixture onto its center, roll it up tightly, and place seam-side down in the dish. Repeat this process until all tortillas are filled and arranged snugly in the dish.
Step 7: Top and Bake
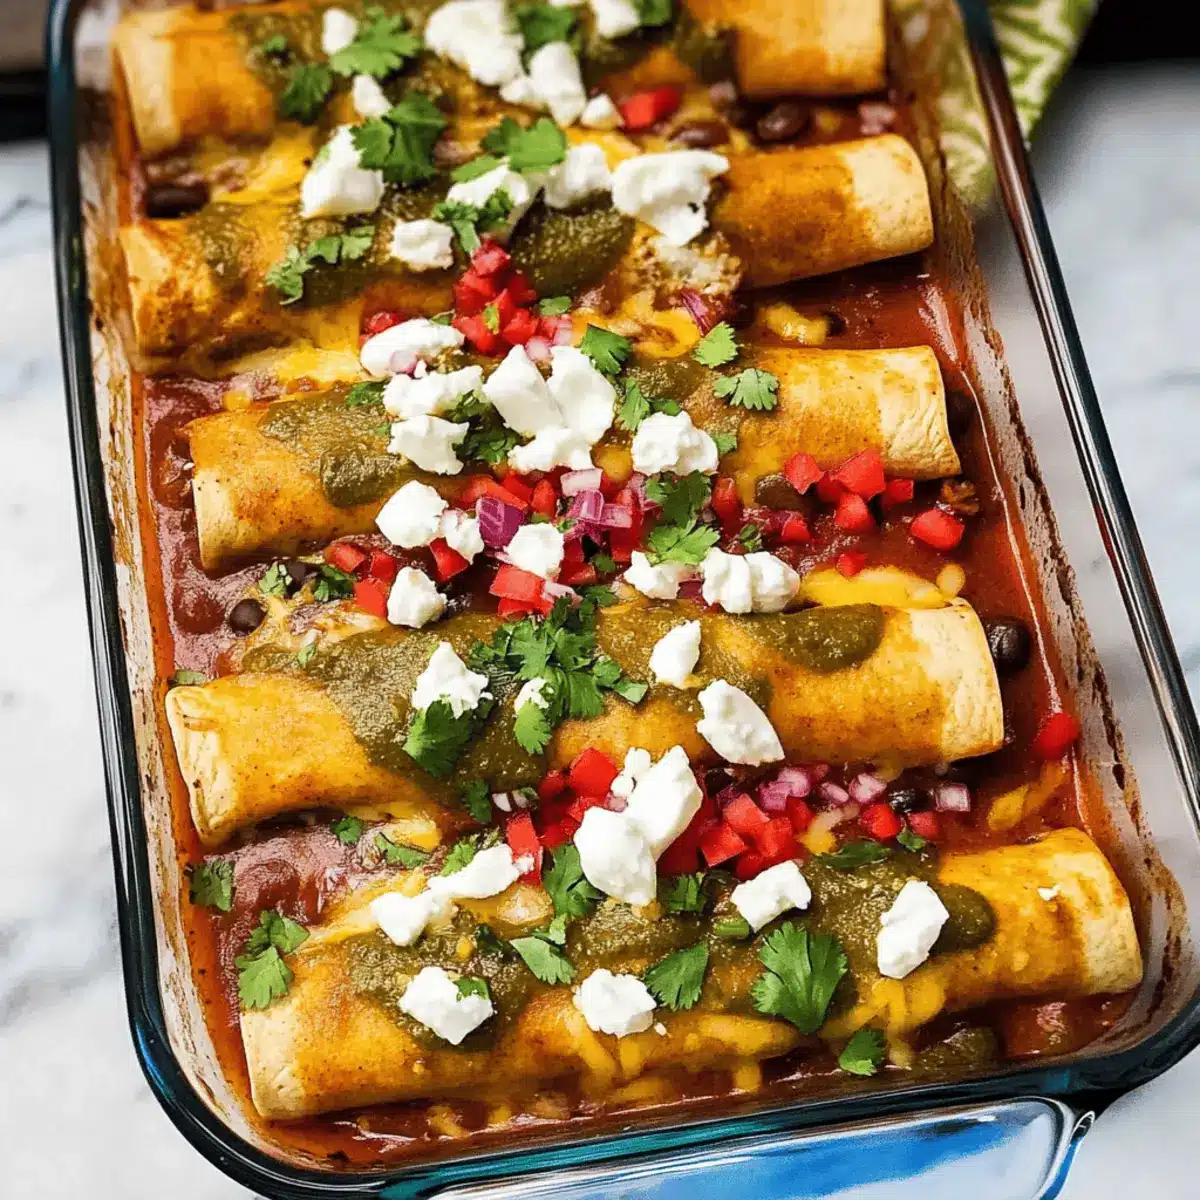
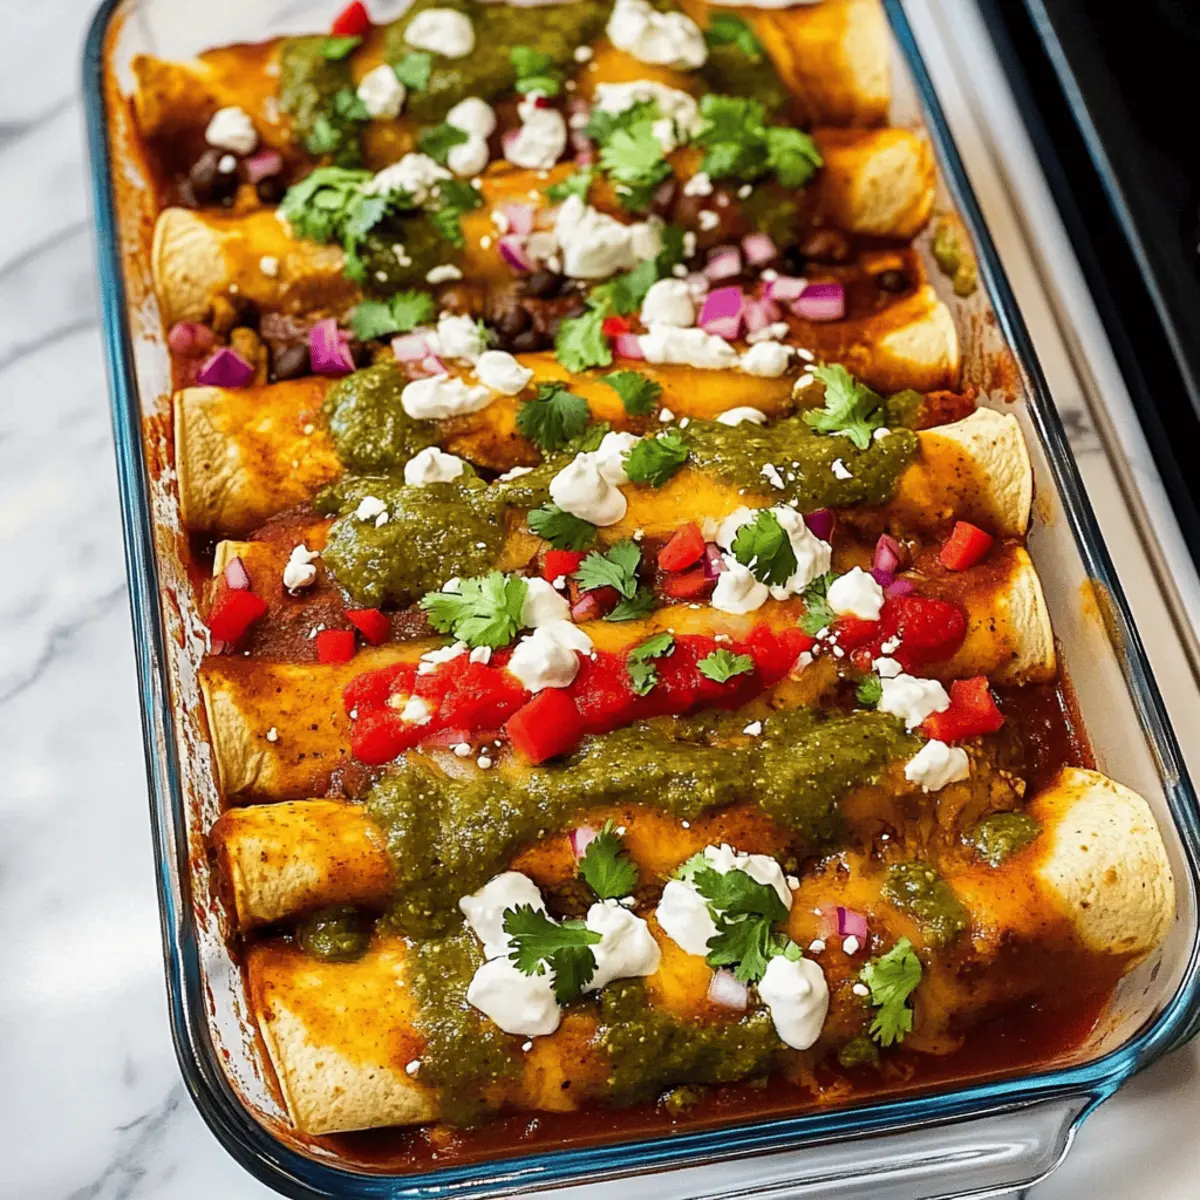
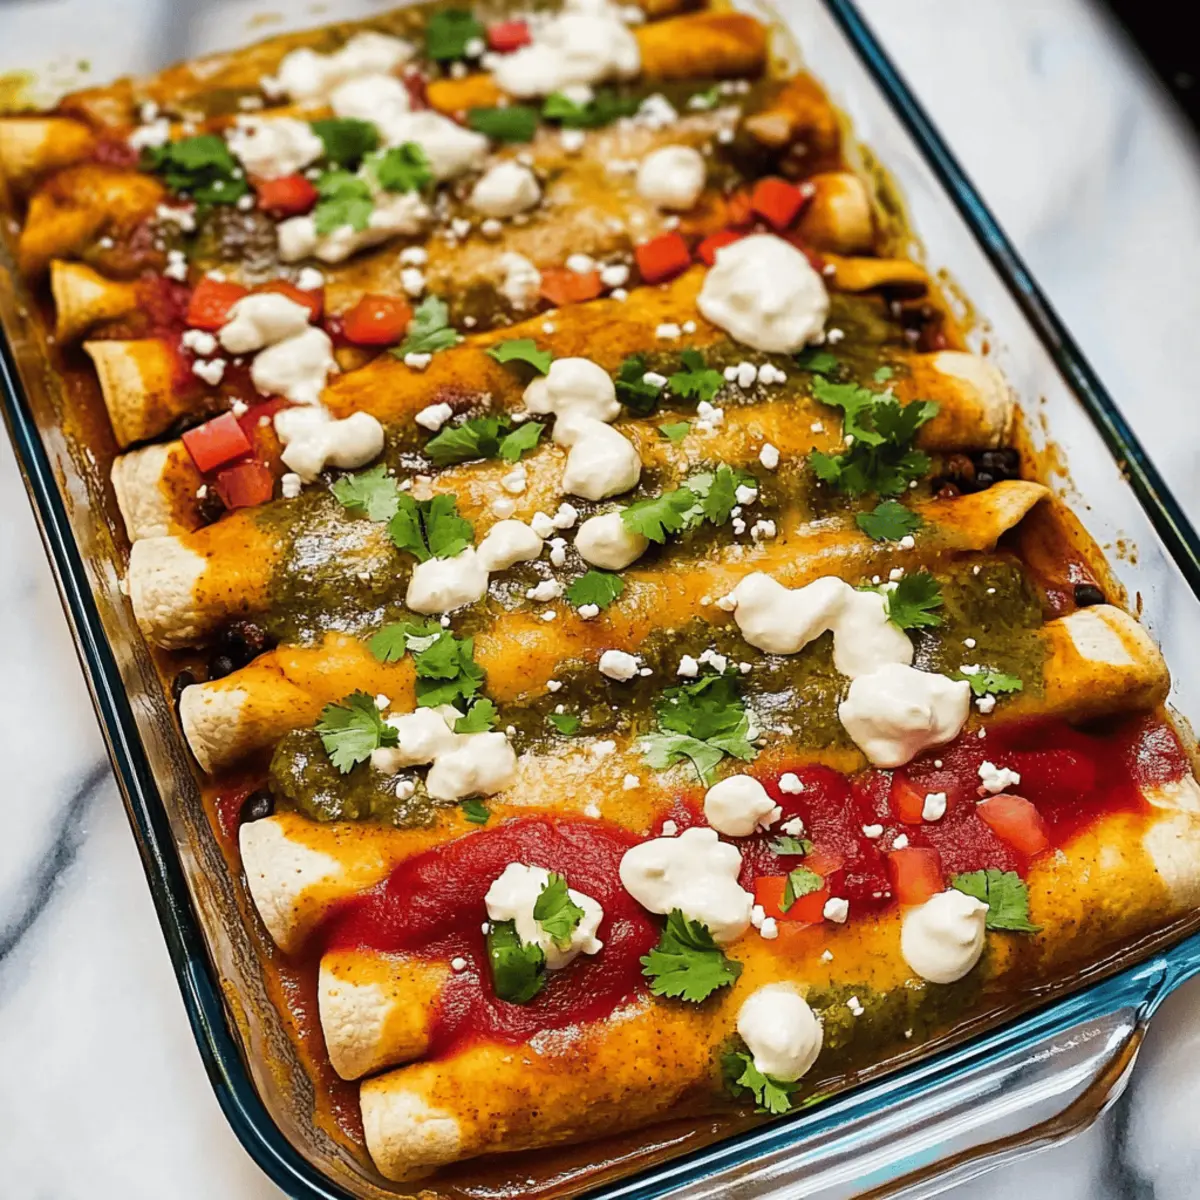
Pour the remaining enchilada sauces over the rolled tortillas, ensuring an even coating that will enhance the flavors. Transfer your baking dish to the preheated oven and bake for 20-22 minutes. Look for bubbling edges and a slightly matte top, indicating your Christmas enchiladas are done and ready to be savored.
Step 8: Garnish and Serve
Once removed from the oven, let the enchiladas sit for a few minutes before garnishing. You might sprinkle fresh cilantro, crumbled cheese, or avocado slices on top if desired. Serve warm, enjoying this festive dish that encapsulates the spirit of the season with every bite of your delightful Christmas enchiladas.
How to Store and Freeze Christmas Enchiladas
Fridge: Store leftover Christmas enchiladas in an airtight container for up to 3 days, ensuring they retain their delicious flavors and textures.
Freezer: For longer storage, freeze assembled enchiladas in a tightly wrapped dish or freezer-safe container for up to 2 months. Thaw overnight in the fridge before baking.
Reheating: Reheat in the oven at 350°F (175°C) until warmed through, approximately 20-25 minutes. This brings back the creamy goodness of your enchiladas, making them just as enjoyable as the first day.
Assembly Preparation: If you prefer to prep ahead, feel free to assemble the enchiladas in advance and simply store them in the fridge until you’re ready to bake; they’ll be fresh and ready for your holiday table!
Christmas Enchiladas: Flavorful Variations Await
Feel free to get creative with your Christmas enchiladas—each delightful twist enhances the flavor and caters to your unique taste buds!
-
Gluten-Free: Use corn tortillas for a naturally gluten-free option that doesn’t compromise flavor.
-
Cheese Swap: Experiment with Monterey Jack or pepper jack cheese for a creamier, spicier filling. Each bite offers a satisfying melt that elevates your dish.
-
Veggie Boost: Add additional veggies like zucchini, roasted corn, or sweet potatoes for a hearty twist that enhances the nutritional profile.
-
Protein-Packed: Include shredded chicken or sautéed tofu to add protein and make the dish more filling. It’s a delicious way to make it a complete meal!
-
Extra Spice: Incorporate diced jalapeños or sprinkle crushed red pepper flakes for an added kick. Spice lovers will appreciate the bold flavors that shine through.
-
Sauce Variation: Try using green chili sauce in place of the traditional green enchilada sauce for a different flavor dimension. This swap brings a unique zest that contrasts nicely with the red sauce.
-
Herb Enhancer: Mix fresh cilantro or parsley into the filling for a burst of fresh flavor that complements the richness of the enchiladas.
-
Creamy Dream: Top with a dollop of sour cream or Greek yogurt before serving. It adds a luscious, tangy finish that balances the spices perfectly.
Explore these variations to keep your Christmas enchiladas exciting and tailored just for you—your loved ones will be delightfully surprised!
What to Serve with Christmas Enchiladas?
Enhance your festive meal with delightful sides that perfectly complement these vibrant enchiladas.
-
Mexican Rice: This fluffy, fragrant side adds a comforting base. The gentle spice and tomato flavor pair seamlessly with the rich enchiladas.
-
Refried Beans: Creamy and hearty, refried beans provide an excellent contrast in texture. Their subtle flavor balances the zesty sauces and filling, making each bite a delight.
-
Fresh Green Salad: Lighten your meal with a crisp salad featuring mixed greens and avocado. This adds freshness and brightness, cutting through the richness of the cheeses.
-
Guacamole: Creamy and zesty, guacamole serves as a perfect dip alongside. Its coolness contrasts nicely with the warmth of the enchiladas, enhancing your flavor experience.
-
Margaritas: Refreshing and tangy, margaritas are an ideal beverage choice amidst a cozy gathering. Their citrusy notes pair wonderfully with the Mexican flavors inherent in the enchiladas.
-
Churros: End the meal on a sweet note with churros. Their crispy outside and soft interior, served with a side of chocolate sauce, create a delightful finish after the savory enchiladas.
-
Pico de Gallo: This fresh salsa offers a burst of flavor and acidity. It brightens up the dish, adding a contrast that elevates the entire meal.
-
Grilled Corn: Sweet and slightly charred, grilled corn adds another layer of texture. Its natural sweetness balances the savory notes of the enchiladas perfectly.
-
Mexican Hot Chocolate: Rich and indulgent, this beverage provides a warm, comforting finish to your meal. Its deep chocolate flavor complements the spices in the enchiladas, making for a lovely ending.
Expert Tips for Christmas Enchiladas
-
Tortilla Warming: Always warm your corn tortillas before filling. This prevents cracking and makes rolling easier for perfect Christmas enchiladas.
-
Filling Variations: Experiment with fillings by swapping in seasonal vegetables or adding plant-based protein like lentils or quinoa for extra heartiness.
-
Sauce Balance: Don’t skimp on the red and green sauces; they’re key for flavor. Mixing them well ensures even coverage and vibrant taste in every bite.
-
Cheese Melting: For melty perfection, use a combination of Cotija and mozzarella. Layering the cheese in the filling and on top provides a delicious, cheesy crust.
-
Make-Ahead Tips: Prepare the filling a day in advance and store it in the fridge. Just assemble and bake the next day for a quicker cooking experience.
-
Freezing Instructions: If you have leftovers or want to prep ahead, freeze your assembled enchiladas. They maintain great flavor when baked straight from frozen; just add extra time in the oven!
Make Ahead Options
These Christmas enchiladas are ideal for meal prep, allowing you to save time during the busy holiday season! You can assemble the enchiladas up to 24 hours in advance. Simply prepare your filling and roll the enchiladas according to the recipe instructions, then place them in the baking dish and cover with sauce. Refrigerate until ready to bake. This method retains the flavors beautifully, ensuring they’re just as delicious when baked. When you’re ready to serve, pop them in the oven for 20-22 minutes until bubbling. Enjoy the ease of a festive meal without the last-minute rush!
Christmas Enchiladas Recipe FAQs
What type of tortillas work best for Christmas enchiladas?
Absolutely! Corn tortillas are traditional and provide the best structural integrity for enchiladas. If you prefer, you can use flour tortillas, but for an authentic taste, stick with corn.
How long can I store leftover Christmas enchiladas?
Leftover Christmas enchiladas can be stored in an airtight container in the fridge for up to 3 days. To enjoy them at their best, reheat them in the oven to refresh their flavors and textures.
Can I freeze Christmas enchiladas?
Very! For freezing, assemble your enchiladas in a freezer-safe container, tightly wrapped to prevent freezer burn. They can be stored for up to 2 months. When you’re ready to enjoy them, thaw overnight in the fridge, then bake at 350°F (175°C) for 20-25 minutes until warmed through.
What should I do if my tortillas break while rolling?
No worries! If your tortillas are cracking or breaking, consider warming them for another minute in the oven or using a few drops of water to steam them. If available, use a plastic wrap or damp towel to cover them while they warm, which helps keep them pliable for rolling.
Are there any dietary concerns for Christmas enchiladas?
Absolutely! While this recipe is naturally vegetarian, for gluten-free options, ensure you source gluten-free tortillas and sauces. Additionally, if you’re cooking for someone with allergies, be mindful of the cheese and the type of beans you use, opting for dairy-free cheese and checking the labels on packaged sauces.
Christmas Enchiladas: Festive Flavor in Every Bite!
Ingredients
Equipment
Method
- Preheat your oven to 400°F (200°C) and grease a 9x13-inch baking dish.
- In a Dutch oven, warm a couple of tablespoons of olive oil over medium heat. Add finely chopped onion and diced bell peppers, sauté for 5-6 minutes until softened.
- Incorporate sliced mushrooms and cook for an additional 6-9 minutes. Stir in fresh spinach until wilted, then add minced garlic and cumin.
- Remove from heat and fold in rinsed black beans and crumbled cheese. Season the filling with salt and pepper.
- Warm tortillas in the oven for about 2 minutes. Once heated, wrap them in a towel to keep warm.
- Spread red and green enchilada sauces in the bottom of the prepared baking dish. Fill tortillas with the mixture, roll tightly, and place seam-side down.
- Pour remaining enchilada sauces over the tortillas and bake for 20-22 minutes.
- Let cool for a few minutes before garnishing. Serve warm with cilantro, cheese, or avocado slices.
Leave a Reply