
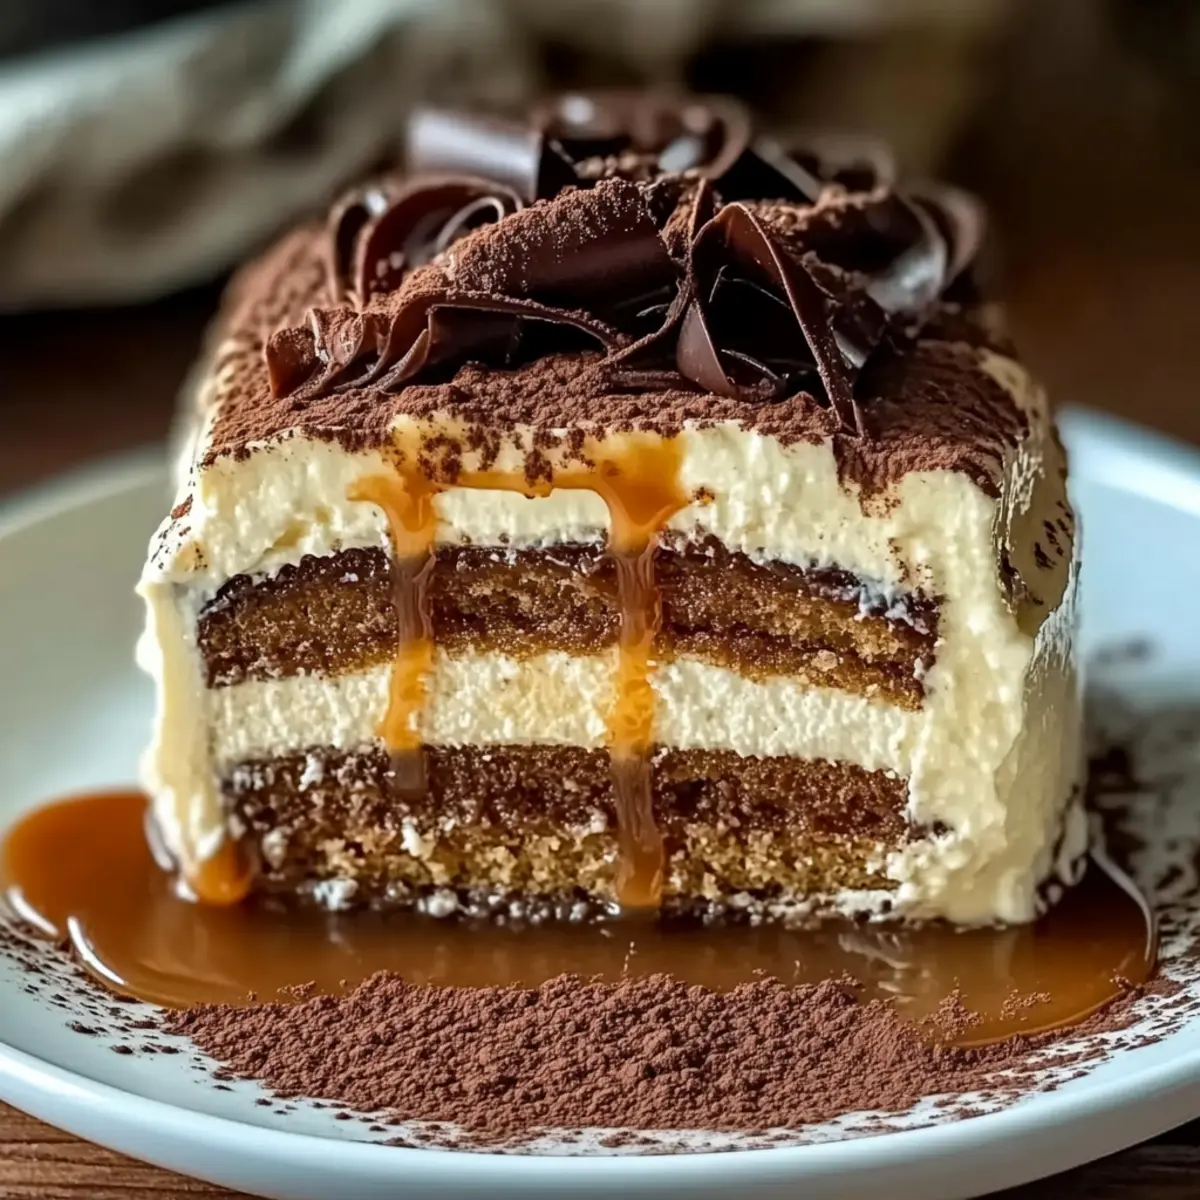
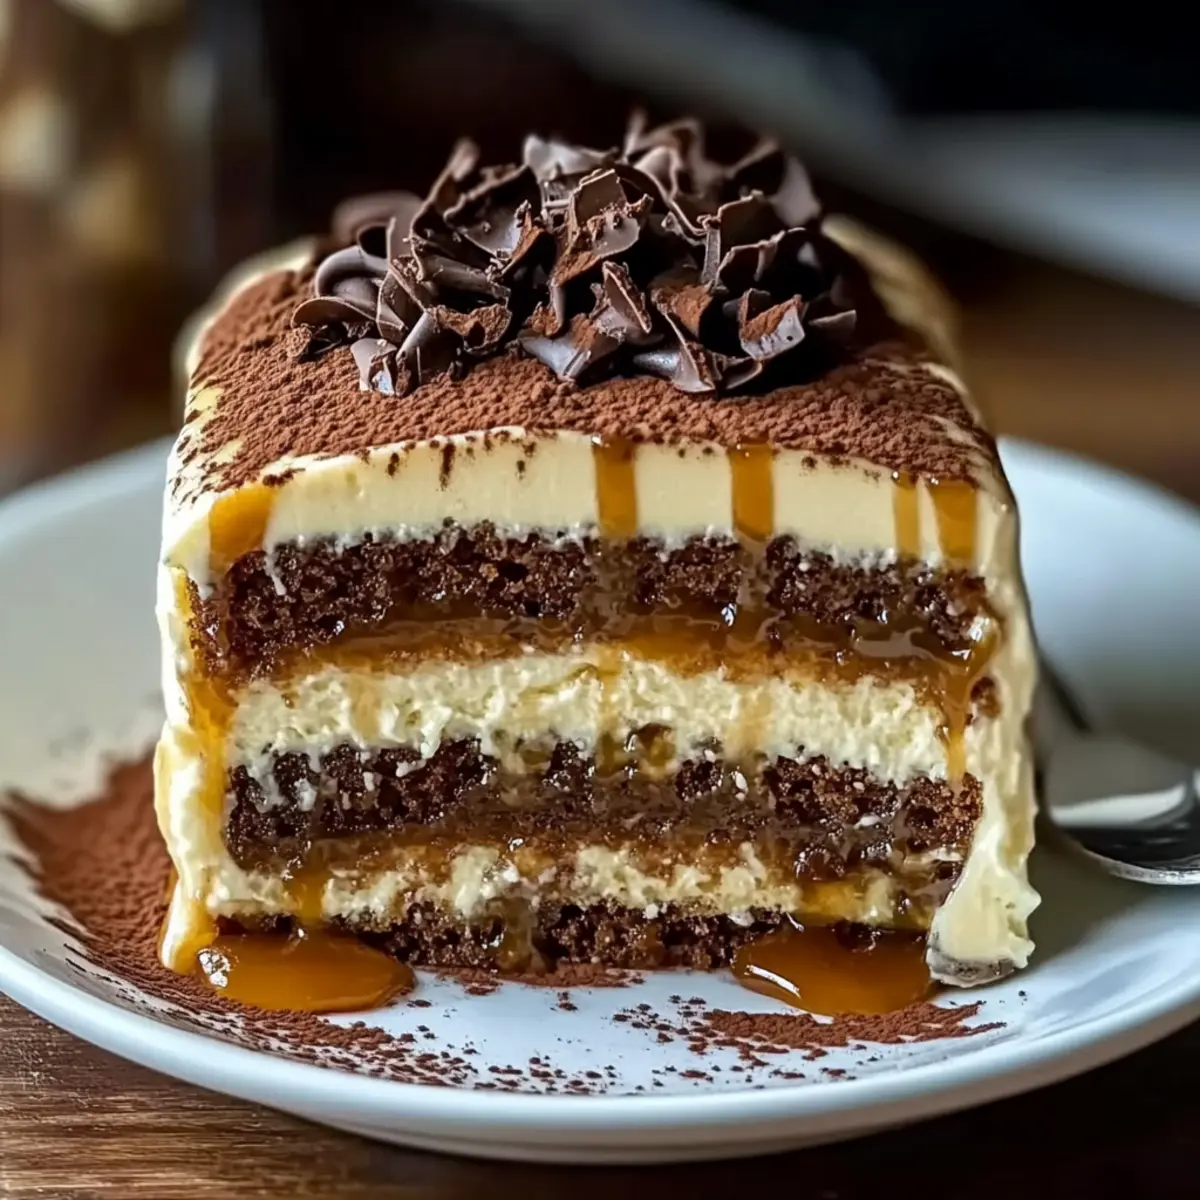
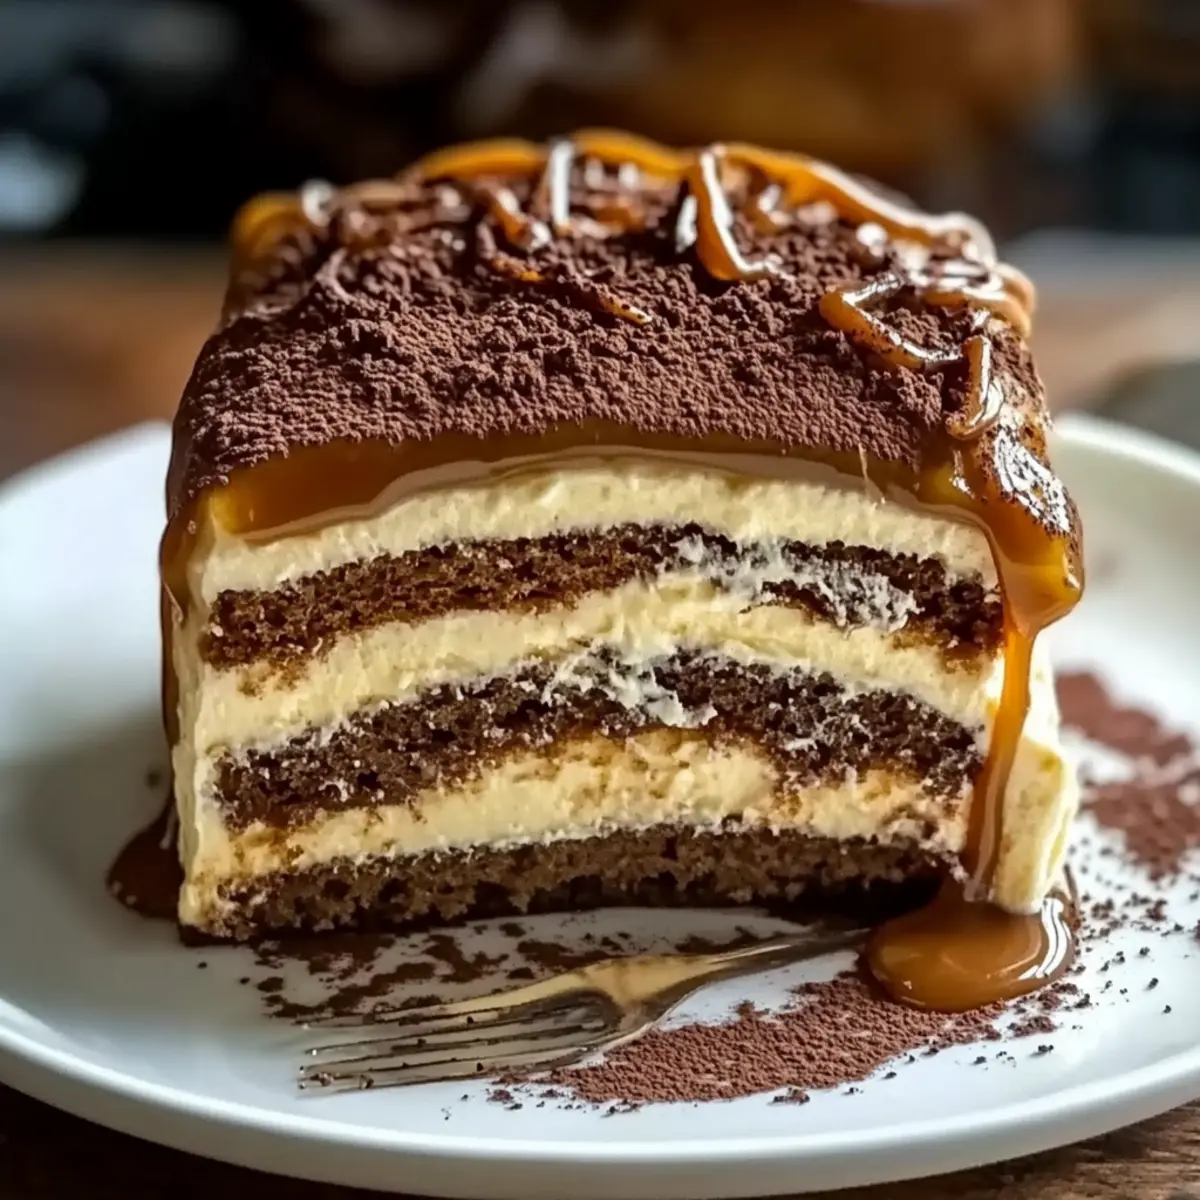
The moment the rich aroma of freshly brewed espresso wafts through my kitchen, I know it’s time to whip up something truly indulgent: Millionaire’s Tiramisu. This no-bake dessert embodies the luxurious blend of chocolate and salted caramel that feels both sophisticated and comforting. The intricate layers of espresso-soaked ladyfingers, creamy mascarpone, and sumptuous flavors transform any gathering into a memorable experience, making it a perfect choice for celebrations or a cozy evening at home. Plus, it’s surprisingly easy to make, allowing you to impress without feeling overwhelmed. Curious how these elements come together to create magic? Let’s dive into this delectable recipe that promises to become a beloved favorite!
Why is Millionaire’s Tiramisu a Must-Try?
Decadent Indulgence: Each bite of this millionaire’s tiramisu is a luxurious experience, thanks to the harmonious blend of rich chocolate and tantalizing salted caramel.
No-Bake Convenience: The recipe requires no baking, making it perfect for even the busiest home cooks. Simply layer and chill for a delightful dessert.
Crowd-Pleasing Flavor: With its balance of creamy mascarpone and bold espresso, this dessert pleases everyone at the table—ideal for gatherings or family dinners.
Versatile Options: Easily customizable; consider swapping in gluten-free ladyfingers or infusing unique flavors like rum or hazelnut liqueur for a personalized touch.
Impressive Presentation: Serve it chilled in elegant dessert glasses for a sophisticated look that will wow your guests, elevating any dining experience.
Ready to impress with minimal effort? This millionaire’s tiramisu is your ticket to effortless elegance!
Millionaire’s Tiramisu Ingredients
For the Layers
• Ladyfingers – They provide the structure and soak up the espresso beautifully; choose high-quality ones for the best texture.
• Espresso – Adds a deep, robust flavor to the dish; consider adding a splash of coffee liqueur for an adult twist.
• Salted Caramel – Introduces a delightful complexity to the dessert; store-bought is convenient, but homemade adds a personal touch.
For the Filling
• Mascarpone Cheese – Essential for achieving that creamy texture; opt for fresh and high-quality mascarpone for the best results.
• Whipping Cream – Helps to create a light and fluffy mascarpone layer; make sure it’s chilled for optimal whipping.
• Sugar – Sweetens the mascarpone mixture; taste before adding, as the caramel and chocolate also contribute sweetness.
For the Topping
• Dark Chocolate – Incorporates a rich, bitter-sweet flavor; use high-quality chocolate for grating or shavings to enhance the taste.
• Cocoa Powder – Dust on top for a polished, professional look and a hint of bitterness that balances the sweetness.
This Millionaire’s Tiramisu is not just a dessert; it’s a luxurious experience waiting to delight your palate!
Step‑by‑Step Instructions for Millionaire’s Tiramisu
Step 1: Prepare Espresso
Brew fresh espresso and allow it to cool for about 10 minutes. For an enhanced flavor, consider mixing in a splash of coffee liqueur while it’s warm. Once cooled, pour the espresso into a shallow dish to create an easy soaking area for the ladyfingers.
Step 2: Mix Mascarpone Mixture
In a large mixing bowl, combine fresh mascarpone cheese, chilled whipping cream, and sugar. Using an electric mixer, whip the mixture on medium speed until it’s smooth and fluffy, about 3-5 minutes. The mascarpone should have a thick, creamy consistency—this will be the velvety filling in your Millionaire’s Tiramisu.
Step 3: Assemble Layers
Carefully dip each ladyfinger into the cooled espresso mixture for 1-2 seconds, ensuring they’re soaked but not soggy. In a serving dish, create a layer of soaked ladyfingers at the bottom, followed by a generous spread of your mascarpone mixture. Drizzle salted caramel across the mascarpone for an added touch of sweetness.
Step 4: Repeat Layering
Continue to layer your components by adding another layer of soaked ladyfingers followed by more mascarpone mixture and salted caramel. Aim for at least three layers, finishing with a mascarpone layer on top to give your Millionaire’s Tiramisu a beautiful final look.
Step 5: Chill
Cover the assembled dessert with plastic wrap or a lid and refrigerate for at least 4 hours, but overnight is preferable for optimal flavor melding. This chilling period allows the layers to set beautifully, creating a delectable and well-integrated dessert experience.
Step 6: Serve
Just before serving, remove the tiramisu from the refrigerator. Dust the top generously with cocoa powder for a refined finish, and for an extra touch, garnish with chocolate shavings or a sprinkle of sea salt. Slice or scoop portions and enjoy the exquisite layers of your Millionaire’s Tiramisu!
Millionaire’s Tiramisu Variations & Substitutions
Feel free to get creative with your millionaire’s tiramisu, turning this already indulgent dessert into your own unique masterpiece!
-
Gluten-Free: Use gluten-free ladyfingers or a homemade gluten-free sponge cake for a delicious alternative that everyone can enjoy.
-
Cheesecake Twist: Mix cream cheese with whipped cream for a rich filling; this adds a delightful tang to your tiramisu layers.
-
Flavoring Variations: Enhance your espresso soak with flavored liqueurs like hazelnut or amaretto for a nuanced twist that elevates the flavor.
-
Fruity Layers: Incorporate layers of fresh fruit like raspberries or strawberries in between the mascarpone and ladyfingers for a refreshing contrast.
-
Nutty Crunch: Add a layer of crushed toasted nuts, like hazelnuts or almonds, for added texture and a lovely nutty flavor that complements the dessert.
-
Experiment with Chocolate: Use different types of chocolate, such as white chocolate or milk chocolate, for a unique take on the classic chocolate flavor profile.
-
Salted Caramel Infusion: Fold a tablespoon of salted caramel directly into the mascarpone mixture for an extra layer of sweetness and depth.
-
Chili Heat: For a surprising kick, sprinkle a pinch of chili powder on top of the cocoa powder before serving. This unexpected spice can elevate the dessert experience!
Explore these variations to make your millionaire’s tiramisu truly your own, and enjoy the journey of flavor and texture!
Make Ahead Options
These Millionaire’s Tiramisu layers are perfect for busy home cooks looking to save time! You can prepare the mascarpone mixture and layer the soaked ladyfingers up to 24 hours in advance, allowing flavors to meld beautifully. Simply assemble the dessert in a serving dish, cover tightly with plastic wrap, and refrigerate. To maintain the luxurious texture, keep the tiramisu chilled until ready to serve. When it’s time to enjoy, dust the top with cocoa powder and add any additional garnishes like chocolate shavings or a sprinkle of sea salt. This way, you can impress guests with minimal effort while enjoying a dessert that’s just as delicious!
How to Store and Freeze Millionaire’s Tiramisu
Fridge: Store your millionaire’s tiramisu in an airtight container for up to 3-4 days. This helps maintain its creamy texture and prevents it from absorbing other scents.
Freezer: While freezing is possible, it’s not recommended as it may alter the creamy texture. If necessary, wrap tightly in plastic wrap and store for up to 1 month.
Thawing: To serve after freezing, transfer it to the fridge to thaw overnight. Allow it to come to room temperature for about 30 minutes before serving for the best flavor and texture.
Reheating: This dessert is best enjoyed chilled, so there’s no need for reheating. Just remove it from the fridge and enjoy the indulgent layers!
What to Serve with Millionaire’s Tiramisu
Indulging in a slice of this luxurious dessert calls for delightful accompaniments that elevate your dining experience.
- Espresso Coffee: A rich, bold cup of espresso beautifully complements the tiramisu’s flavors, enhancing your dessert’s coffee notes with every sip.
- Whipped Cream: A dollop of freshly whipped cream provides a light, airy contrast, balancing the dense layers of mascarpone and caramel.
- Chocolate Covered Almonds: The crunch and slight bitterness of chocolate-covered almonds offer a delightful textural contrast to the creamy dessert.
- Fresh Berries: Seasonal berries add a bright, tart freshness that cuts through the richness, creating a harmonious balance of flavors.
- Dessert Wine: A glass of sweet dessert wine, like Moscato, enhances the tiramisu’s richness with its fruity notes, making each bite a celebration.
- Vanilla Bean Ice Cream: A scoop of velvety vanilla bean ice cream paired with millionaire’s tiramisu creates a luxurious melting experience.
Consider these pairings to craft a multi-sensory meal that leaves your guests raving and craving more!
Expert Tips for Millionaire’s Tiramisu
• Use Quality Ingredients: Always opt for high-quality mascarpone and dark chocolate. It makes a noticeable difference in flavor and texture of your millionaire’s tiramisu.
• Cool Espresso Thoroughly: Let the brewed espresso cool completely before soaking ladyfingers. Hot espresso can make them too soft and soggy, ruining your layers.
• Layering Technique: Dip ladyfingers quickly to avoid sogginess. A brief 1-2 second soak is all you need for perfect texture without falling apart!
• Chill for Best Flavor: For optimal taste, refrigerate overnight. This allows the flavors to meld beautifully, enhancing the overall experience of your millionaire’s tiramisu.
• Texture Variations: Consider adding toasted nuts between layers for a delightful crunch. This added texture can elevate the richness of the dessert!
Millionaire’s Tiramisu Recipe FAQs
What type of ladyfingers should I use for Millionaire’s Tiramisu?
When choosing ladyfingers, opt for high-quality, soft ones that can absorb the espresso without falling apart. I often use Italian Savoiardi, which provide the perfect texture and flavor contrast in this dessert.
How long can I store Millionaire’s Tiramisu in the fridge?
You can store your Millionaire’s Tiramisu in an airtight container in the refrigerator for up to 3-4 days. This helps preserve its creamy texture and avoids it absorbing odors from other food.
Can I freeze Millionaire’s Tiramisu?
Freezing Tiramisu is possible, but I wouldn’t recommend it as it might change the dessert’s creamy consistency. If you decide to freeze it, wrap it tightly in plastic wrap and store it for up to 1 month. Thaw it in the fridge overnight before serving to regain some of its original texture.
What should I do if my mascarpone mixture appears grainy?
If your mascarpone mixture is looking grainy, it might be due to not mixing it long enough or using cold ingredients. Ensure all your cream and mascarpone are at room temperature before starting to mix. Whip on medium speed until smooth and fluffy, making sure not to overbeat it, which can lead to separation.
Is Millionaire’s Tiramisu suitable for people with gluten allergies?
Absolutely! You can make this dessert gluten-free by using gluten-free ladyfingers or even a homemade gluten-free sponge cake. Just be sure to check that your other ingredients, like cocoa powder and caramel, are also gluten-free.
What happens if I soak the ladyfingers for too long?
Soaking ladyfingers for too long can cause them to become overly soggy and fall apart, ruining the layered effect of your Millionaire’s Tiramisu. Aim for a quick dip of 1-2 seconds in the espresso to keep the perfect balance of texture!

Millionaire’s Tiramisu: A Decadent No-Bake Delight
Ingredients
Equipment
Method
- Brew fresh espresso and allow it to cool for about 10 minutes. For enhanced flavor, mix in a splash of coffee liqueur while warm. Pour into a shallow dish.
- In a large bowl, combine mascarpone cheese, chilled whipping cream, and sugar. Whip on medium speed until smooth and fluffy, about 3-5 minutes.
- Dip ladyfingers quickly in the cooled espresso for 1-2 seconds. Layer soaked ladyfingers in the serving dish, followed by mascarpone mixture and drizzle with salted caramel.
- Repeat layering with soaked ladyfingers, more mascarpone, and salted caramel at least three times. Finish with a mascarpone layer on top.
- Cover and refrigerate for at least 4 hours, preferably overnight, to allow layers to set.
- Before serving, remove from the fridge and dust with cocoa powder. Garnish with chocolate shavings or sea salt.
Leave a Reply