
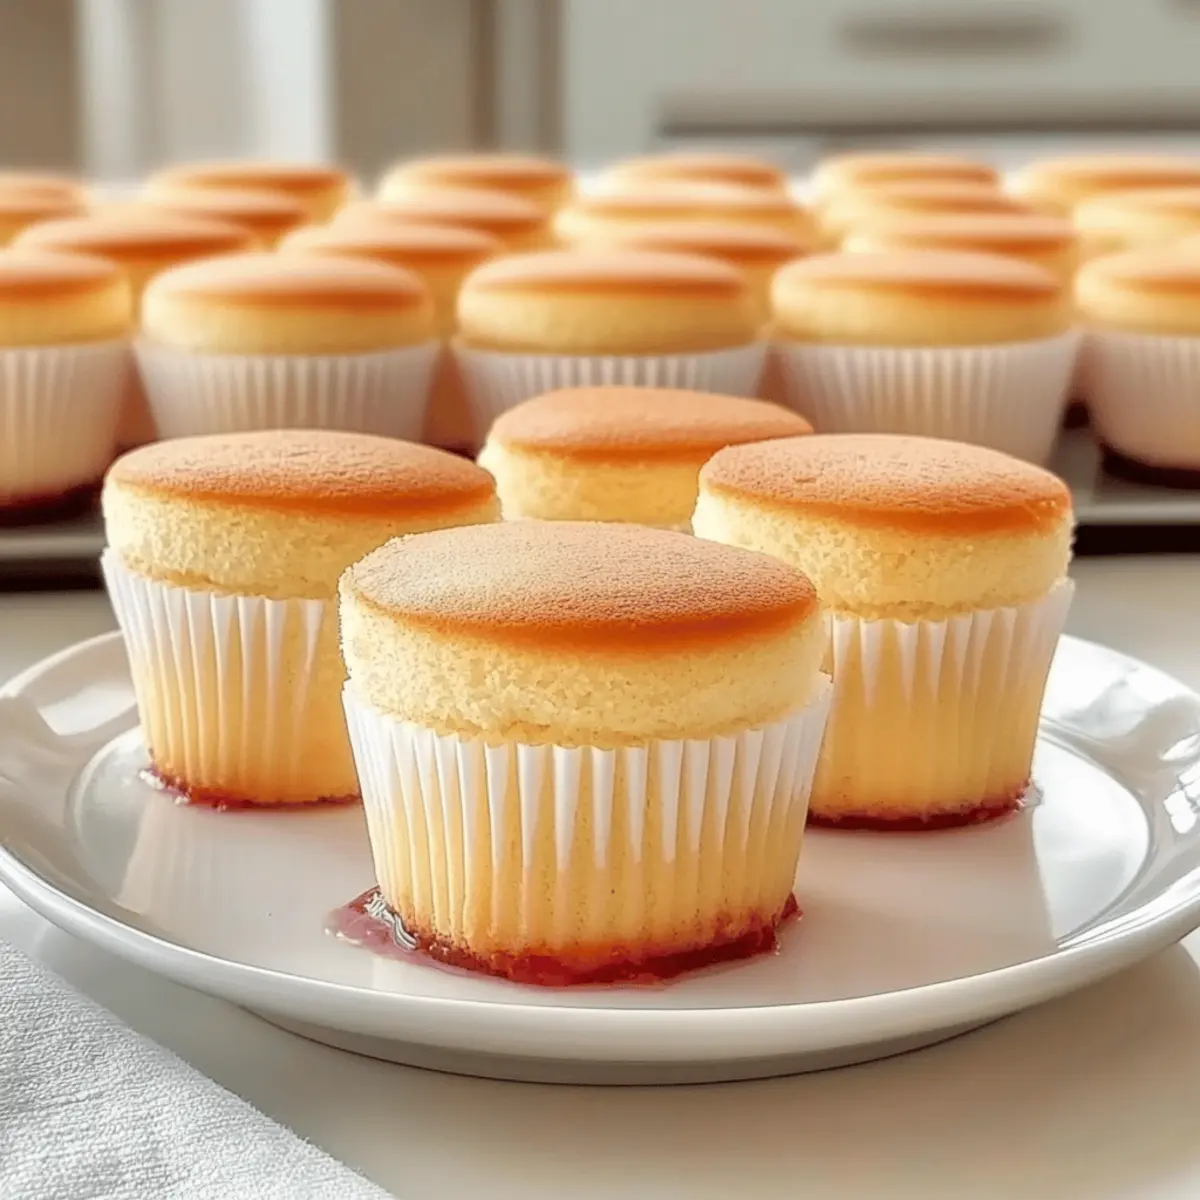
As I stood by the window, sunlight streaming in, I could almost hear the soft clatter of teacups and delicate laughter from an afternoon tea gathering. That’s when I realized how perfectly Mini Victoria Sponge Cakes would fit into such a charming scene. These delightful mini sponge cakes are not just a classic dessert; they’re an easy-to-make crowd-pleaser that will leave your guests raving about your baking skills. With layers of buttery sponge, a luscious vanilla buttercream, and a touch of tangy raspberry jam, they’re simply irresistible. Whether it’s a spring picnic or an elegant event, these charming treats ensure your table looks as stunning as it tastes. Are you ready to impress those you love with these delectable bites?
Why are Mini Sponge Cakes So Irresistible?
Uniquely Delightful: These Mini Victoria Sponge Cakes are not just adorable but also bursting with flavor, making them a standout at any gathering.
Effortless Preparation: With simple ingredients and a straightforward process, you can whip up these charming treats even if you’re short on time.
Crowd-Pleasing Appeal: Perfect for tea parties, picnics, or a cozy afternoon at home, these mini cakes are sure to impress friends and family alike.
Versatile Options: Feel free to experiment with different jams like strawberry or flavors like lemon—making them a truly customizable delight!
Perfect for Any Occasion: From birthdays to casual get-togethers, these cakes adapt beautifully and elevate any event. Add them to your dessert lineup next to Delightful Mini Cakes or Healthy Carrot Cake for a sweet spread everyone will love!
Mini Sponge Cake Ingredients
For the Cake
• All-Purpose Flour – Provides structure; using all-purpose flour ensures a light, fluffy texture.
• Butter – Adds richness and a tender crumb; keep it at room temperature for easy creaming.
• Granulated Sugar – Sweetens the cake; opt for granulated sugar for the best lightness in your Mini Sponge Cake.
• Large Eggs – Acts as a binder and adds moisture; using large eggs ensures consistency in your batter.
• Baking Powder – Leavening agent that helps the cake rise; an alternative is self-rising flour if desired.
• Vanilla Extract – Enhances the flavor profile; for a twist, try almond extract for a unique taste.
For the Filling
• Raspberry Jam – Adds a fruity layer; feel free to substitute with strawberry or your favorite jam.
• Vanilla Buttercream – Frosting that complements the cake; can be swapped with whipped cream for a lighter option.
These Mini Sponge Cake ingredients are sure to create a delightful treat that is perfect for your next gathering!
Step‑by‑Step Instructions for Mini Victoria Sponge Cakes
Step 1: Preheat and Prepare
Begin by preheating your oven to 350°F (175°C). While the oven is heating, line a muffin pan with paper liners to keep your Mini Victoria Sponge Cakes from sticking. Ensuring your ingredients are at room temperature will help create a light and fluffy batter later on.
Step 2: Cream Butter and Sugar
In a medium mixing bowl, combine room-temperature butter and granulated sugar. Using an electric mixer, cream them together on medium speed until the mixture becomes light and fluffy, about 3 to 5 minutes. This step is crucial for incorporating air, which will help your sponge cakes rise beautifully.
Step 3: Add Eggs
Next, beat in the large eggs one at a time into the creamed butter and sugar mixture. Mix well after each addition until fully incorporated. You should notice a smooth and slightly thicker batter forming, which sets the foundation for your Mini Victoria Sponge Cakes.
Step 4: Mix in Dry Ingredients
Sift together the all-purpose flour and baking powder over the batter. Gently fold the dry ingredients into the wet mixture using a spatula or wooden spoon until just combined. Be careful not to overmix—aim for a smooth batter with a few small lumps remaining to keep your cakes fluffy.
Step 5: Incorporate Vanilla Extract
Pour in the vanilla extract and gently stir it into the batter until evenly distributed. This step will enhance the flavor profile of your Mini Victoria Sponge Cakes, providing a delightful aroma to your kitchen as you continue baking.
Step 6: Fill Muffin Pan
Use a spoon or ice cream scoop to fill each muffin liner about two-thirds full with the cake batter. Make sure to distribute the batter evenly among the liners to ensure uniform baking and that each Mini Victoria Sponge Cake has the same delightful rise.
Step 7: Bake the Cakes
Place the muffin pan in the preheated oven and bake for 10 to 12 minutes. You’ll know they are done when the tops are golden brown and a toothpick inserted into the center of a cake comes out clean. Keep an eye on the cakes to avoid over-baking, which can dry them out.
Step 8: Cool the Cakes
Once baked, carefully remove the muffin pan from the oven and allow the Mini Victoria Sponge Cakes to cool in the pan for about 5 minutes. Then, transfer them to a wire rack to cool completely. This cooling step is essential to maintain their fluffy texture before assembly.
Step 9: Assemble the Treats
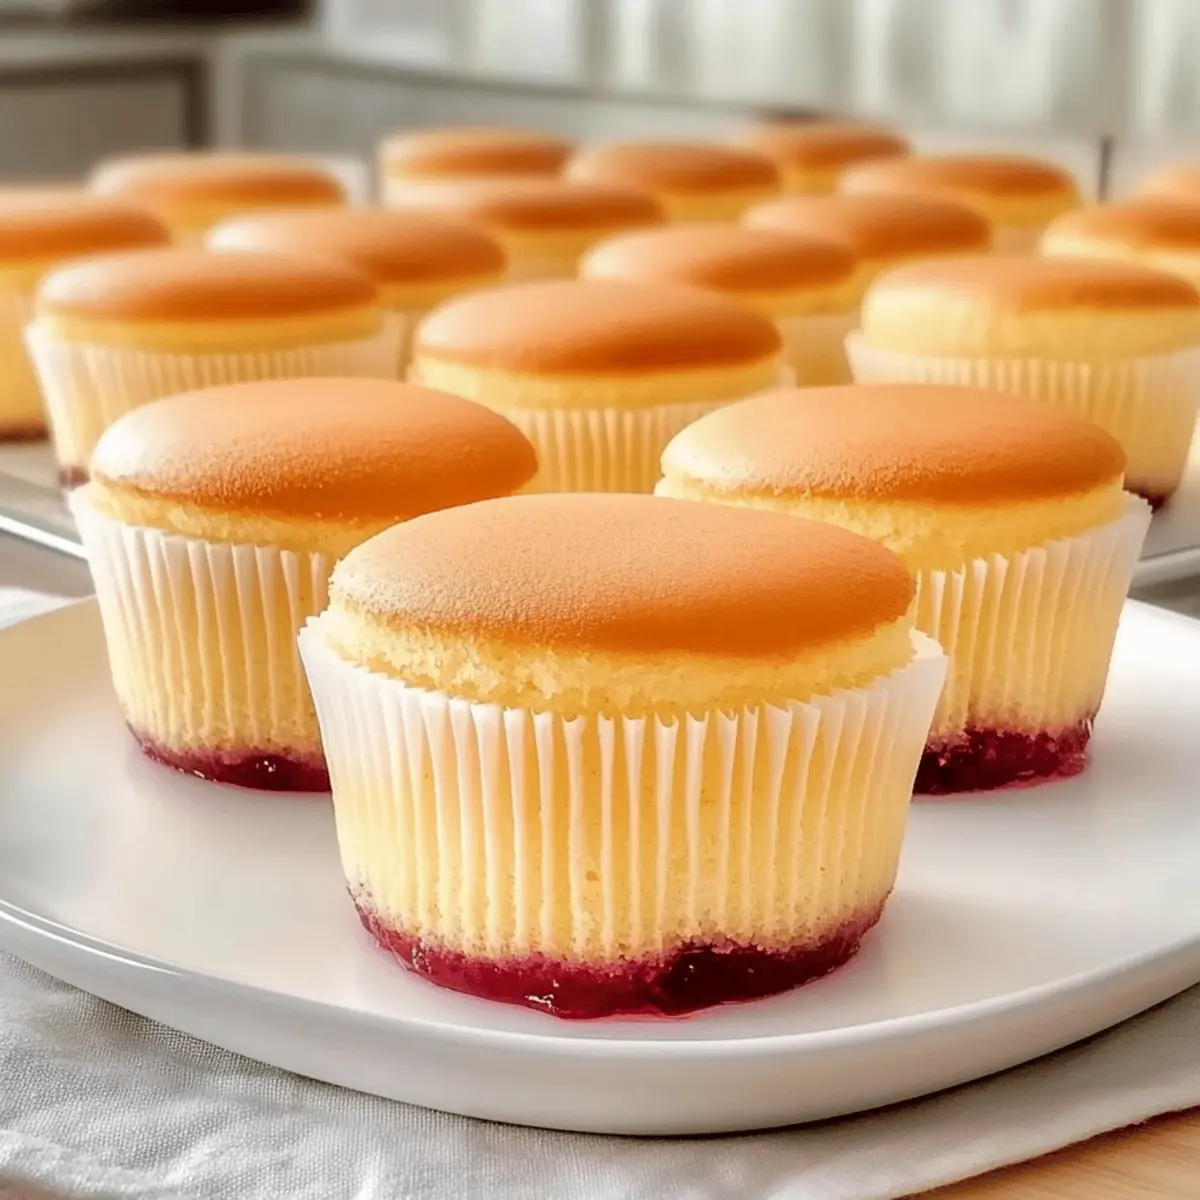
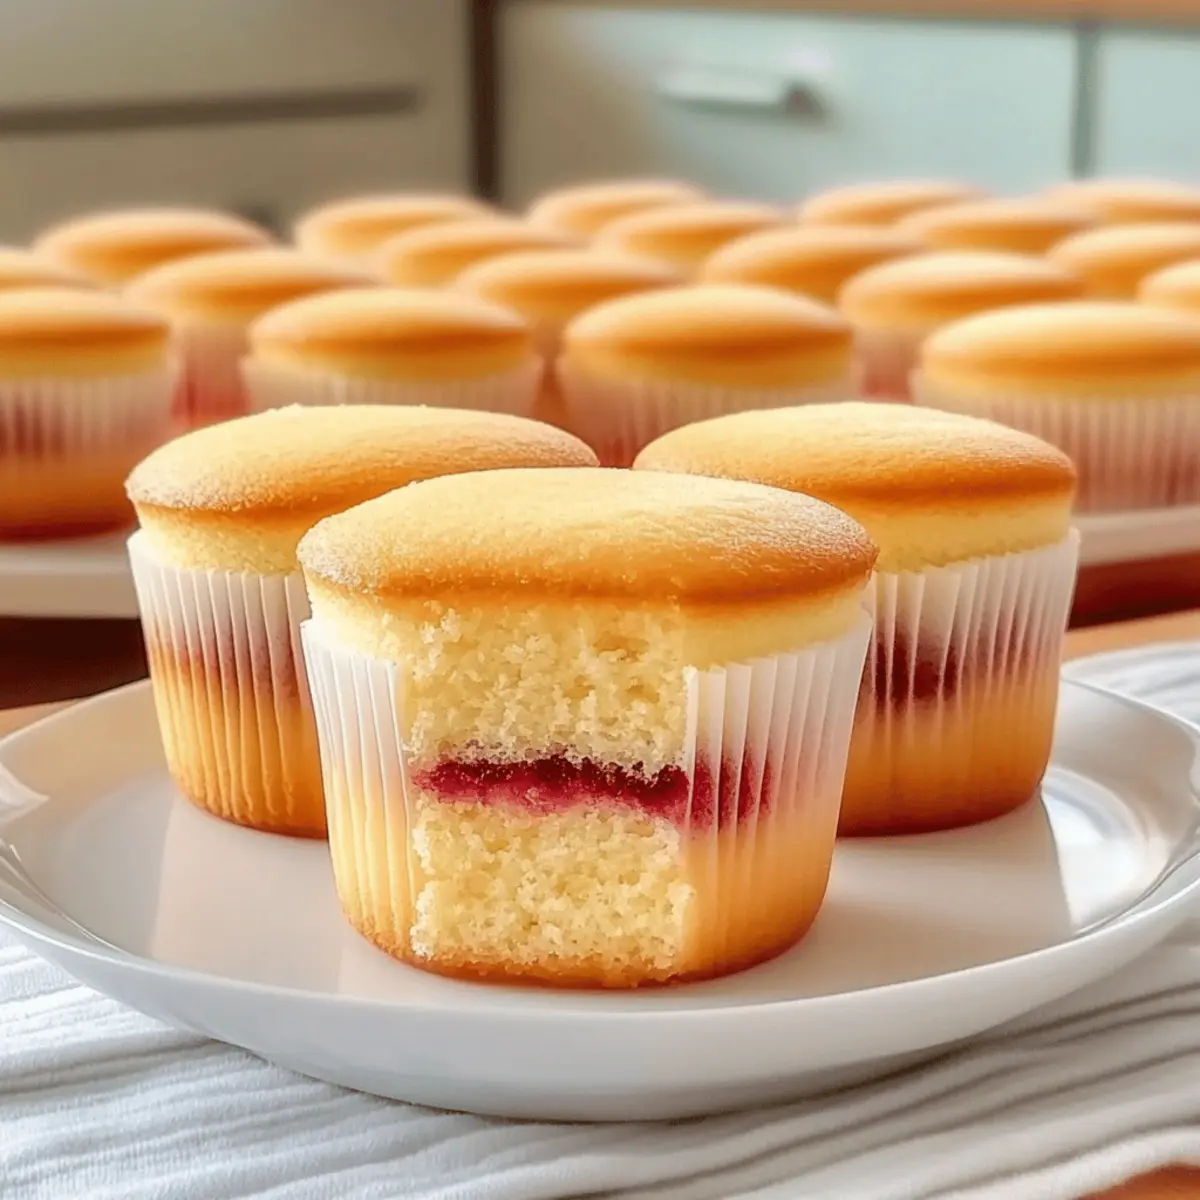
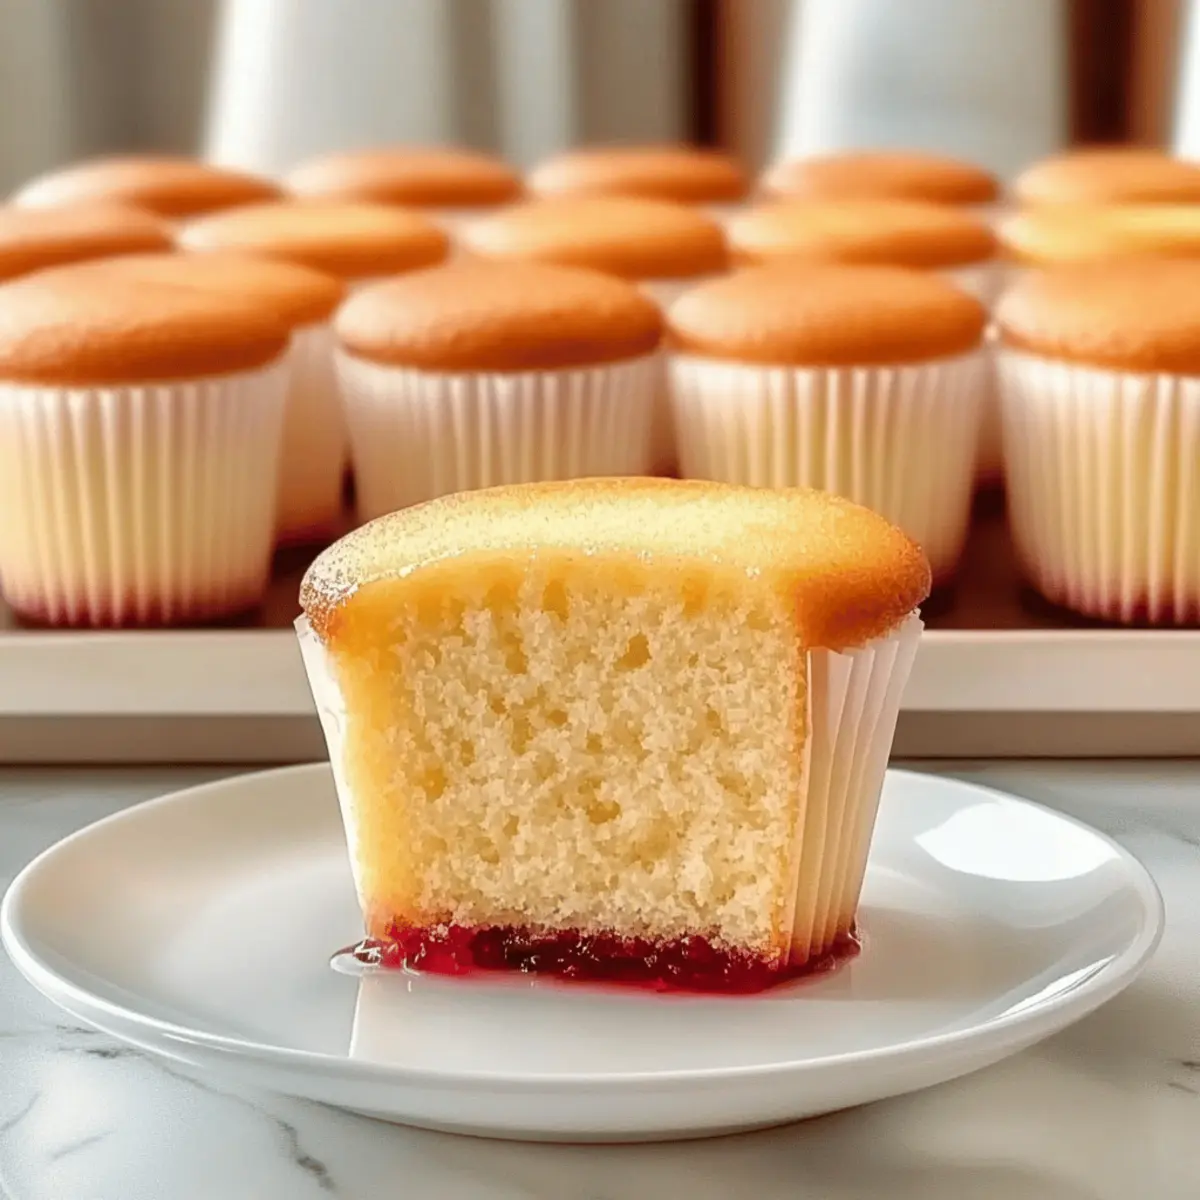
Once the cakes are cool, slice each one in half horizontally. Spread a generous layer of raspberry jam on the bottom half, then add a dollop of vanilla buttercream. Finally, place the top half back on, gently pressing down to secure the filling. Your Mini Victoria Sponge Cakes are now ready to be enjoyed!
Tips for the Best Mini Sponge Cakes
Room Temperature Ingredients: Ensure all ingredients, especially butter and eggs, are at room temperature for a smooth batter and fluffy Mini Sponge Cake.
Gentle Mixing: Avoid overmixing the batter after adding flour and baking powder; this can toughen the cakes. Mix until just combined for light, airy results.
Even Baking: Distribute the batter evenly in the muffin pan; this ensures that all mini cakes bake uniformly and rise perfectly.
Cooling Time: Allow the cakes to cool completely on a wire rack before assembly to maintain their fluffy texture; warm cakes can lead to a messy filling.
Fill Just Before Serving: For the best taste and presentation, assemble your Mini Sponge Cakes shortly before serving to prevent sogginess and keep the jam and buttercream fresh.
Make Ahead Options
These Mini Victoria Sponge Cakes are a wonderful choice for meal prep! You can bake the cakes up to 24 hours in advance. Simply allow them to cool completely and store them in an airtight container at room temperature to maintain their fluffy texture. Additionally, you can prepare the vanilla buttercream and raspberry jam ahead of time; just refrigerate them in separate containers. When you’re ready to serve, assemble the cakes by slicing them in half, spreading the jam and buttercream, and placing the tops back on. This way, you’ll have charming Mini Sponge Cakes that are just as delicious and fresh, ready to impress your guests with minimal last-minute effort.
What to Serve with Mini Victoria Sponge Cakes?
Prepare for a delightful afternoon tea experience that pairs beautifully with these charming little cakes, perfect for gatherings or cozy moments.
-
Creamy Mashed Potatoes: Their rich, buttery texture balances the lightness of the sponge cakes, making for a delightful contrast during your meal.
-
Fresh Fruit Salad: A medley of vibrant fruits adds a refreshing crunch and sweet-tart notes that beautifully complement the sweetness of the cakes.
-
Herbal Tea Selection: A fragrant herbal tea, like chamomile or mint, will elevate your tea-time and enhance the delicate flavors of the Mini Victoria Sponge Cakes.
-
Classic Scones: Slightly decadent scones alongside your cakes offer a traditional touch, making your tea party feel truly special. Spread with clotted cream, they’re heavenly together!
-
Lemonade Spritzer: A fizzy lemonade spritzer brings a refreshing zing that plays wonderfully against the cake’s buttery flavor, perfect for warm days.
-
Chocolate Covered Strawberries: The sweet and slightly bitter notes of chocolate-coated strawberries add a touch of elegance and romance to your dessert spread.
-
Profiteroles: These airy cream-filled pastries bring an indulgent flair that balances the simplicity of the sponge cakes, enticing guests with their creamy fillings.
-
Whipped Cream: A dollop of lightly sweetened whipped cream adds a luscious element to each bite of cake, enhancing its moistness.
Let your creativity shine as you mix and match these delightful accompaniments for a truly memorable afternoon tea gathering!
Mini Sponge Cake Variations & Substitutions
Feel free to explore these fun variations and swaps to make this classic Mini Sponge Cake even more delightful!
-
Flavor Boost: Experiment with almond extract for a unique twist on the vanilla flavor; it brings a comforting aromatic touch.
-
Berry Swap: Use strawberry jam instead of raspberry for a fruity explosion; this change offers a slightly sweeter, yet still delicious filling.
-
Chocolate Delight: Add cocoa powder to the batter for a chocolatey version, or top with rich chocolate buttercream for a decadent treat.
-
Lemon Zing: Incorporate lemon zest into the batter to brighten the flavors; it adds a refreshing citrus note that’s perfect for spring gatherings.
-
Nutty Texture: Fold in finely chopped nuts, like hazelnuts or almonds, for an unexpected crunch; this will elevate the texture and add depth to the cakes.
-
Dairy-Free Adaptation: Swap the butter with coconut oil and use dairy-free buttercream for a delicious dairy-free option that doesn’t skimp on flavor.
-
Spiced Up: Sprinkle a dash of cinnamon or nutmeg in the batter to warm up the flavor profile, perfect for cozy gatherings.
-
Whipped Cream Option: Consider using whipped cream in place of buttercream for a light and airy filling; it pairs beautifully with fresh fruit toppings.
Let your creativity run wild, and remember, each variation brings its own charm to this delightful classic! If you’re looking for other sweet inspirations, try adding a side of Healthy Carrot Cake to your dessert table or enjoy these alongside some Delightful Mini Cakes for a colorful spread.
How to Store and Freeze Mini Sponge Cakes
Room Temperature: Store unfilled Mini Sponge Cakes in an airtight container at room temperature for up to 2 days. Keep them in a cool, dry place to maintain their fluffy texture.
Fridge: If you have filled cakes with buttercream and jam, refrigerate them in an airtight container to keep them fresh for up to 4 days. This allows the flavors to meld beautifully.
Freezer: For longer storage, freeze unfilled Mini Sponge Cakes by wrapping them tightly in plastic wrap and then placing them in a freezer bag. They can be frozen for up to 3 months.
Reheating: To enjoy previously frozen Mini Sponge Cakes, thaw them in the fridge overnight, then bring them to room temperature before filling and serving for the best texture and flavor.
Mini Victoria Sponge Cakes Recipe FAQs
What type of flour is best for Mini Sponge Cakes?
I recommend using all-purpose flour for Mini Sponge Cakes, as it provides the perfect structure and texture. This flour ensures a light and fluffy sponge, which is essential for that delightful mouthfeel.
How do I store Mini Victoria Sponge Cakes?
Store unfilled Mini Sponge Cakes in an airtight container at room temperature for up to 2 days. If you’ve filled them with buttercream and jam, refrigerate them in an airtight container for up to 4 days to keep the flavors fresh and delicious.
Can I freeze Mini Sponge Cakes?
Absolutely! To freeze unfilled Mini Sponge Cakes, wrap them tightly in plastic wrap and place them in a freezer bag. They can be frozen for up to 3 months. When you’re ready to enjoy them, simply thaw them in the fridge overnight, then bring them to room temperature before filling and serving.
What should I do if my cakes are dense?
If your Mini Sponge Cakes turn out dense, it could be due to overmixing after adding the flour. To achieve a light and airy texture, mix until just combined and avoid using cold ingredients—ensure your butter and eggs are at room temperature for the best results.
Can I make these cakes allergy-friendly?
Yes! If you’re looking for alternatives, you can use gluten-free all-purpose flour instead of regular flour. Additionally, for those with dairy allergies, consider substituting butter with a dairy-free margarine or oil. Just be aware that these changes may slightly alter the taste and texture of the Mini Victoria Sponge Cakes.
How do I know when the cakes are done baking?
You’ll know your Mini Victoria Sponge Cakes are ready when the tops are golden brown and a toothpick inserted into the center comes out clean. Baking them for 10-12 minutes is typically spot on, but always keep an eye on them to prevent over-baking!
Mini Sponge Cake Bliss – The Perfect Easy Treat for Tea!
Ingredients
Equipment
Method
- Preheat your oven to 350°F (175°C) and line a muffin pan with paper liners.
- In a bowl, cream room-temperature butter and granulated sugar until light and fluffy.
- Beat in the eggs one at a time until fully incorporated.
- Sift together flour and baking powder over the batter and gently fold in.
- Pour in vanilla extract and stir until evenly distributed.
- Fill muffin liners two-thirds full with batter.
- Bake for 10 to 12 minutes until golden and a toothpick comes out clean.
- Cool in the pan for 5 minutes, then transfer to a wire rack to cool completely.
- Slice each cake in half, spread jam on the bottom, add buttercream, and replace the top.
Leave a Reply