
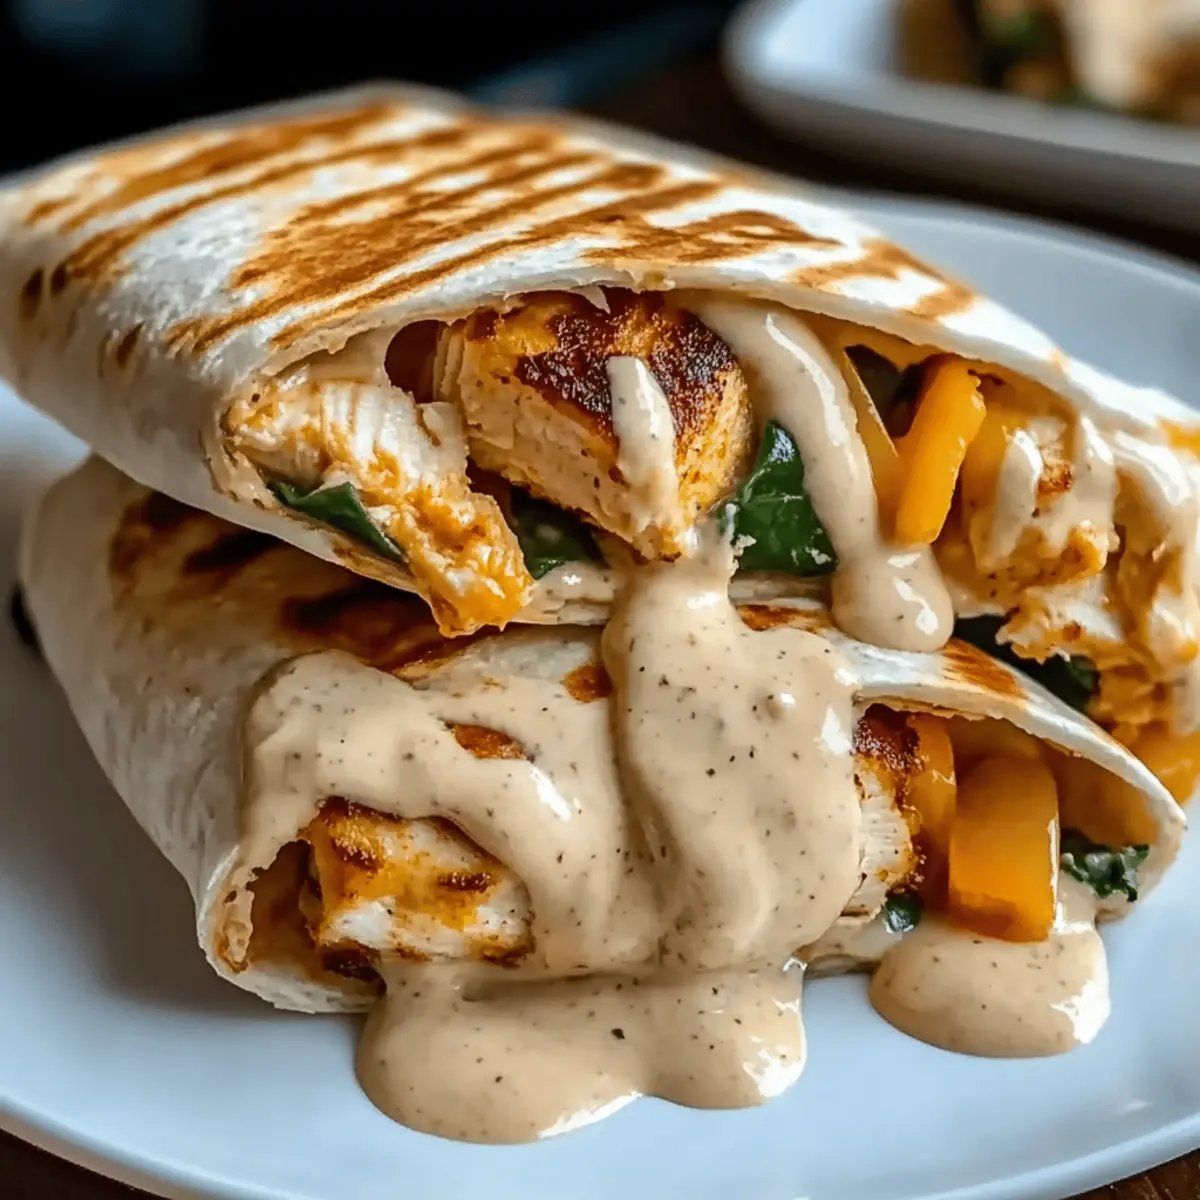
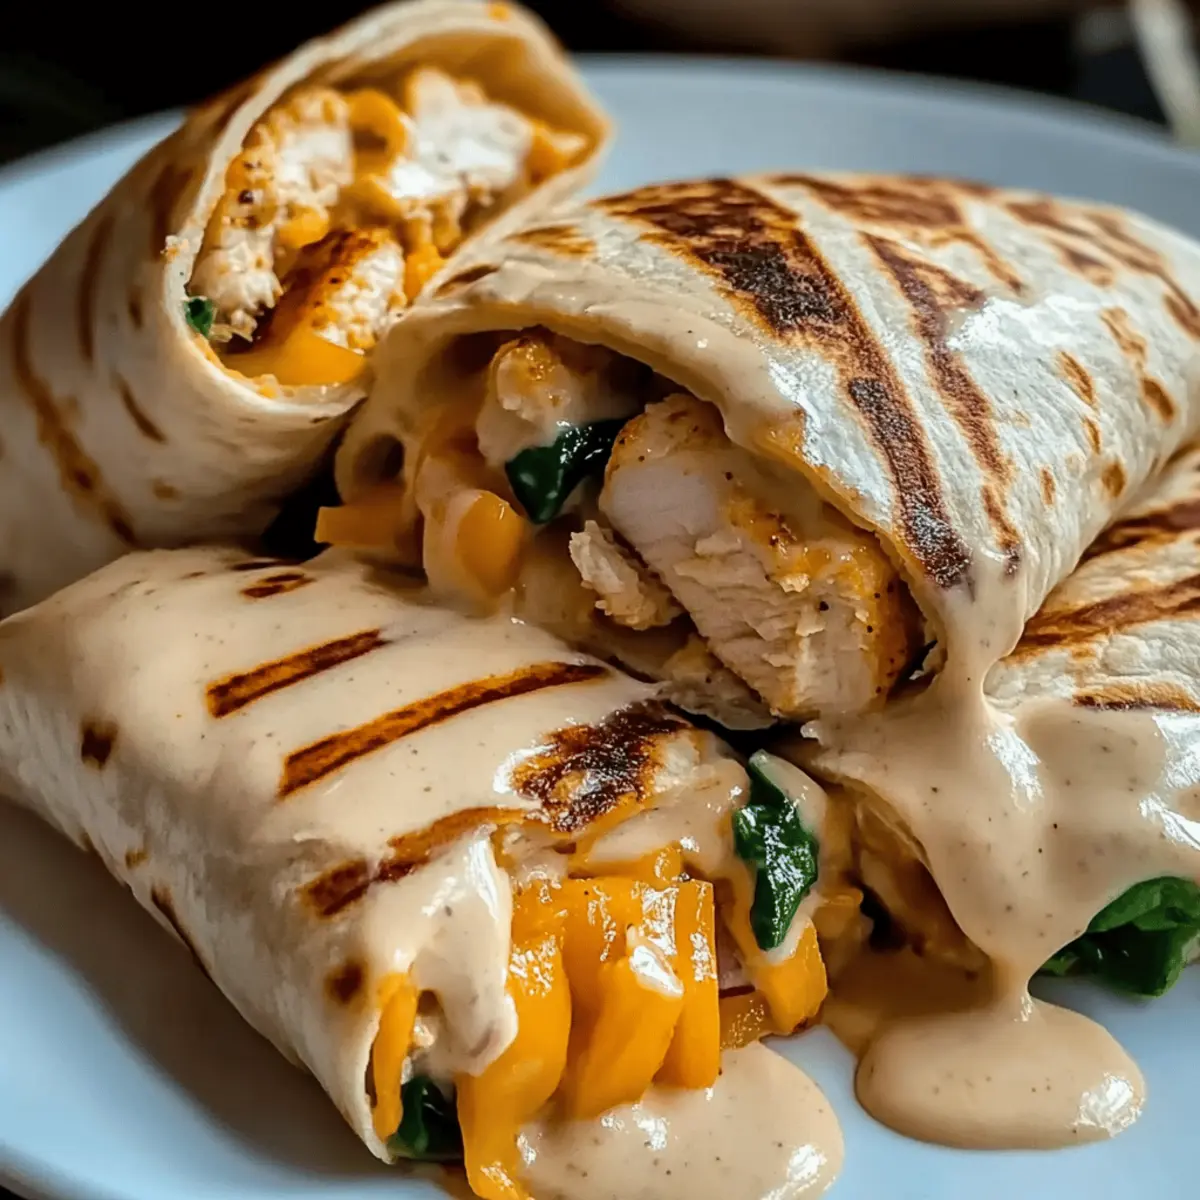
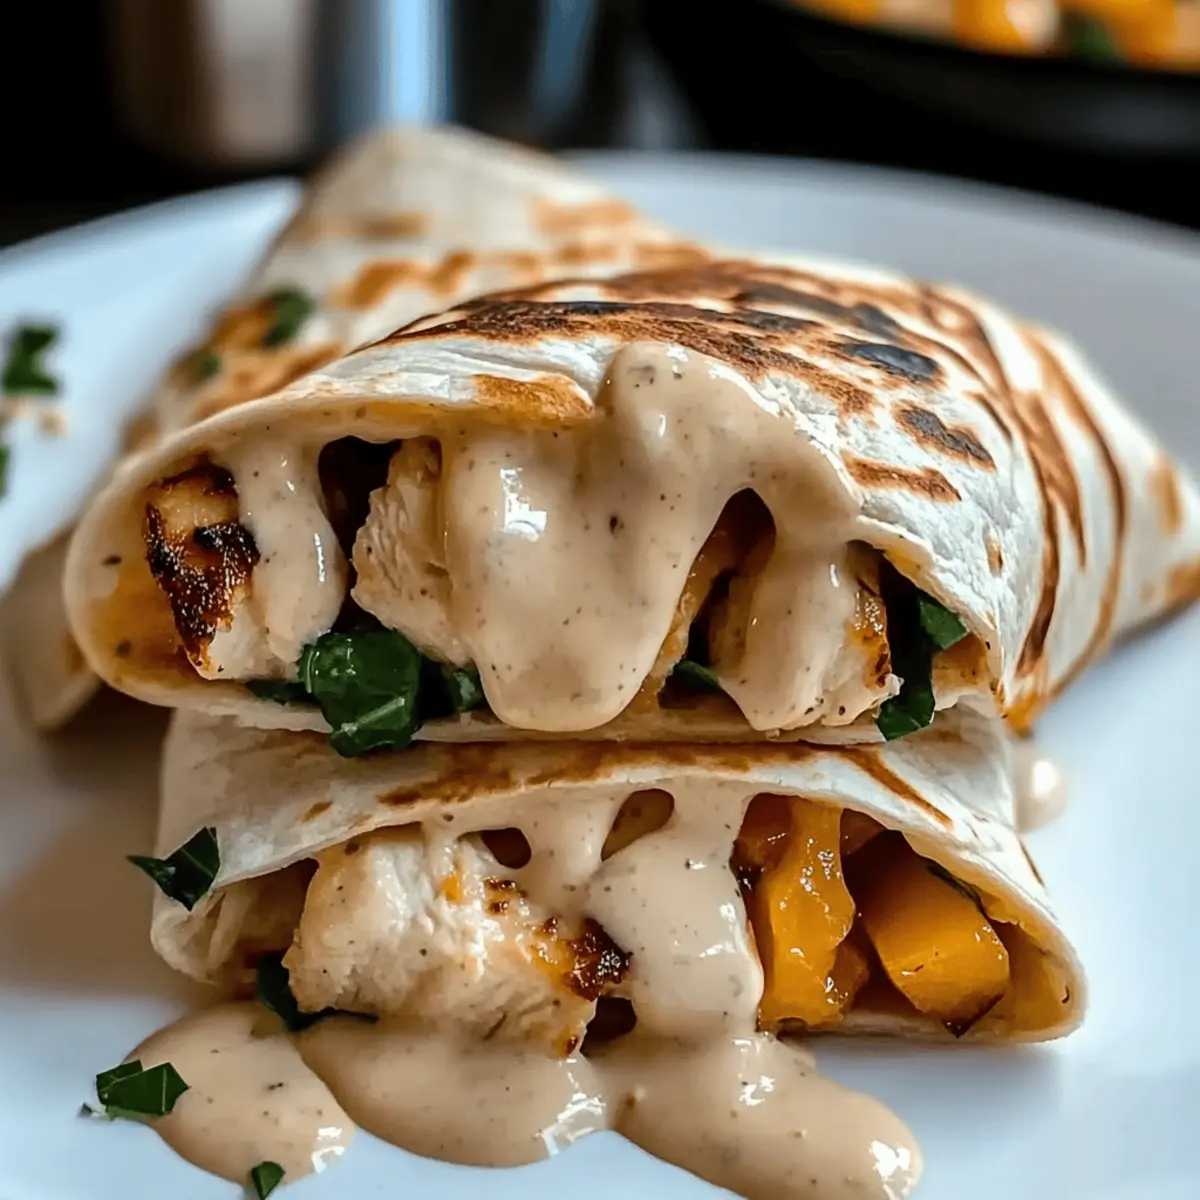
As I rummaged through my pantry one evening, I stumbled upon an enticing combination: chicken, cheese, and a handful of vibrant vegetables. It hit me—why not transform this medley into something deliciously comforting? That’s how I created these Cheesy Garlic Chicken Wraps. This recipe is not only a breeze to whip up, making it perfect for a quick dinner, but it’s also a customizable feast, with options for everyone, whether you’re craving a vegetarian version or a zesty Buffalo twist. Picture crispy tortillas enveloping a warm, gooey filling of seasoned chicken and melty cheeses, all infused with garlic goodness. Ready for a satisfying meal that will become a weekday favorite? Let’s dive into this delicious recipe!
Why You’ll Crave These Wraps
Comforting: These Cheesy Garlic Chicken Wraps are the ultimate in cozy cuisine, perfect for chilly nights or when you simply need a hug in food form.
Versatile: With options from vegetarian delights to spicy Buffalo adaptations, there’s a version to please everyone at your table.
Quick & Easy: Whip them up in no time, making it a go-to recipe for busy weeknights when you want to skip takeout.
Flavor-Packed: Experience the sensational blend of melty cheese and vibrant veggies, enhanced by aromatic garlic—each bite is a taste explosion!
Make-Ahead: Ideal for meal prep, you can prepare components in advance and assemble them for quick dinners or freeze for later indulgence.
Crowd-Pleaser: Serve them at gatherings, and watch them disappear—it’s hard to resist these little bundles of joy! For more satisfying meals, check out my Garlic Chicken Gnocchi Skillet and Cheesy Chicken Crescent.
Cheesy Garlic Chicken Wraps Ingredients
• Here’s what you need to create your delicious Cheesy Garlic Chicken Wraps.
For the Filling
- Extra Virgin Olive Oil – A great cooking base, but any light oil will work in a pinch.
- Chicken Breast – The star protein; substitute with turkey or tofu for a vegetarian-friendly option.
- Garlic Cloves – Fresh garlic gives aromatic depth, though garlic powder can be used in a hurry.
- Mediterranean Herb Blend – Adds vibrant flavor; Italian seasoning serves as a fine alternative.
- Smoky Paprika – This spice enhances flavor with a hint of smokiness; use regular paprika for less heat.
- Chili Flakes – A touch of heat; feel free to omit for a milder flavor.
- Sea Salt and Black Pepper – Essential seasonings to taste.
- Sweet Onion – Contributes sweetness and texture; yellow onion or shallots work instead.
- Red Bell Pepper – For sweetness and crunch; any bell pepper color or other crunchy veggies can substitute.
- Fresh Spinach Leaves – A nutritional boost; kale or arugula makes a nice swap.
- Shredded Mozzarella & Cheddar – A melty cheese blend; consider dairy-free options for lactose intolerance.
- Cream Cheese and Sour Cream – These add creaminess to the filling; Greek yogurt is a healthy alternative.
- Fresh Chives – Ideal for garnish; green onions are also great if chives aren’t available.
For the Wrap
- Flour Tortillas – The base wrap; swap in corn tortillas for a gluten-free option or use lettuce leaves for a low-carb choice.
- Melted Butter and Roasted Garlic Powder – For brushing the tortillas; olive oil can replace butter for a dairy-free version.
Now that you have your ingredients ready, you’re one step closer to whipping up these indulgent Cheesy Garlic Chicken Wraps!
Step‑by‑Step Instructions for Cheesy Garlic Chicken Wraps
Step 1: Cook Chicken
In a large skillet, heat 2 tablespoons of extra virgin olive oil over medium heat. Season 1 pound of chicken breast with sea salt and black pepper, then add it to the pan. Cook for about 5–7 minutes on each side until golden brown and cooked through, reaching an internal temperature of 165°F. Once done, remove the chicken and let it rest while you prepare the vegetables.
Step 2: Sauté Vegetables
In the same skillet, add sweet onion and red bell pepper, and sauté over medium heat for about 3–4 minutes until softened. Stir in 2 cups of fresh spinach, cooking until wilted, which should take another minute. This vegetable mixture will add vibrant color and flavor to your Cheesy Garlic Chicken Wraps.
Step 3: Mix Cheese Filling
In a mixing bowl, combine 1 cup each of shredded mozzarella and cheddar cheese, along with 4 ounces of cream cheese and ¼ cup of sour cream. Add finely chopped fresh chives, a sprinkle of Mediterranean herb blend, and chili flakes for a kick. Stir until well combined, creating a creamy filling that complements the chicken and sautéed veggies perfectly.
Step 4: Prepare Tortillas
To enhance flavor, mix 2 tablespoons of melted butter with 1 teaspoon of roasted garlic powder in a small bowl. Brush both sides of 4 flour tortillas with this garlic-butter mixture. This step ensures your tortillas will be deliciously aromatic and crispy when cooked.
Step 5: Assemble Wraps
Lay the garlic-coated tortillas flat, then evenly distribute the sliced chicken and sautéed vegetable mixture across the center. Spoon the cheese filling on top, ensuring not to overfill. Carefully roll the tortillas tightly around the filling, tucking in the edges as you go to create secure Cheesy Garlic Chicken Wraps.
Step 6: Toast Wraps
Return the skillet to medium heat and place the seam-side down wraps in the skillet. Cook for about 3–4 minutes until the bottom is golden brown and crispy. Carefully flip the wraps using tongs and toast the other side for another 3–4 minutes, ensuring the cheese is melted and the tortillas are perfectly crisp.

Tips for the Best Cheesy Garlic Chicken Wraps
-
Avoid Overfilling: Keep wraps snug but not overstuffed to prevent them from tearing or spilling during cooking.
-
Warm Tortillas: Microwaving tortillas for a few seconds before assembly makes them pliable and easier to roll without cracking.
-
Cool Ingredients: Let the cooked chicken and sautéed veggies cool slightly before adding to the wraps to maintain tortilla crispness.
-
Flavor Boost: Deglaze your skillet after cooking chicken with a splash of broth or wine to enhance the flavor of the filling.
-
Cheese Variations: Experiment with different cheese blends based on your preference; using a sharp cheddar or pepper jack adds exciting flavor changes to your Cheesy Garlic Chicken Wraps.
Make Ahead Options
These Cheesy Garlic Chicken Wraps are perfect for meal prep enthusiasts! You can cook the chicken and sauté the vegetables up to 3 days in advance; simply refrigerate them in airtight containers. For maximum flavor and to prevent soggy tortillas, assemble the wraps right before serving. If desired, you can also prepare the cheese filling ahead and store it separately. When you’re ready to indulge, just roll the wraps and toast them in the skillet for about 3–4 minutes on each side until they’re golden brown and crispy. This way, you’ll have delightful comfort food ready in a fraction of the time, just as delicious as if you made them fresh!
Cheesy Garlic Chicken Wraps Variations
Feel free to explore these delightful variations that will let your creativity shine in the kitchen!
-
Vegetarian: Swap chicken for sautéed mushrooms or chickpeas for a hearty, plant-based option. You won’t miss the meat with these flavor-packed alternatives!
-
Gluten-Free: Use corn tortillas or large lettuce leaves instead of flour tortillas, making these wraps suitable for gluten-sensitive diners. A simple swap can make all the difference!
-
Mediterranean Twist: Add kalamata olives and crumbled feta cheese while replacing Italian herbs with oregano. This Mediterranean-inspired version will transport your taste buds from your kitchen to the sunny shores of Greece.
-
Southwest Version: Incorporate black beans, corn, and pepper jack cheese to create a spicy kick. This zesty adaptation will surely become a family favorite for taco night!
-
Buffalo Adaptation: Toss cooked chicken in buffalo sauce before adding to the filling, and throw in some crumbled blue cheese for that extra tang. Feeling adventurous? Embrace the heat!
-
Breakfast Wrap: Fill with scrambled eggs, sautéed veggies, and crispy bacon instead of chicken. This morning-inspired wrap makes for a delicious start to any day. Enjoy with a side of fresh fruit for a well-rounded meal!
For more satisfying meals, consider making these Cheesy Chicken Crescent or our delightful Herb Roasted Chicken in Creamy White Wine Sauce.
What to Serve with Cheesy Garlic Chicken Wraps
Elevate your meal experience with delightful sides that perfectly complement the flavors of these ooey-gooey wraps.
-
Refreshing Side Salad: A crisp salad with mixed greens, cherry tomatoes, and a light vinaigrette adds a refreshing contrast to the rich wraps.
-
Mexican Street Corn: Grilled corn tossed in spicy mayo, cheese, and lime enhances the wrap’s creamy elements while adding a burst of zesty flavor.
-
Homemade Guacamole: Creamy avocado dip with lime and cilantro rounds out the meal with its fresh, bright taste that pairs wonderfully with the wraps.
-
Salsa Verde: This tangy and vibrant sauce offers just the right kick, perfect for drizzling over your Cheesy Garlic Chicken Wraps or enjoying as a dip.
-
Sweet Potato Fries: Crisp and slightly sweet, these fries provide an appealing texture contrast, enhancing the overall flavor profile of your meal.
-
Chilled Mango Lassi: A creamy, fruity drink that cools down the heat and adds a tropical flare—pairing great with the spicy undertones in the wraps.
Make your dinner a feast with these delightful pairings that not only satisfy the belly but also elevate the dining experience!
How to Store and Freeze Cheesy Garlic Chicken Wraps
Room Temperature: Best enjoyed fresh, store any leftovers at room temperature for no more than 2 hours to maintain safety and quality.
Fridge: If you have leftover Cheesy Garlic Chicken Wraps, keep them in an airtight container in the fridge for up to 3 days. Reheat in a skillet for a crispy exterior.
Freezer: Assemble uncooked wraps and freeze them in a single layer on a baking sheet. Once frozen, transfer to a zip-top bag and store for up to 3 months. Thaw before cooking.
Reheating: To reheat, place wraps in a preheated skillet over medium heat for 4–5 minutes per side until crispy and heated through, ensuring a deliciously satisfying meal.
Cheesy Garlic Chicken Wraps Recipe FAQs
How do I choose ripe ingredients for my Cheesy Garlic Chicken Wraps?
When selecting your ingredients, particularly for bell peppers and onions, look for firm, brightly colored produce without dark spots or soft spots. Fresh spinach should be vibrant green and free of wilting. For garlic, choose firm heads with dry, papery skins for the best flavor.
How should I store leftover Cheesy Garlic Chicken Wraps?
Store any leftover wraps in an airtight container in your refrigerator for up to 3 days. If possible, reheat them in a skillet to maintain that delightful crispy exterior, ensuring they heat through and remain delicious.
Can I freeze Cheesy Garlic Chicken Wraps?
Absolutely! To freeze, assemble uncooked wraps and place them in a single layer on a baking sheet. Once frozen solid, transfer them to a zip-top bag for up to 3 months. Thaw in the refrigerator overnight before cooking, or cook from frozen by adding a few extra minutes to the cooking time.
What should I do if my wraps are falling apart?
If your wraps are falling apart, it could be due to overfilling or not using fresh tortillas. I recommend warming the tortillas in the microwave before filling them. Also, ensure to let the chicken and vegetable mixture cool slightly before assembly to prevent soggy tortillas. Keeping the filling snug but not overstuffed is key for secure wraps.
Are there any dietary considerations I should be aware of?
Yes! For those with dairy allergies, you can use dairy-free cheeses and Greek yogurt as a substitute for cream cheese and sour cream. If you’re looking for gluten-free options, opt for corn tortillas or large lettuce leaves instead of flour tortillas. Always check labels on any packaged ingredients for potential allergens.
Cheesy Garlic Chicken Wraps for the Ultimate Comfort Bite
Ingredients
Equipment
Method
- In a large skillet, heat 2 tablespoons of extra virgin olive oil over medium heat. Season 1 pound of chicken breast with sea salt and black pepper, then add it to the pan. Cook for about 5–7 minutes on each side until golden brown and cooked through. Once done, remove the chicken and let it rest.
- In the same skillet, add sweet onion and red bell pepper, and sauté over medium heat for about 3–4 minutes until softened. Stir in 2 cups of fresh spinach, cooking until wilted, which should take another minute.
- In a mixing bowl, combine 1 cup each of shredded mozzarella and cheddar cheese, along with 4 ounces of cream cheese and 1/4 cup of sour cream. Add finely chopped fresh chives, a sprinkle of Mediterranean herb blend, and chili flakes for a kick. Stir until well combined.
- Mix 2 tablespoons of melted butter with 1 teaspoon of roasted garlic powder in a small bowl. Brush both sides of 4 flour tortillas with this garlic-butter mixture.
- Lay the garlic-coated tortillas flat, then evenly distribute the sliced chicken and sautéed vegetable mixture across the center. Spoon the cheese filling on top. Carefully roll the tortillas tightly around the filling.
- Return the skillet to medium heat and place the seam-side down wraps in the skillet. Cook for about 3–4 minutes until the bottom is golden brown and crispy. Flip the wraps and toast the other side for another 3–4 minutes.
Leave a Reply