
As I walked through the aisles of my local grocery store, an array of vibrant Halloween decorations caught my eye, igniting a spark of creativity. It dawned on me how much I love making homemade treats for this spirited season, especially my delightful Witch’s Fingers Sugar Cookies. These eerie yet tasty cookies are not only fun to make, but they’re also a phenomenal crowd-pleaser—guaranteed to enchant guests of all ages with their whimsical appearance and delicious flavor. Plus, there are gluten-free and vegan options for those with dietary needs! With a buttery, crispy exterior and a chewy center, these cookies are perfect for Halloween gatherings. Are you ready to bake a batch that will steal the spotlight? Let’s dive into this spooky recipe!
Why Are Witch’s Fingers so Irresistible?
Eerie Design: The unique shape and decoration of these cookies spark curiosity, making them a perfect centerpiece for any Halloween gathering.
Customizable Options: With gluten-free and vegan adaptations available, everyone can join in on the fun, ensuring no one misses out on these spooky delights.
Crowd-Pleasing Taste: Expect smiles all around as the buttery, chewy texture and rich flavor tantalize taste buds.
Quick and Easy: This recipe is quick to whip up, making it an excellent choice for last-minute Halloween treats. Grab your ingredients like all-purpose flour or gluten-free flour and let’s get baking!
Perfect Activity: Baking Witch’s Fingers with friends or family adds a fun element to your Halloween preparation, creating memorable moments. Don’t forget to check out these Gluten Free Cookies or Healthy Carrot Cookies for more festive ideas!
Witch’s Fingers Sugar Cookies Ingredients
• Here’s what you need for these spooky delights:
For the Dough
- Unsalted Butter – Provides richness and moisture; swap with vegan butter for a dairy-free version.
- Vanilla Extract – Adds flavor complexity; almond extract can be used for a nuttier taste.
- Confectioner’s Sugar – Sweetens and helps achieve a tender texture; use powdered monk fruit sweetener for lower sugar.
- All-Purpose Flour – Gives structure to the cookies; for gluten-free, substitute with gluten-free baking flour like Bob’s Red Mill.
- Baking Soda – Works as a leavening agent; ensure accurate measurement for proper rise.
- Salt – Enhances sweetness and balances flavors.
For the Decoration
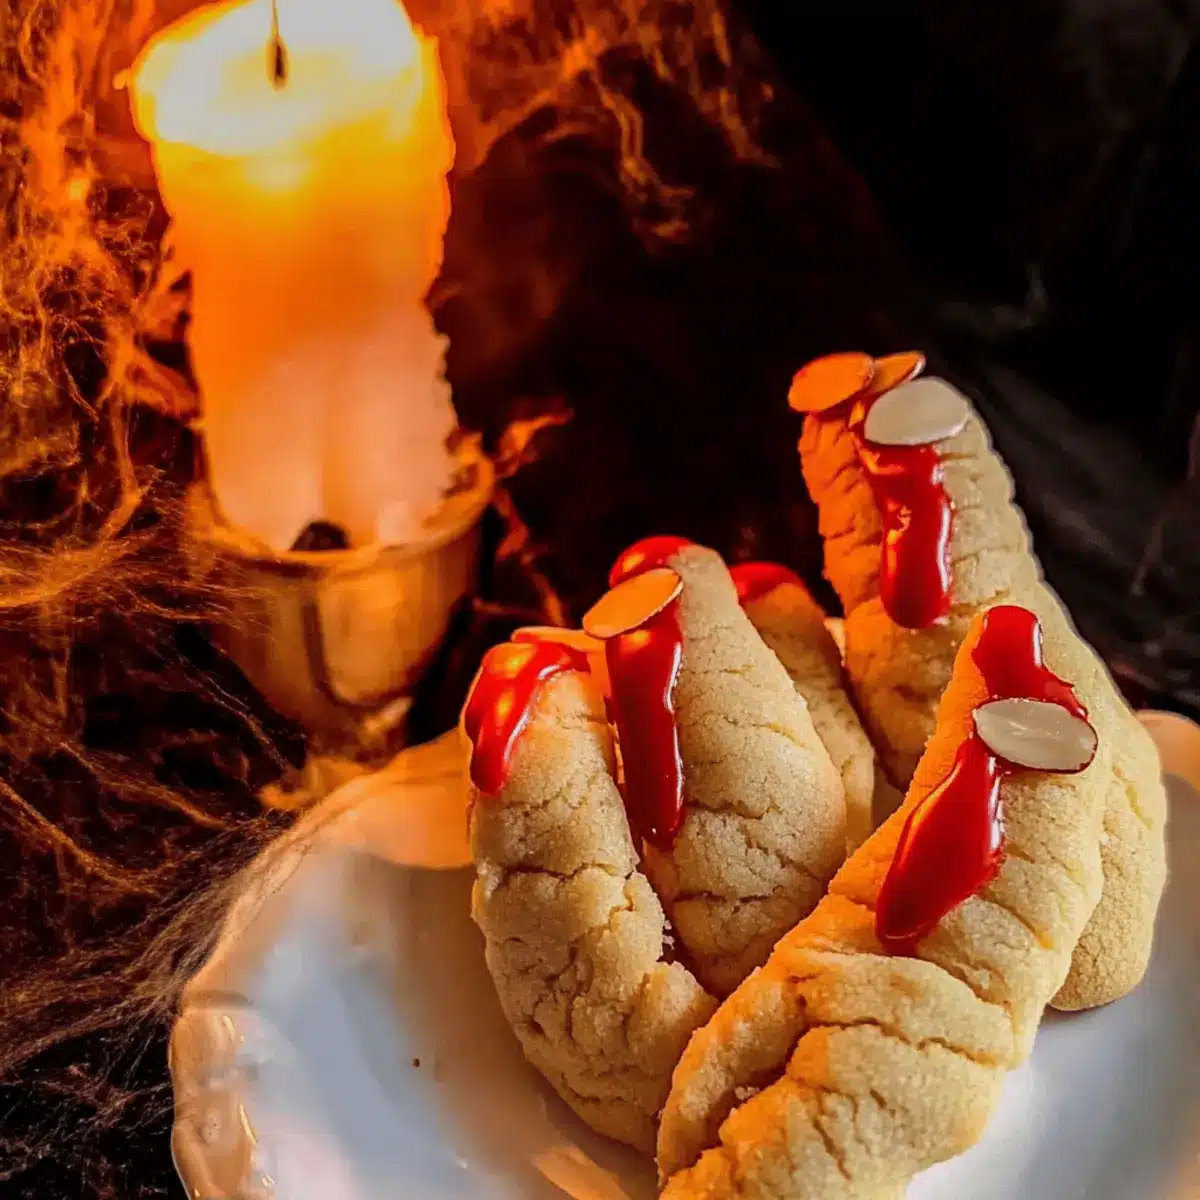
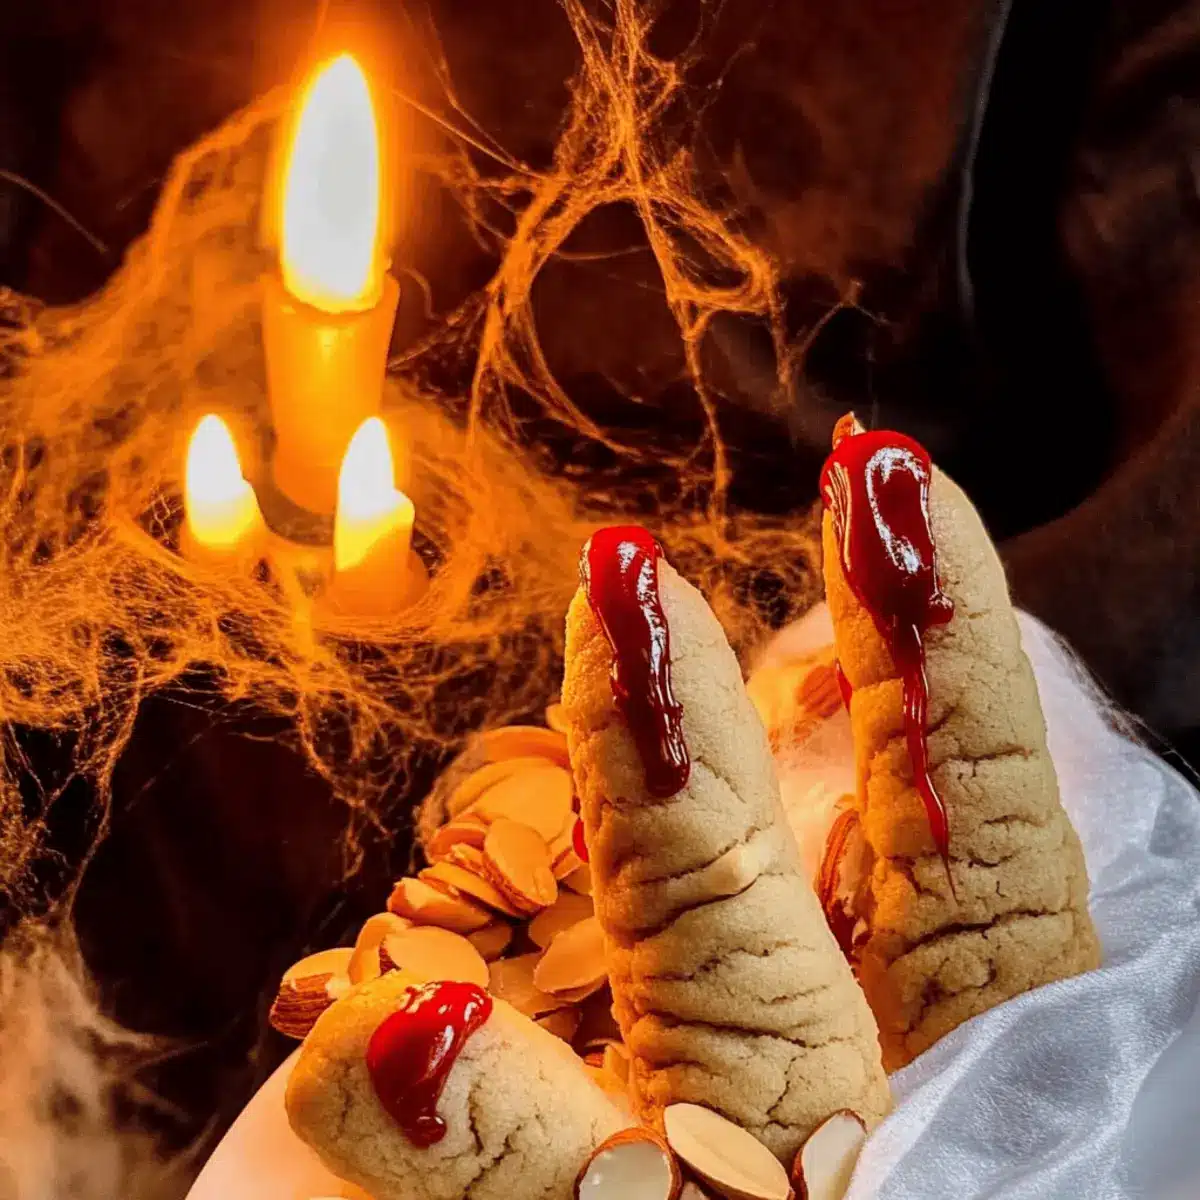
- Red Candies (Candy Melts) – Creates a spooky effect; can be replaced with raspberry or strawberry jam for a different look.
- Sliced Almonds – Represents the “fingernail,” providing texture and crunch; use sunflower seeds or pumpkin seeds if allergic.
With these Witch’s Fingers Sugar Cookies ingredients, you’re one step closer to baking a hauntingly delicious treat that everyone will love!
Step‑by‑Step Instructions for Witch’s Fingers Sugar Cookies
Step 1: Preheat the Oven
Begin by preheating your oven to 320°F (160°C). This temperature is essential for achieving the perfect balance of crispy edges and chewy centers in your Witch’s Fingers Sugar Cookies. While the oven warms, gather your baking sheets and line them with parchment paper to prepare for the spooky cookies.
Step 2: Mix the Wet Ingredients
In a large mixing bowl, combine melted unsalted butter, vanilla extract, and confectioner’s sugar. Whisk these ingredients together until they’re smooth and well-blended, creating a creamy base. This mixture should look glossy and have a slightly thick, syrupy consistency, which is crucial for the delicate texture of your cookies.
Step 3: Prepare the Dry Ingredients
In a separate bowl, sift together the all-purpose flour, baking soda, and salt. This step ensures that the leavening agent is evenly distributed, resulting in perfectly risen Witch’s Fingers Sugar Cookies. Once combined, gradually fold this dry mix into the wet ingredients, stirring gently to form a cohesive dough without overworking it.
Step 4: Shape the Cookies
Once your dough is ready, divide it into small portions and roll them into balls. Then, stretch each ball into an elongated shape, mimicking a finger. Remember, aim for a uniform thickness throughout to ensure even baking. The flattened dough should have pointed tips resembling witch’s fingers, with visual cues to guide their eerie shapes.
Step 5: Add the Details
Using your fingers, create two small indentations on each ‘finger’ to represent knuckles. With the edge of a butter knife, gently score lines to enhance the illusion. These markings and indents will make your Witch’s Fingers Sugar Cookies look delightfully spooky and realistic, ready for the next decorating step.
Step 6: Decorate the Cookies
Place a sliced almond at the tip of each shaped cookie to serve as the “nail.” Then, fill the indentations with melted red candy melts, adding a gruesome touch that makes these cookies truly festive. This color contrast not only enhances the visual appeal but also adds a sweet surprise in every bite.
Step 7: Chill the Cookies
For the best results, refrigerate or freeze the decorated cookies for 15-30 minutes. This chilling step helps the cookies maintain their shape while baking, preventing them from spreading too much. Rest assured, the cookies will absorb all the chilling flavors and hold their eerie look during the bake.
Step 8: Bake the Cookies
Transfer your chilled Witch’s Fingers Sugar Cookies to the preheated oven and bake for 15-16 minutes. Keep an eye on them; they should turn a delightful golden brown around the edges while remaining slightly soft in the center. This is the perfect time to fill your kitchen with the smell of Halloween baking!
Step 9: Cool and Serve
Once baked, remove the cookies from the oven and let them cool on the baking sheets for a few minutes before transferring them to a wire rack. This cooling process allows the cookies to set completely, ensuring a perfect texture. Once cooled, these spooky treats are ready to be shared and enjoyed!
Variations & Substitutions for Witch’s Fingers Sugar Cookies
Feel free to unleash your creativity and make these Witch’s Fingers Sugar Cookies uniquely yours with enticing twists and adaptations!
-
Gluten-Free: Swap all-purpose flour for gluten-free baking flour and add xanthan gum to maintain the texture. A simple change can yield equally delightful results.
-
Vegan: Replace unsalted butter with vegan butter and use a plant-based milk or water-based binding agent instead of any eggs. This way, everyone can join in on the fun!
-
Different Flavors: Instead of vanilla extract, try using almond extract for a nuttier flavor profile that adds a warm touch to your spooky cookies. It’s an exciting way to surprise your taste buds!
-
Lower Sugar: For a lower-sugar alternative, substitute confectioner’s sugar with powdered monk fruit sweetener or coconut sugar, which will maintain sweetness while being a healthier choice.
-
Nut-Free: If allergies are a concern, you can swap sliced almonds for sunflower seeds or pumpkin seeds. They’ll still look eerily like nails but will be safe for nut-sensitive friends!
-
Candy Alternatives: Instead of using candy melts, fill all the indents with raspberry or strawberry jam to keep the spooky look while creating a tart, fruity flavor for your cookies.
-
Spicy Touch: For those who enjoy a bit of heat, sprinkle a touch of cayenne pepper into the dough for a surprising twist that gives your cookies a subtle kick!
-
Dough Flavoring: Fold in some orange zest into the dough for a citrusy hint that harmonizes beautifully with the spooky theme while bringing a refreshing brightness to each bite.
Let the Halloween spirit guide you as you bake and explore these variations! If you’re looking for more festive delights, check out these delicious Healthy Carrot Cookies and indulge in the creativity of baking!
Make Ahead Options
These Witch’s Fingers Sugar Cookies are perfect for meal prep, allowing you to save time when Halloween approaches! You can prepare the cookie dough up to 24 hours in advance; simply form into finger shapes and place them on a lined baking sheet. Cover tightly with plastic wrap and refrigerate until you’re ready to bake. For the best quality, chill the dough before baking to maintain the eerie shape. The decorated cookies can also be frozen for up to 3 months; just ensure they are placed in an airtight container. When ready to serve, bake them directly from frozen, adding a couple of extra minutes to the baking time. Enjoy fresh, spooky treats at a moment’s notice!
Expert Tips for Witch’s Fingers Sugar Cookies
-
Chill the Dough: Ensure the dough is well-chilled before shaping to prevent sticking and maintain the finger shape during baking.
-
Don’t Overmix: When combining wet and dry ingredients, mix just until combined to keep your Witch’s Fingers Sugar Cookies tender. Overmixing can lead to a tough texture.
-
Accurate Measurements: Use a kitchen scale for precise flour measurement; too much can make cookies dry. For gluten-free versions, follow the packaging guidelines for best results.
-
Watch the Bake Time: Ovens vary; check cookies a minute or two early to prevent burning. Aim for a beautifully golden edge while keeping the center soft.
-
Fun with Decor: Encourage creativity! Use different candies or nuts for decorating if you’re out of almonds, making your Witch’s Fingers uniquely spooky.
-
Storage Tips: Store your cookies in an airtight container at room temperature for up to 10 days. They freeze well, too—perfect for prepping ahead of your Halloween party!
How to Store and Freeze Witch’s Fingers Sugar Cookies
-
Room Temperature: Store cookies in an airtight container at room temperature for up to 10 days to maintain freshness. Keep them in a cool, dry place away from direct sunlight.
-
Fridge: For longer-lasting cookies, you can refrigerate them for up to 2 weeks. Make sure they’re wrapped tightly to avoid absorbing any odors from the fridge.
-
Freezer: Freeze Witch’s Fingers Sugar Cookies in a single layer; once solid, transfer to a freezer-safe bag or container. They can be frozen for up to 3 months.
-
Reheating: Thaw frozen cookies in the refrigerator or at room temperature before enjoying. For a fresh-out-of-the-oven taste, warm them in the oven at 300°F (150°C) for 5-7 minutes.
What to Serve with Witch’s Fingers Sugar Cookies?
Indulging in the Halloween spirit is easier when you pair these eerie treats with delightful accompaniments that enhance the festive atmosphere.
- Witch’s Brew Punch: A spooky drink with green and purple hues that adds a fun visual element, refreshing guests while they enjoy their cookies.
- Caramel Apple Slices: The sweetness of juicy apples dipped in caramel complements the sugary cookies beautifully, creating a delightful balance of flavors.
- Ghostly Marshmallow Brownies: Rich, fudgy brownies topped with ghost-shaped marshmallows create a decadent dessert table, perfect for chocolate lovers.
- Spiced Pumpkin Muffins: The warm, inviting flavors of pumpkin spice resonate with the Halloween theme, making a cozy pairing for chilled autumn evenings.
- Candy Corn Trail Mix: A crunchy, sweet treat combining candy corn, nuts, and pretzels, offering a playful texture that’s both satisfying and nostalgic.
- Chilling Hot Chocolate: Serve this rich drink either warm or iced, topped with whipped cream—it’s an irresistible contrast to the crispiness of the cookies.
- Skeletal Cheese and Crackers: Arrange your favorite cheeses and crunchy crackers in spooky shapes for a savory touch, balancing the sweetness of the sugar cookies.
- Bubbling Cauldron Fondue: Set up a chocolate or caramel fondue that guests can dip various snacks into, encouraging enjoyment and interaction around the Halloween table.
- Frightening Fruit Skewers: Assemble a mix of fruits with Halloween-themed decoration to promote freshness and add a healthy element alongside the other treats.
- Creepy Cupcakes: Decorate cupcakes with ghoulish designs for an additional sweet treat that will enchant both kids and adults during your festive gathering.

Witch’s Fingers Sugar Cookies Recipe FAQs
How can I tell if my butter is the right temperature for baking?
Absolutely! For optimal results, use softened unsalted butter that is slightly warm to the touch but not melting. It should give easily when pressed, allowing you to cream it smoothly with sugar. If it’s too hard straight from the fridge, consider cutting it into smaller pieces and letting it sit for about 15-20 minutes.
How should I store my Witch’s Fingers Sugar Cookies?
Keep your cookies in an airtight container at room temperature for up to 10 days. If you want them to last longer, you can refrigerate them for up to 2 weeks, ensuring they are tightly wrapped to prevent them from absorbing any fridge odors.
Can I freeze leftover Witch’s Fingers Sugar Cookies?
Yes, indeed! You can freeze your cookies for up to 3 months. First, place them in a single layer on a baking sheet and freeze until firm. After that, transfer them to a freezer-safe bag or container. When you’re ready to enjoy them, thaw them in the fridge overnight or at room temperature for a few hours.
What should I do if my cookie dough is too sticky?
No worries! If your dough is too sticky to roll, it might need some extra flour or a chill in the fridge. Just sprinkle a little more flour during rolling to help prevent sticking, or refrigerate for 15-30 minutes. Chilling helps the butter solidify, making it easier to shape.
Are there nut-free options for decorating my Witch’s Fingers Sugar Cookies?
Very much so! If you or your guests have nut allergies, you can use sunflower seeds or pumpkin seeds instead of almond slices for the “nails.” Additionally, raspberry or strawberry jam is a lovely alternative for the “blood” effect—just dollop it in the knuckle indentations.
How can I make my Witch’s Fingers Sugar Cookies gluten-free?
For a gluten-free version, simply substitute all-purpose flour with a high-quality gluten-free baking flour, like Bob’s Red Mill. It’s also a great idea to add a teaspoon of xanthan gum to improve texture and elasticity. Just follow the same instructions for shaping and baking!

Witch's Fingers Sugar Cookies: Spooky Yet Delicious Treats
Ingredients
Equipment
Method
- Preheat your oven to 320°F (160°C) and line baking sheets with parchment paper.
- In a large mixing bowl, combine melted unsalted butter, vanilla extract, and confectioner’s sugar. Whisk until smooth.
- In another bowl, sift together all-purpose flour, baking soda, and salt. Fold this mix into the wet ingredients.
- Divide the dough into small portions, roll into balls, and stretch each into an elongated shape.
- Create indentations on each 'finger' for knuckles and score lines for realism.
- Place a sliced almond at the tip of each cookie and fill indentations with melted red candy melts.
- Refrigerate or freeze the decorated cookies for 15-30 minutes.
- Bake the cookies for 15-16 minutes or until they turn golden brown.
- Remove from the oven, let cool on baking sheets, then transfer to a wire rack.
Leave a Reply