
At my last dinner party, I caught myself sneaking into the kitchen for another bite of these irresistible Sushi Cups, a quirky twist on traditional sushi that’s become my new favorite. With a delightful combination of tender sushi rice and vibrant fresh veggies, they’re not just a feast for the eyes; they also allow for endless customization. These no-bake wonders are quick to whip up, making them perfect for those of us who love homemade food without the fuss. Whether you’re looking for a crowd-pleasing appetizer or a fun snack, these Sushi Cups offer a delicious, low-calorie option that everyone can enjoy. What will you choose to fill yours with?
Why Are Sushi Cups the Perfect Snack?
Versatile and Customizable: These sushi cups adapt to your taste buds! Mix and match different veggies and proteins—like adding grilled chicken or tofu—for a personal touch.
No-Bake Convenience: No cooking required means you’ll save time and enjoy mess-free preparation, making these an ideal choice for busy home chefs.
Low-Calorie Delight: Each cup is only about 110 calories, perfect for guilt-free snacking or serving at parties.
Crowd-Pleasing Appeal: Impress guests at gatherings with their vibrant colors and stunning presentations; they’re sure to be a hit! If you’re a fan of satisfying finger foods, don’t forget to also try my delicious Breakfast Granola Cups.
Healthy and Fresh: Loaded with vegetables and nutritious ingredients, these cups bring a refreshing taste that outshines any fast food option.
You’re bound to love this quick, engaging recipe!
Sushi Cups Ingredients
• Get ready to create some tasty, no-bake sushi cups!
For the Cups
- Sushi Rice – Use short-grain sushi rice for the best texture and stickiness.
- Water – Essential for cooking the rice to achieve the perfect tenderness.
For the Filling
- Finely Chopped Veggies – Choose a mix of raw carrots, cucumber, or bell peppers for a fresh, crunchy bite.
- Steamed Mukimame (Shelled Edamame) – A protein-packed addition; substitute with regular edamame if desired.
- Diced Avocado – Adds a creamy texture and healthy fats; swap with nut-based cream for a different twist.
For the Sauce
- Soy Sauce, Tamari, or Coconut Aminos – Enhances flavor and can accommodate dietary restrictions, like being gluten-free.
- Mayonnaise – Adds creaminess to the spicy mayo; Greek yogurt makes a lighter alternative.
- Sriracha Sauce – Provides a kick of heat; adjust according to your spice preference.
- Sesame Oil – Balances flavors in the spicy mayo, adding a rich undertone.
- Honey – Sweetens the spicy mayo and can be adjusted based on taste preferences.
For Garnish
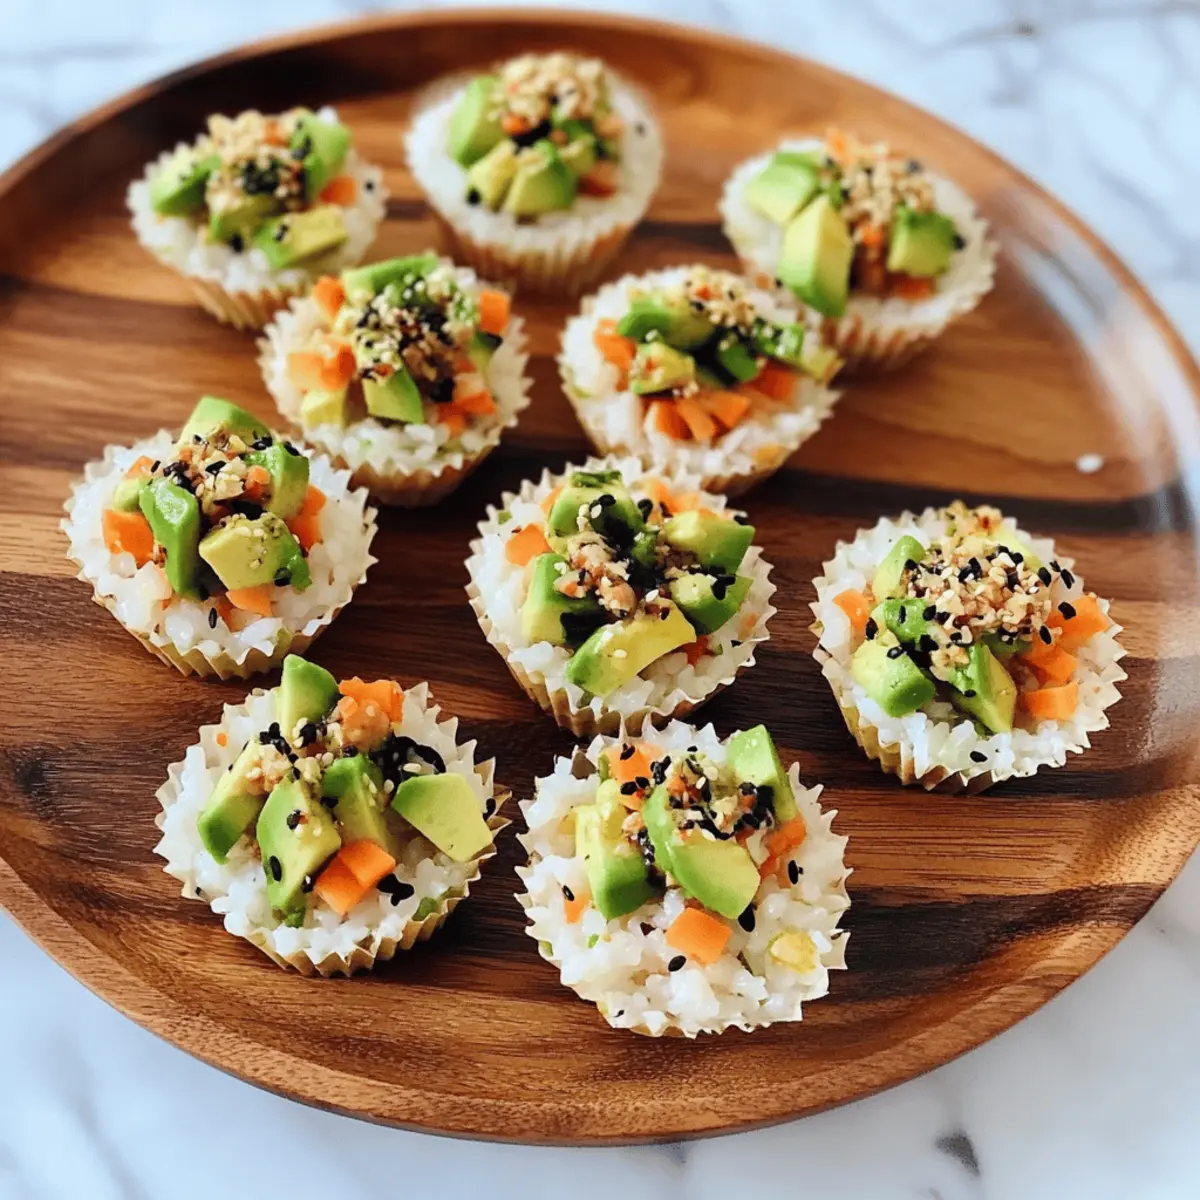
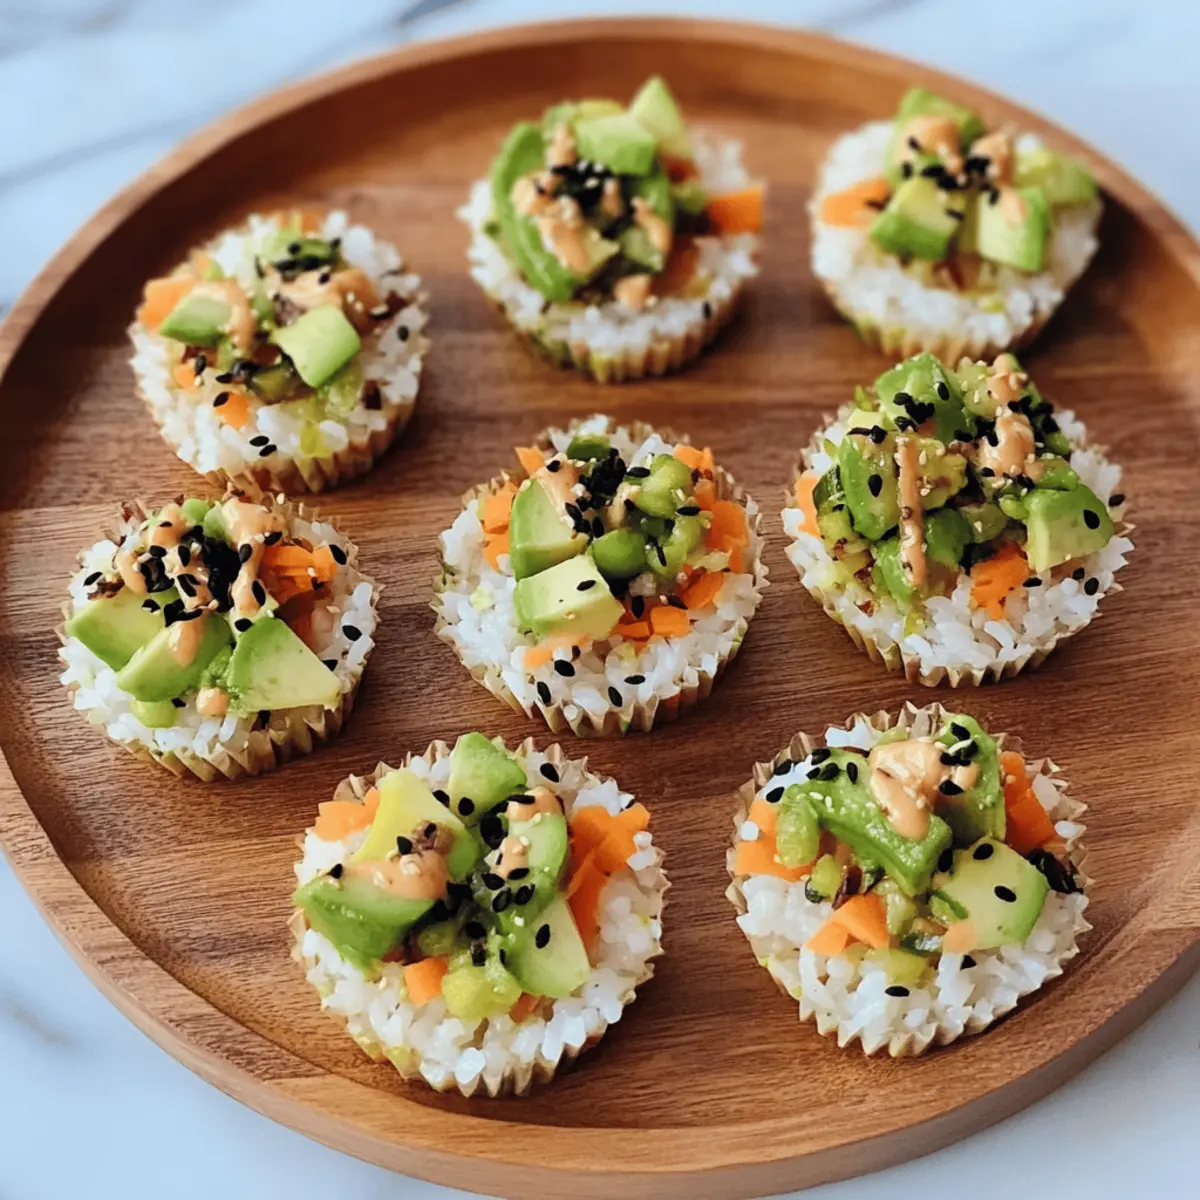
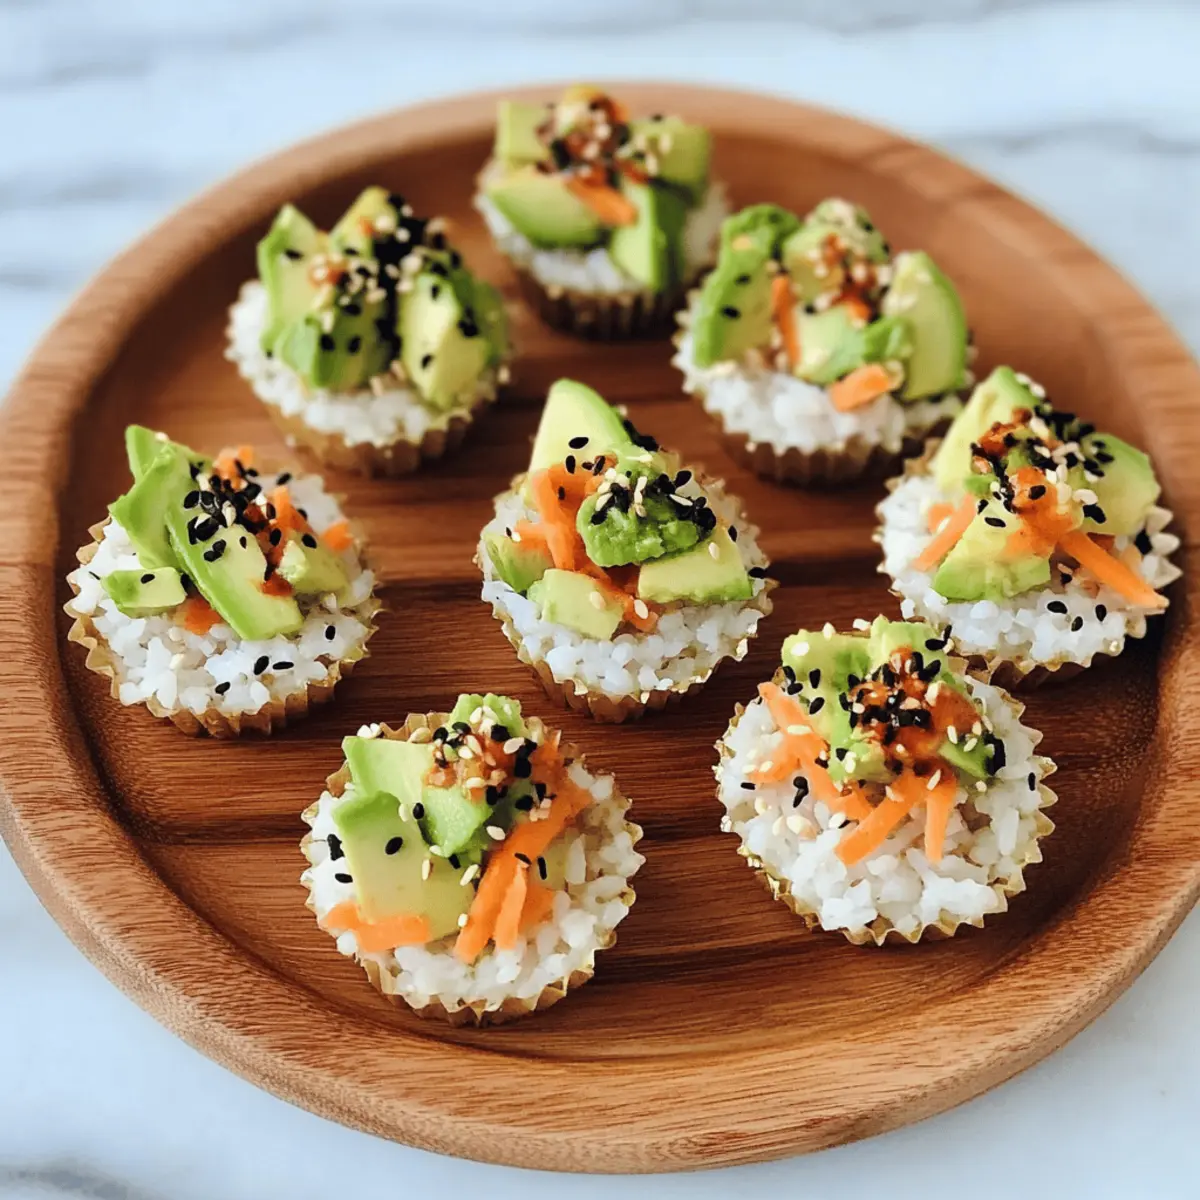
- Black Sesame Seeds – Offers visual appeal and a nutty flavor to finish off your sushi cups beautifully.
With these sushi cups ingredients, you’re all set to create a delightful appetizer that can be customized to your heart’s content!
Step‑by‑Step Instructions for Sushi Cups
Step 1: Prepare the Rice
In a medium saucepan, combine 1 cup of rinsed sushi rice with 1 ¼ cups of water. Bring to a boil over medium heat, then reduce the heat to low, cover, and simmer for 20 minutes until the rice is tender and the water is absorbed. Once cooked, let it sit covered for an additional 10 minutes to allow the rice to steam and become fluffy.
Step 2: Mold Rice Cups
After the rice has steamed, preheat your oven to 375°F (190°C). Using a muffin tin, press about 2 tablespoons of the cooked sushi rice into each cup, forming a compact base. Make sure to mold the rice evenly so that it holds its shape. Place the muffin tin in the refrigerator and chill for 20 minutes to set the rice cups firmly.
Step 3: Prepare Filling
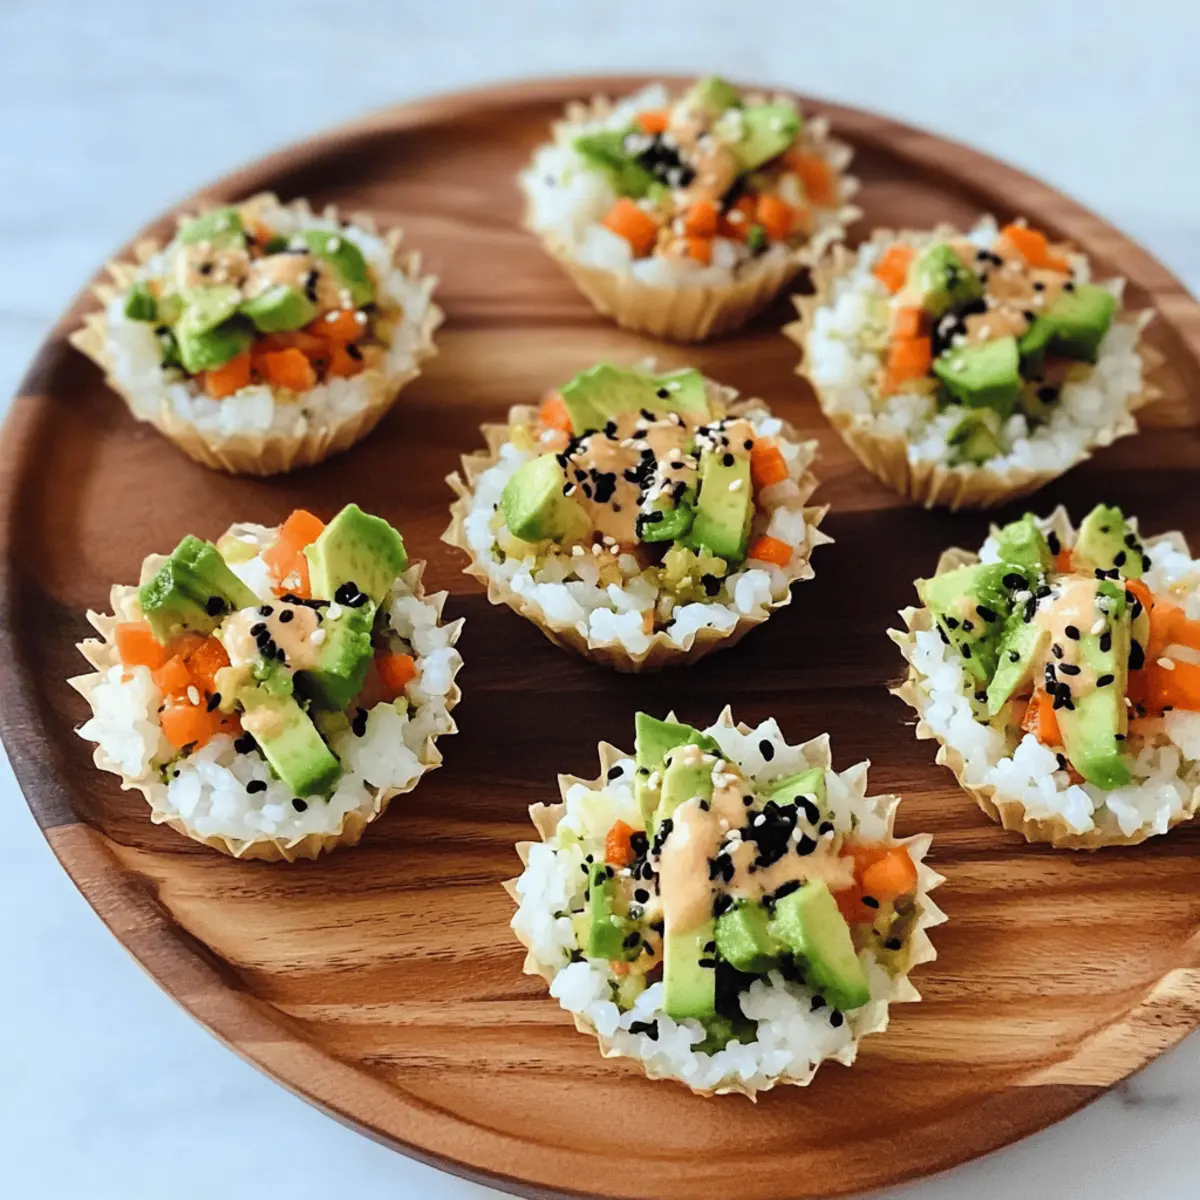
While the rice cups chill, gather and chop your choice of finely chopped veggies such as carrots, cucumbers, and bell peppers. In a medium bowl, combine the chopped veggies with ½ cup of steamed mukimame and diced avocado. Drizzle in your chosen sauce—like soy sauce or tamari—and gently toss the filling until everything is well coated and mixed.
Step 4: Make Spicy Mayo
In a small bowl, whisk together ¼ cup of mayonnaise, 1 tablespoon of Sriracha, 1 teaspoon of honey, and 1 teaspoon of sesame oil until smooth and creamy. Adjust the ingredients according to your desired spice level, tasting as you go. This spicy mayo will bring a zesty kick to your delicious sushi cups.
Step 5: Assemble Sushi Cups
Once the rice cups are chilled and firm, remove them from the muffin tin. Spoon a generous amount of the veggie filling into each rice cup, packing them slightly to ensure a satisfying bite. Drizzle the prepared spicy mayo over the top and finish with a sprinkle of black sesame seeds for an appealing garnish. These colorful Sushi Cups are now ready to serve!
Make Ahead Options
These Sushi Cups are perfect for busy home cooks looking to save time without sacrificing flavor! You can prepare the sushi rice and mold the rice cups up to 24 hours in advance—just keep them covered in the refrigerator to maintain freshness. Additionally, the filling can be mixed and stored in an airtight container for up to 3 days before assembly. When you’re ready to serve, simply fill the chilled rice cups with the veggie mixture, drizzle with spicy mayo, and top with sesame seeds. This way, you can enjoy delicious, restaurant-quality sushi cups with minimal effort on a busy weeknight!
What to Serve with Customizable No-Bake Sushi Cups
These sushi cups are a feast for your senses, inviting vibrant flavors and delightful textures to create the perfect gathering.
-
Crispy Seaweed Salad: Refreshing and umami-packed, this salad adds a crunchy contrast that elevates your sushi experience. Its vibrant greens harmonize beautifully with the sushi cups.
-
Edamame Beans: Lightly salted and protein-rich, they offer a satisfying bite and a touch of simplicity that pairs pleasantly alongside your sushi cups.
-
Aromatic Miso Soup: The warm, savory broth provides a comforting element that complements the cool sushi cups, creating a delightful contrast in temperatures.
-
Citrusy Cucumber Salad: A quick, bright salad that adds a tangy kick and a refreshing crunch, perfectly balancing the richness of the creamy toppings in the sushi cups.
-
Sake or Sparkling Water: Sipping on chilled sake or sparkling water enhances the flavors of your meal while refreshing your palate between bites.
-
Mochi Ice Cream: For a sweet finish, this chewy, ice cream-filled treat offers a fun texture and variety of flavors, making it a delightful treat after the savory courses.
-
Sesame Ginger Dressing: Drizzle this dressing over mixed greens for a crisp side that adds another layer of flavor, tying in well with both the sushi cups and your gathering.
With such a colorful array of pairings, every bite of your sushi cups will be a delightful culinary adventure!
Expert Tips for Sushi Cups
- Rinse the Rice: Ensure to rinse the sushi rice thoroughly before cooking to remove excess starch, resulting in a firmer texture that holds up well in sushi cups.
- Silicone Muffin Liners: Use silicone muffin liners for easy removal of the sushi cups, which helps avoid any breakage and makes serving a breeze.
- Chill Time: Don’t skip the chilling step! Allowing the rice cups to chill for 20 minutes helps them maintain their shape and texture when filled with toppings.
- Mix and Match: Feel free to get creative with your fillings! Customize your sushi cups with different vegetables or proteins according to your dietary needs for a unique twist on this classic dish.
- Storage Tips: For the freshest taste, store any leftover sushi cups in an airtight container in the refrigerator and consume them within two days to avoid staleness.
How to Store and Freeze Sushi Cups
Fridge: Store sushi cups in an airtight container in the refrigerator for up to 2 days to maintain freshness; the rice may become stale if left too long.
Freezer: If you want to make these cups in advance, freeze the uncooked rice and the prepared filling separately. Freeze for up to 1 month, then assemble and enjoy.
Reheating: If refrigerated, enjoy sushi cups cold or let them sit at room temperature for a bit before serving. For best results, avoid reheating cooked sushi cups to retain texture.
Assembly Tip: Assemble your sushi cups just before serving to maintain their delightful crispness and prevent sogginess from the toppings.
Sushi Cups: Endless Variations Await
Get ready to tailor these sushi cups to your taste, enhancing every bite with new flavors and textures!
- Vegetable Swap: Substitute your chopped veggies based on seasonal favorites or personal cravings for a fresh twist. Think shredded cabbage or daikon radish for crunchy alternatives!
- Protein Boost: Add grilled chicken, shrimp, or tofu to your filling for an extra protein kick. This makes these cups not only delightful but also satisfying!
- Dairy-Free Delight: Replace mayonnaise with a blend of avocado and lime juice for a creamy, dairy-free spicy alternative. It offers a fresh zest that keeps everyone coming back for more!
- Sriracha Swap: For a milder option, use sweet chili sauce instead of sriracha to tone down the heat while keeping the flavor intact. Perfect for those who prefer a gentler spice!
- Ginger Dressing Layer: Try swapping your spicy mayo with a tangy ginger dressing. This will add a zesty, fresh taste that brightens up your sushi cups beautifully!
- Avocado Alternative: If you’re not a fan of avocado, nut-based creams or hummus work wonderfully as a creamy filling substitute, offering a different yet delightful texture. You might just find a new favorite!
- Crunchy Topping: Sprinkle crushed rice crackers or crispy shallots on top for added crunch and a burst of flavor that contrasts beautifully with the soft rice!
- Herb Infusion: Toss in fresh herbs like cilantro or mint into your veggie filling. They can transform your cups into an aromatic adventure, adding delightful freshness in every bite!
Feel inspired? For even more delicious ideas, check out my Breakfast Granola Cups that can be customized just like these sushi cups! 🥳
Sushi Cups Recipe FAQs
How do I select the right sushi rice?
Absolutely! For the best texture, use short-grain sushi rice. The stickiness of short-grain rice helps your sushi cups hold together beautifully. When purchasing, look for packages labeled “sushi rice” or “Japanese rice” to ensure quality.
What’s the best way to store sushi cups?
Store your sushi cups in an airtight container in the refrigerator for up to 2 days. Make sure to keep them away from moisture to prevent the rice from becoming stale. I often find that consuming them within this timeframe keeps them tasting fresh and delightful!
Can I freeze sushi cups?
Yes, you can freeze components of your sushi cups! First, freeze the uncooked sushi rice in a sealed bag for up to 3 months. You can also freeze the veggie filling separately. To assemble, just thaw the rice, reheat it gently, and mold it into cups before topping with the filling and sauce.
What if the rice is too sticky?
No worries! If your rice ends up too sticky, try this: rinse it thoroughly under cold water before cooking to remove excess starch. If it’s already cooked, let it cool completely before molding to help firm it up. This should give you firmer, more manageable rice cups.
Are there any dietary considerations for sushi cups?
Definitely! You can make these vegan by omitting mayonnaise and replacing it with a creamy nut-based dressing. For gluten-free options, choose Tamari or coconut aminos instead of soy sauce. Always check the ingredients in your sauces and fillings to accommodate any food allergies.
How can I ensure my sushi cups don’t get soggy?
To keep your sushi cups crisp, assemble them just before serving. Store the components separately—filling, rice, and sauce—until you’re ready to dig in. This way, the rice stays tender without absorbing excess moisture from the toppings.
Delicious Sushi Cups: No-Bake Marvels for Any Occasion
Ingredients
Equipment
Method
- In a medium saucepan, combine the sushi rice with water. Bring to a boil, then reduce to low, cover, and simmer for 20 minutes. Let sit covered for 10 minutes.
- Preheat oven to 375°F (190°C). Using a muffin tin, press 2 tablespoons of rice into each cup. Chill for 20 minutes.
- While chilling, chop your choice of veggies. Mix with mukimame, avocado, and drizzle with soy sauce. Toss until mixed.
- In a small bowl, whisk together mayonnaise, Sriracha, honey, and sesame oil until smooth. Adjust flavors to taste.
- Remove rice cups from the muffin tin, fill with veggie mixture, drizzle with spicy mayo, and garnish with black sesame seeds.
Leave a Reply