
As I stood in my kitchen surrounded by the intoxicating scents of spring, I couldn’t help but feel the excitement bubbling up for the upcoming Easter celebrations. That’s when the idea of creating these adorable Easter Chick Cake Pops struck me! Combining a soft vanilla cake with creamy frosting, these delightful pops are dressed in vibrant yellow candy melts that mimic charming little chicks. What I love most is that they not only bring a festive flair to any dessert table but can also be whipped up in under two hours—perfect for those spirited gatherings with family and friends. Plus, they hide a hint of lemon zest that beautifully balances the sweetness, making each bite a joyful treat. Ready to add some whimsy to your Easter festivities? Let’s dive into making these sweet treats!
Why Are These Cake Pops So Special?
Unique Charm: These Easter Chick Cake Pops are not just cute; they’re a delightful blend of nostalgia and creativity that will impress your guests.
Quick and Easy: With a total preparation time of under two hours, you can whip up these festive treats without stress—perfect for those last-minute celebrations!
Versatile Decor: Feel free to swap out colors and shapes of the candy coating or decorations for a personalized touch. You can even try variations like adding a dash of lemon zest from Healthy Carrot Cake or creating unique designs!
Crowd-Pleaser: With their bright color and charming appearance, these pops are guaranteed to be a hit at any gathering, making them suitable for Easter festivities, birthdays, or even casual get-togethers.
Delicious Flavor: The soft cake, creamy frosting, and vibrant candy melts combine for a joyful bite that’s both sweet and refreshing—a true celebration of spring!
Easter Chick Cake Pops Ingredients
• Gather these delightful ingredients for your Easter Chick Cake Pops!
For the Batter
• Baked Vanilla or Yellow Cake – Use a dense cake for the best structure and moisture.
• Cream Cheese Frosting or Buttercream – Binds the cake crumbs together for a moist texture; store-bought works great for convenience.
• Lemon Zest – Enhances flavor with a refreshing burst; not essential but recommended for a delightful twist.
For the Coating
• Yellow Candy Melts – Provides a vibrant coating mimicking adorable chicks; mixing with white candy melts creates a layered effect.
• Vegetable Oil – Thins candy melts if too thick for easy dipping; add in increments as needed.
For the Decorations
• Mini Chocolate Chips or Black Sugar Pearls – Perfect for making the chick’s eyes; small black candies can be a fun alternative.
• Orange Candy or Fondant – Use for the beak; fondant can be shaped into various expressions for extra fun.
• Yellow Fondant or Melted Candy – Creates the tuft of ‘hair’ on the chicks; additional yellow candy melts can be substituted.
Step‑by‑Step Instructions for Easter Chick Cake Pops
Step 1: Prepare the Cake
Begin by baking a dense vanilla or yellow cake according to your recipe, then allow it to cool completely on a wire rack for about 30 minutes. The cake should be completely cool to ensure easy crumbling, preventing sogginess in your Easter Chick Cake Pops.
Step 2: Crumble the Cake
Once your cake is fully cooled, transfer it to a large mixing bowl and crumble it into fine crumbs using your hands or a fork. Add cream cheese frosting gradually, mixing thoroughly until the mixture is moist and moldable, achieving a consistency that holds together well.
Step 3: Shape the Pops
With the mixture ready, scoop small portions and roll them into 1-inch balls, placing them on a parchment-lined baking sheet. Once shaped, chill the cake balls in the refrigerator for about 20-30 minutes to firm up, making them easier to handle for the next steps.
Step 4: Insert the Sticks
While the cake pops are chilling, melt a small amount of yellow candy melts in the microwave, heating in 30-second intervals until smooth. Dip the end of each lollipop stick into the melted candy before inserting it into the center of each chilled cake ball, then return them to the fridge to set for another 15 minutes.
Step 5: Dip in Candy Melts
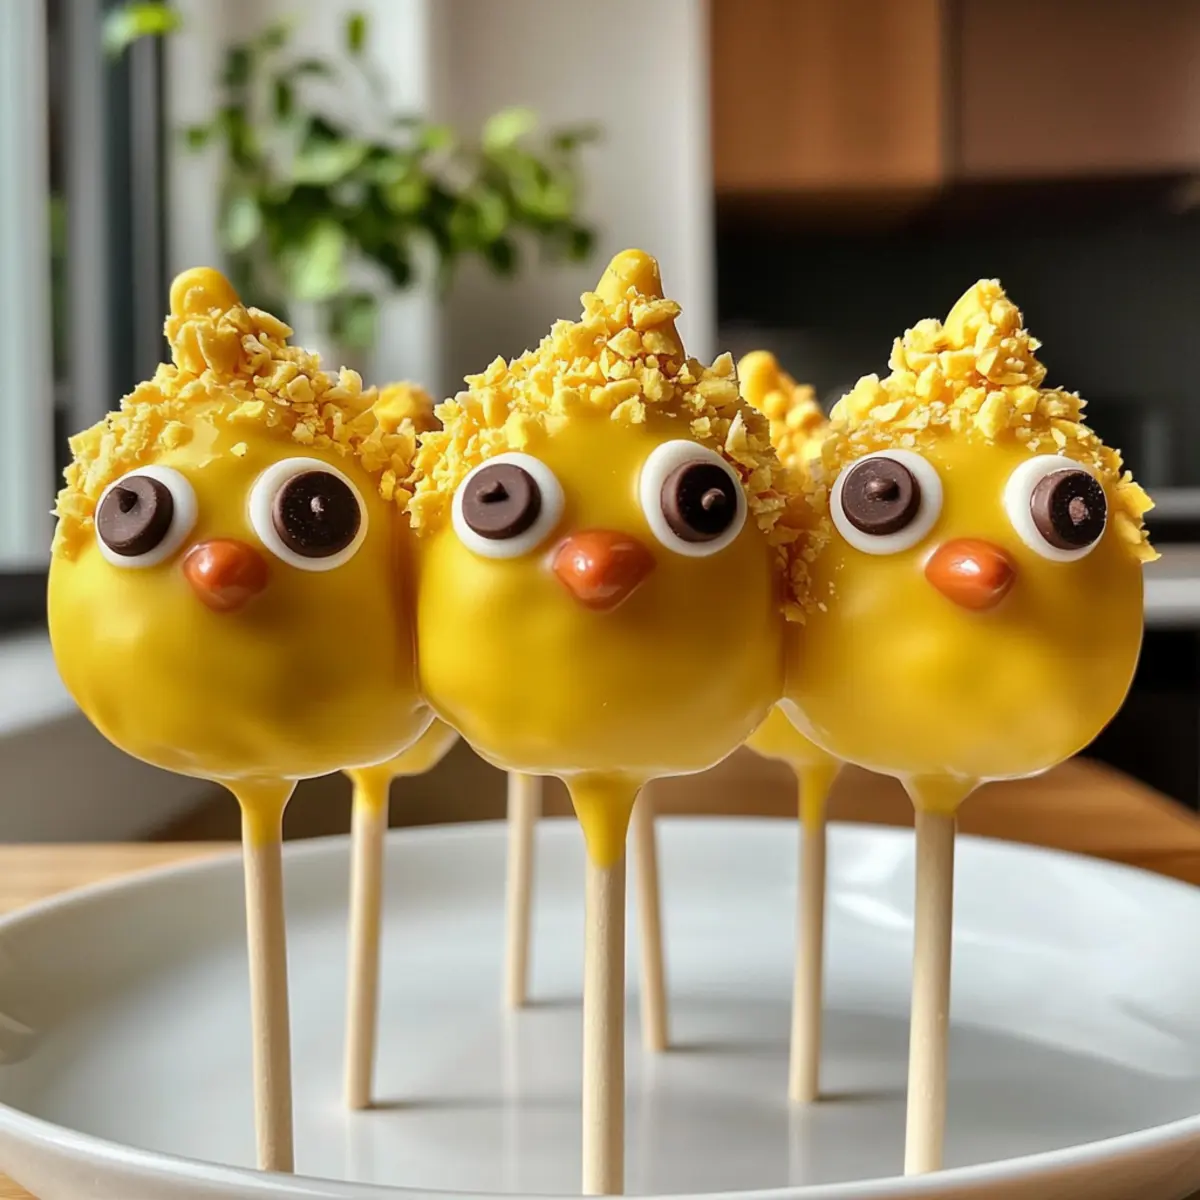
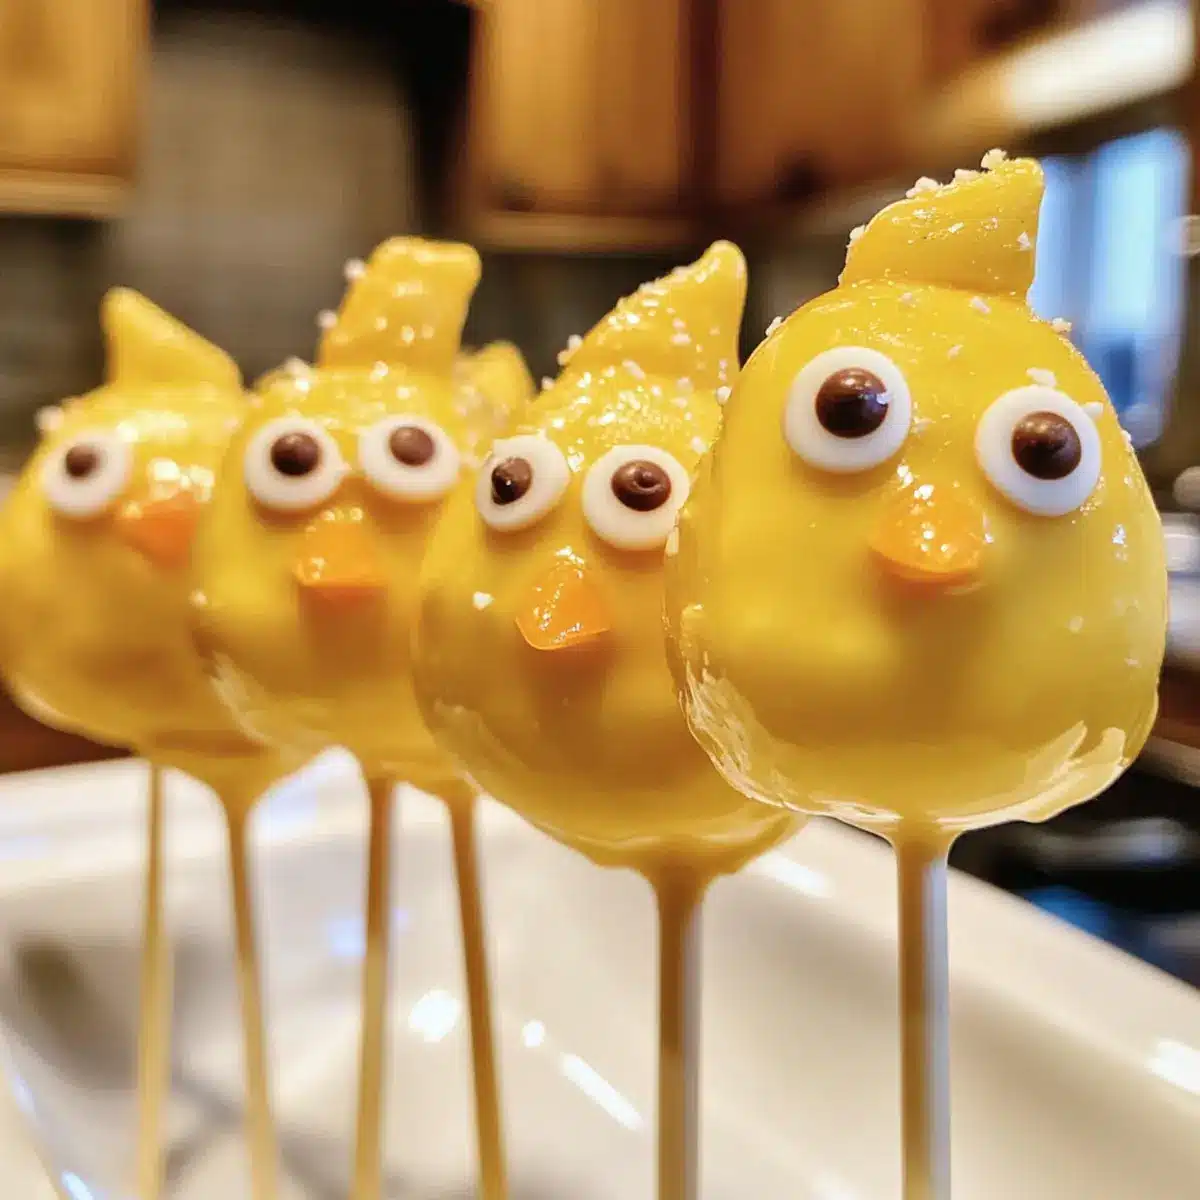
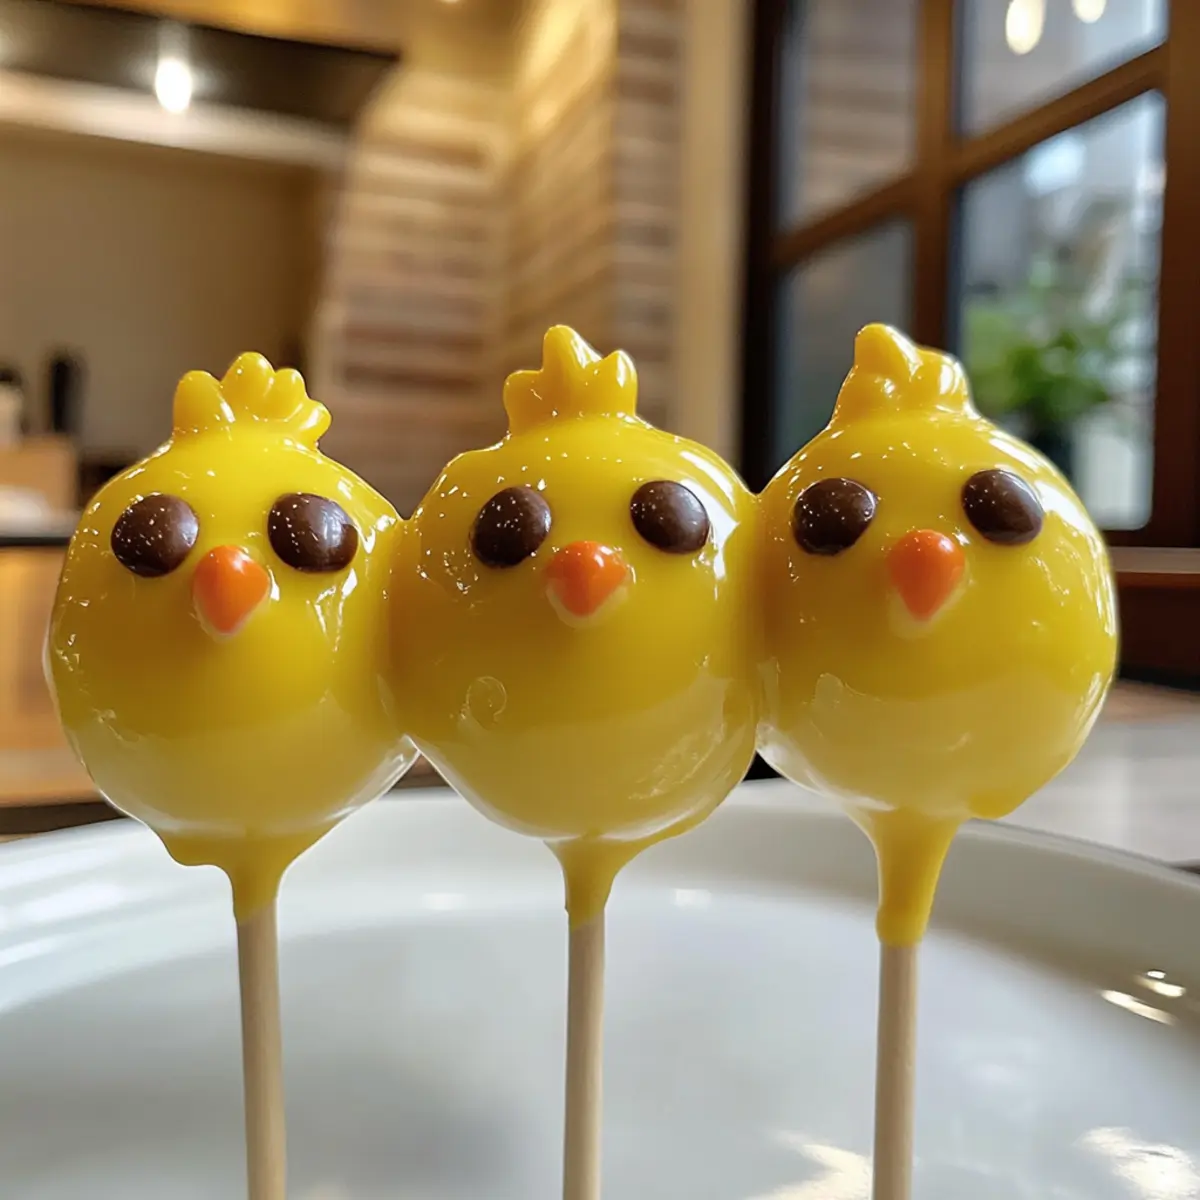
Melt the remaining yellow candy melts following the same technique as before, adding vegetable oil if necessary to achieve a smooth consistency. Once melted, dip each cake pop into the candy melts, allowing the excess to drip off before setting them upright in a foam block to dry—this creates the vibrant coating for your Easter Chick Cake Pops.
Step 6: Decorate the Pops
Once the candy coating is set, it’s time to decorate your pops! Using melted orange candy or fondant, shape small beaks and attach them to the cake pops. Then, add mini chocolate chips or black sugar pearls for the eyes, and finally, use yellow fondant or melted candy to add the tuft of ‘hair’—bringing your adorable chicks to life!
Expert Tips for Easter Chick Cake Pops
-
Choose the Right Cake: Ensure you’re using a dense baked vanilla or yellow cake. A fluffy cake may crumble too easily and lead to messy pops.
-
Thoroughly Cool: Always let the cake cool completely before crumbling. This prevents sogginess in your Easter Chick Cake Pops and helps maintain their shape.
-
Check Consistency: When mixing cake crumbs with frosting, aim for a moldable consistency. Too much frosting can lead to overly sweet pops; too little will crumble.
-
Foam Block Usage: Use a foam block to hold cake pops upright while they dry. This allows for even coating without smudging your cute decorations.
-
Creative Decor: Feel free to experiment with colors and shapes! Mixing yellow candy melts with pastels or using different candy decorations can add a personal touch and variety.
-
Add Zest for Flavor: For an extra depth of flavor, consider adding a few dashes of lemon zest to your cake mix for a refreshing twist.
Easter Chick Cake Pops Variations
Feel free to let your creativity shine while making these delightful pops! Explore these fun twists that will surely enhance your festive spirit.
-
Colorful Coating: Swap the yellow candy melts for pastel shades like pink or blue. It adds a whimsical touch that’s perfect for a spring celebration!
-
Flavor Infusion: Experiment by adding almond or coconut extracts instead of vanilla to the cake batter; this twist creates a unique flavor that’s sure to surprise your taste buds.
-
Festive Sprinkles: Mix in edible glitter or festive sprinkles to the melted candy coating for a sparkling finish. The extra crunch and color will elevate your cake pops!
-
Mini Egg Center: Place a small chocolate egg or candy surprise inside each cake ball before shaping. This hidden treat will delight everyone once they take their first bite!
-
Citrus Zing: For an extra punch, mix in lemon or orange zest with the frosting. It brightens the flavor, making them stand out even more! Consider pairing it with a refreshing treat like an Ube Mochi Cake.
-
Saucy Surprise: Drizzle chocolate sauce over the finished pops for an elegant touch. It adds a new layer of sweetness that complements the candy coating beautifully.
-
Flavored Fondant: Use flavored fondant instead of candy melts for the decorations, making each pop not just adorable but also deliciously unique!
-
Nutty Crunch: Add crushed nuts or cookie crumbs to the cake mixture for a bit of texture. It creates a delightful contrast to the creamy frosting within.
These variations not only let you play with flavors and designs but will also make your Easter celebrations all the more special!
Make Ahead Options
These Easter Chick Cake Pops are perfect for busy home cooks looking to save time! You can prepare the cake base up to 24 hours in advance by baking and cooling it completely, then crumbling it and mixing it with frosting. Keep the mixture tightly covered in the refrigerator to maintain moisture. You can also shape the cake balls and chill them for up to 2 days before dipping; just make sure they are firm before inserting the sticks. When you’re ready to serve, dip the cake pops in candy melts and decorate as directed. This way, you’ll have delightful, festive treats ready with minimal last-minute effort!
What to Serve with Easter Chick Cake Pops
Brighten your celebration with some delightful pairings that elevate these playful treats while pleasing every palate.
- Fresh Fruit Salad: A refreshing medley with juicy strawberries, tangy blueberries, and crisp apples that balances the sweetness of cake pops.
- Chocolate Dipped Strawberries: Sweet and slightly tart, these elegant bites add a touch of indulgence and look stunning next to your cake pops.
- Mini Carrot Muffins: Their moist, spiced flavor complements the lemon zest in the cake pops perfectly while adding a soft, tender texture to the mix.
For a light finish, serve these cake pops alongside a lemon or berry sorbet. The refreshing taste will cleanse the palate beautifully after enjoying a sweet pop.
- Sparkling Lemonade: Serve chilled while adding a fizzy, citrusy zing to your Easter festivities—perfect for kids and adults.
- Creamy Vanilla Ice Cream: A scoop of creamy goodness pairs delightfully with the vibrant flavors of the cake pops, creating a scrumptious dessert duo.
Select any combination, and these options will ensure you create an unforgettable dessert table!
Storage Tips for Easter Chick Cake Pops
Room Temperature: Store your cake pops in an airtight container at room temperature for up to 3 days. This keeps them fresh and ready to enjoy!
Fridge: If you want them to last a little longer, place the cake pops in the fridge where they can stay fresh for up to a week. Just be sure to keep them in an airtight container to prevent drying out.
Freezer: For longer storage, freeze the Easter Chick Cake Pops in a freezer-safe container. They can be kept for up to 2 months. Thaw them in the fridge before serving for the best texture.
Reheating: These cake pops are best enjoyed chilled or at room temperature. If you enjoy them warm, briefly microwave for about 10 seconds, but be sure not to make them too warm, as it may affect the coating.
Easter Chick Cake Pops Recipe FAQs
What type of cake should I use for the cake pops?
For the best results, choose a dense baked vanilla or yellow cake. A lighter cake may crumble too easily and won’t provide the sturdy base you need for shaping delightful Easter Chick Cake Pops.
How should I store Easter Chick Cake Pops?
You can store them in an airtight container at room temperature for up to 3 days. If you want them to last longer, keep them in the refrigerator for up to a week. Just ensure they’re sealed well to maintain freshness!
Can I freeze these cake pops?
Absolutely! To freeze your Easter Chick Cake Pops, place them in a freezer-safe container. They can be stored for up to 2 months. When you’re ready to enjoy them, simply thaw in the fridge overnight for the best texture.
What if my candy melts are too thick?
If your candy melts are too thick for dipping, don’t worry! You can easily thin them out by adding a small amount of vegetable oil—start with ½ teaspoon and mix until you reach your desired consistency. This will help create a smooth coating.
Are there any dietary considerations for these cake pops?
Yes! Be cautious if you have allergies. The base recipe includes common allergens like dairy (in frosting) and gluten (in the cake). You can opt for gluten-free cake mixes and vegan frosting alternatives to accommodate dietary restrictions.
How do I get the cake balls to stay on the sticks?
To keep your cake pops from falling off the sticks, dip the end of each lollipop stick in melted candy before inserting it into your chilled cake balls. This secures them firmly in place as they cool and set!

Easter Chick Cake Pops: Cute Treats to Brighten Your Spring
Ingredients
Equipment
Method
- Prepare the Cake: Bake a dense vanilla or yellow cake and let it cool completely for about 30 minutes.
- Crumble the Cake: Crumble the cooled cake into fine crumbs and mix with cream cheese frosting until moist and moldable.
- Shape the Pops: Roll the mixture into 1-inch balls and chill them for about 20-30 minutes.
- Insert the Sticks: Melt yellow candy melts and dip the end of lollipop sticks before inserting them into the chilled cake balls.
- Dip in Candy Melts: Dip each cake pop in melted yellow candy melts and allow to dry in a foam block.
- Decorate the Pops: Shape beaks with melted orange candy or fondant, add eyes, and finish with a tuft of yellow fondant or melted candy.
Leave a Reply